
| |
This is the Add icon. |
| |
This is the Show members icon. |
| |
This is the Hide members icon. |
- Click the Add Permission Group button in the top-right corner of the Permission Group list. A New Permission Group screen will open.

The General Settings Tab
- Enter a name and a description for the new Permission Group in the Group Name and Group Description fields.
- To add member Permission Groups to this Permission Group, click on Search for member groups to open a drop-down list of existing Permission Groups. Find and click on a Permission Group. As soon as you select a member group, another list will appear so you can make another selection (if needed).
- Press Esc if you don’t need to make another selection.
- To remove a Permission Group, click the X to the right of the member group name.
- You may add individual members and members from external groups, if needed.
- When all of your group members have been selected, click on the Permissions tab to continue configuring the Permission Group. (This group is not going to be an Administrator group, so we can skip the Admin Settings tab.)
The Permissions Tab

- To assign specific, limited permissions for this Permission Group, use the Permissions Granted and Permissions Revoked features. (For more details, please refer to the previous topic.)
Finalizing the Group
- After all of the permissions are set, press the Save Group button.
Here is a view of a simple Permission Group with individual users and member groups.
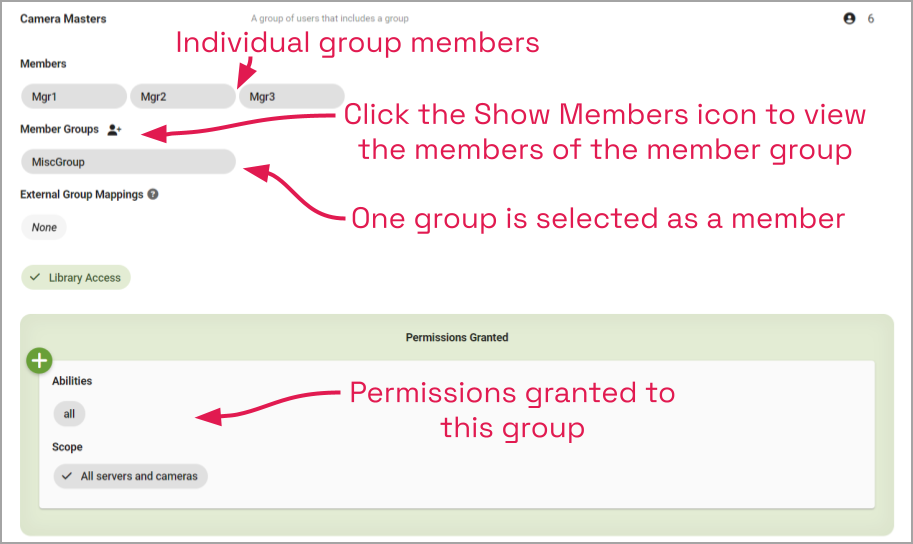
- When the Permission Group appears in the Permission Groups list, click the Show Members icon to display all of the users in the member group.
- Click the Hide members icon to conceal them.
Post your comment on this topic.