
Starting in Orchid Core VMS version 2.8, the Camera Configuration screen includes Fisheye Dewarping which allows you to manipulate video from fisheye cameras for display on the Player. This feature provides three viewing options: Off, Perspective, and Panorama. This means that you can view the standard fisheye view, or one of two “flattened” views.
For any fisheye camera, the Dewarp Settings allow you to enable or disable the dewarping features, and set a default view for the associated Player.
Perspective
- At the Camera Configuration screen, click the camera you want to edit. Then click the Fisheye Dewarping link to open the Dewarp Settings screen.
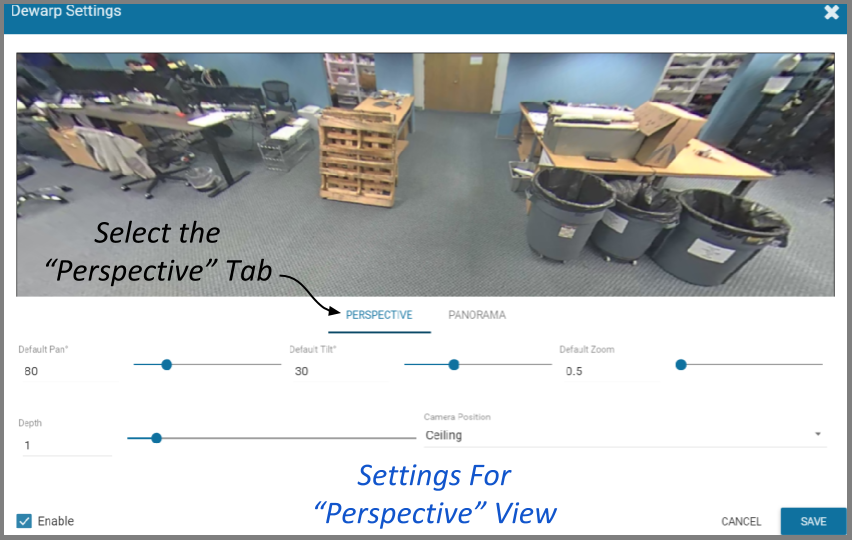
- Select the Perspective tab.
Use the Perspective screen to enter settings for the Perspective view of the selected camera. The Perspective view is a flattened version of the available video from the fisheye camera for which you select a portion of the image as the default view to be displayed on the Player. (The Perspective view can also be changed at the Player, but that will not change the default.)
- Mark the Enable checkbox to activate the Dewarp Settings (both Perspective and Panorama) for this camera. (If this is not marked, Dewarping features will not be available at the Player.)
- Use the Default Pan slider to move the camera to the right and left to set the default view.
- Use the Default Tilt slider to move the camera up and down to set the default view. (Be aware that it is possible to tilt the view beyond the capability of the camera; if this happens, portions of the screen will appear black.)
- Use the Default Zoom slider to zoom into or out of the image to set the default view. (Be aware that it is possible to zoom beyond the capability of the camera; if this happens, portions of the screen will appear black.)
- Use the Depth slider to stretch or compress the image height to set the default view. (This can cause extreme image distortion at the bottom and top ends of the scale. The default value is likely the best setting.)
- Use the drop-down list to select the camera’s mounting location as Ceiling, Floor, or Wall. (This setting will impact how the software displays the camera image.)
- Press the Save button to save your settings, or Cancel to exit without saving.
Panorama
- Select the Panorama tab.
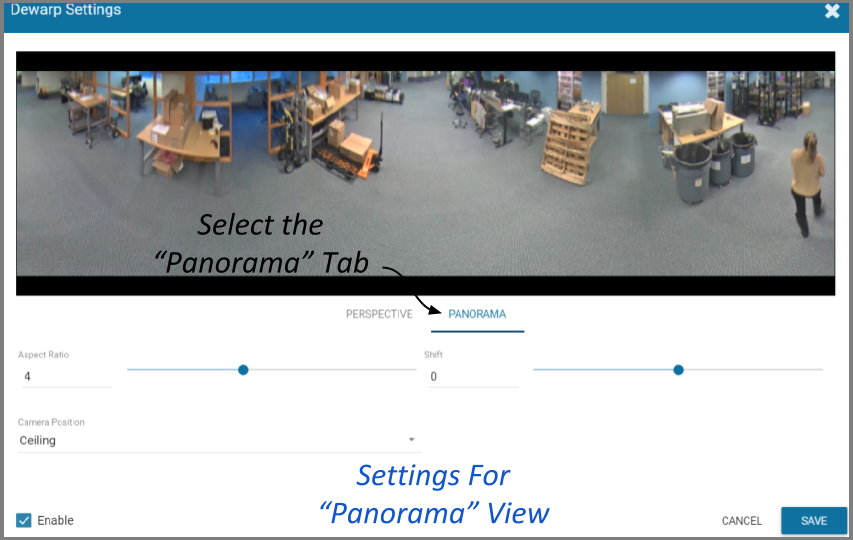
Use the Panorama screen to enter settings for the default Panorama view of the selected camera. The Panorama view is a flattened version of the available video from the fisheye camera. This view displays the entire image and cannot be altered at the Player.
- Mark the Enable checkbox to activate the Dewarp Settings (both Perspective and Panorama) for this camera. (If this is not marked, Dewarping features will not be available at the Player.)
- Use the Aspect Ratio slider to change the amount of Player area the image will fill. You might take some time to experiment with this setting, but the points below describe how it works.
- At the high end of the scale, the image will fill the length of the Player, but the height of the image will be condensed.
- At the center of the scale, the image will fill the length of the Player, and the height of the image will be at its least distorted.
- As you move from the center of the scale to the low end, the height of the image will stretch toward the top and bottom of the Player.
- From the point that the image fills the Player, if you continue to move to the bottom of the scale, the image width will shrink until the image disappears.
- Use the Shift slider to adjust the center point of the image. (If there is a certain part of the image that you prefer at the center of the Player, use the slider to make this adjustment.)
- Use the drop-down list to select the camera’s mounting location as Ceiling, Floor, or Wall. (This setting will impact how the software displays the camera image.)
- Press the Save button to save your settings, or the Cancel button to exit without saving.
Post your comment on this topic.