
| |
This is the Add icon. |
As mentioned earlier, you may configure one or more System Alerts, depending on your needs. We’ll cover each of the basic options step-by-step to show what’s available.
If you are trying to decide whether to create just one or multiple System Alerts, you’ll need to have an understanding of how they work. An Immediate Email alert is pretty simple; if a valid trigger event occurs, the system will send an email with details on the trigger event. If you set up a Daily Email Digest alert, the system will send a daily summary of the trigger events that have been defined within that System Alerts (even if none of the trigger events occurred). For example, assume you have a System Alert that monitors for Server Unreachable events only. During the day, two Camera Unreachable events occur, but no Server Unreachable events occur. Your next Daily Email Digest will report that “No notifications were sent today” because it is only monitoring for Server Unreachable events. (As an added benefit, the Daily Email Digest will confirm that the alert system is working, even when no events occur.)
You’ll also want to consider what recipients want or need to know. While front line people may want to be alerted each time a camera goes down, upper level personnel may only want to know if a server goes down (which is obviously a larger problem). In this situation, you would need to configure at least two System Alerts: one Immediate alert that covers cameras (and perhaps servers), and one Immediate alert for servers.
You may, instead, have upper level personnel that prefer to receive a daily summary (that covers all types of issues). In this situation, you can simply add a Daily Email Digest action item to any or all of the defined System Alerts.
- Click the Add System Alert button at the top-right corner of the System Alerts list. The New System Alert screen will open.
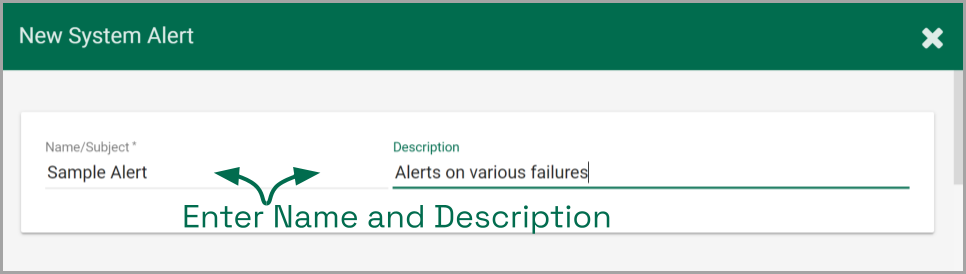
- Enter a name for the System Alert in the Name/Subject field. (Emails sent for this System Alert will use this Name/Subject as the email subject.)
- Enter a general definition for the System Alert in the Description field.
- Scroll down to the Triggers section to continue.
Triggers
In the Triggers section, you may select one or more events that may initiate a System Alert. (Notice that by default, the New System Alert dialog includes a Camera Unreachable trigger, a Server Unreachable trigger, and a Server Error trigger. Scroll down to view all of these and remove any triggers that you don’t wish to use.)
Camera Unreachable/Server Unreachable Trigger
- Click on the Trigger Event drop-down list and select Camera Unreachable or Server Unreachable. The settings for the Camera Unreachable and Server Unreachable triggers are very similar.
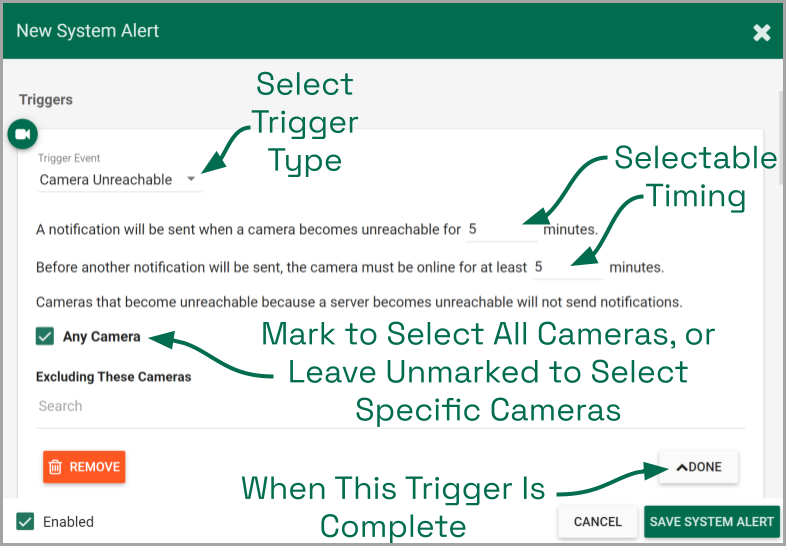
- Determine how long the camera/server must be unreachable before an alert is sent. Enter this number in the first minutes field.
- Determine how long the camera/server must be back online before another unreachable event may qualify as a trigger. Enter this number in the second minutes field. (These timing settings help to eliminate nuisance alerts.)
- Mark the Any Camera checkbox if you want to be alerted when any camera goes offline. (Mark the Any Server checkbox if you want to be alerted when any server goes offline.) Then you can click into the Search field if you want to exclude any cameras (or servers).
- Unmark the Any Camera (Any Server) checkbox if you prefer to select specific cameras (or servers) for the alert. Then click in the Search field to identify those cameras (or servers).
- Click the Remove button if you want to delete this trigger.
- Click the Done button if you want to save this trigger.
- If you would like to define another alert trigger, scroll to the next default trigger (if applicable), or click the Add Another Trigger button. (You may add multiple triggers, just keep in mind that they will all be sent to selected recipients. You may have to scroll down to find this button.)
- If you are finished with trigger settings, remove any unwanted triggers, then scroll down to the Actions section to continue.
Server Error Trigger
- Click on the Trigger Event drop-down list and select Server Error.
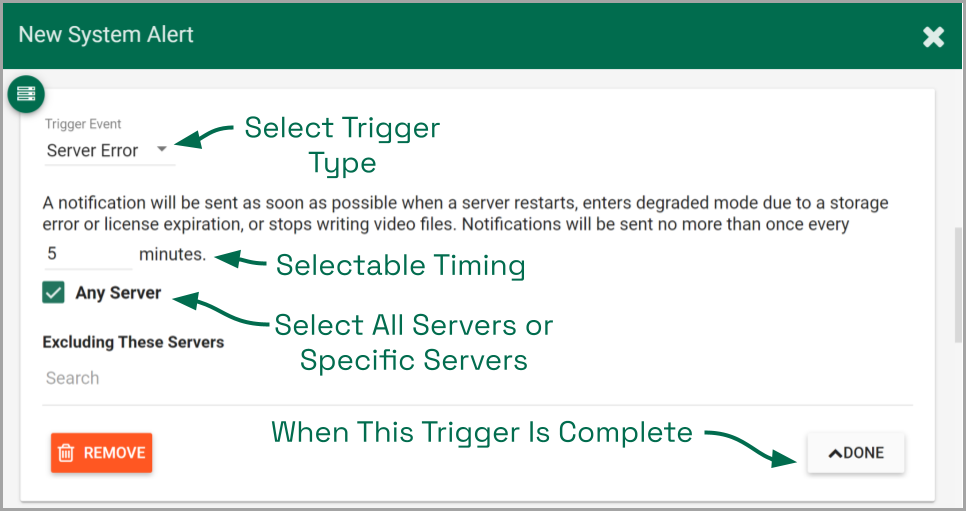
If you select a Server Error trigger, there are two events that will cause the system to send an alert.
- A selected Recording server restarts
- At least one of a Recording server’s cameras has a problem. (It is running and configured for Continuous Recording or Motion Adaptive Frame Rate, but no new video archives have been written in the last 3 minutes.)
- Determine how long you want the system to wait (in minutes) before sending any other Server Error alert, then enter this number in the minutes field.
- Mark the Any Server checkbox if you want to be alerted when a Server Error occurs on any server. Then you can click into the Search field if you want to exclude any servers.
- Unmark the Any Server checkbox if you want to select specific servers for the alert. Then click in the Search field to identify those servers.
- Click the Remove button if you want to delete this trigger.
- Click the Done button if you want to save this trigger.
- If you would like to define another alert trigger, scroll to the next default trigger (if applicable), or click the Add Another Trigger button. (You may add multiple triggers, just keep in mind that they will all be sent to selected recipients. You may have to scroll down to find this button.)
- If you are finished with trigger settings, remove any unwanted triggers, then scroll down to the Actions section to continue.
I/O Error Trigger
- Click on the Trigger Event drop-down list and select I/O Error.
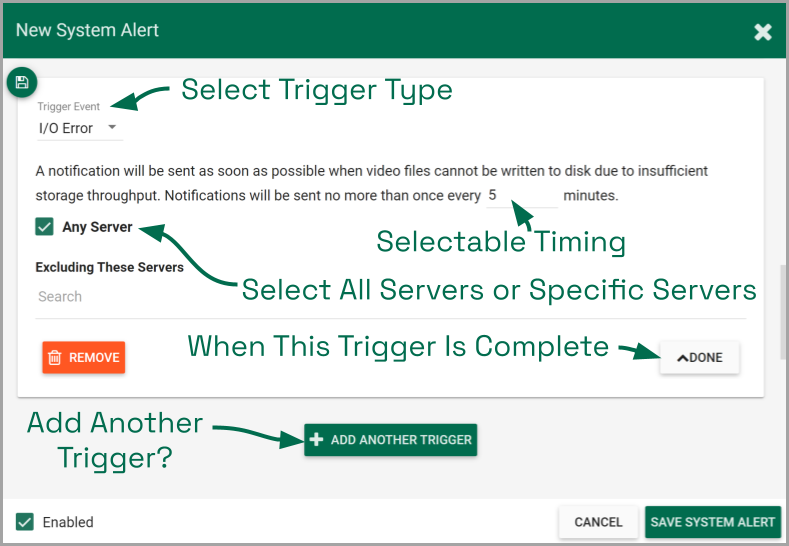
If you select the I/O Error trigger, the system will send an alert if it detects that video files (for a selected server) cannot be written to the disk fast enough to complete the write.
- Determine how long you want the system to wait (in minutes) before sending any other I/O Error alert, then enter this number in the minutes field.
- Mark the Any Server checkbox if you want to be alerted when an I/O Error occurs on any server. Then you can click into the Search field if you want to exclude any servers.
- Unmark the Any Server checkbox if you want to select specific servers for the alert. Then click in the Search field to identify those servers.
- Click the Remove button if you want to delete this trigger.
- Click the Done button if you want to save this trigger.
- If you would like to define another alert trigger, scroll to the next default trigger (if applicable), or click the Add Another Trigger button. (You may add multiple triggers, just keep in mind that they will all be sent to selected recipients. You may have to scroll down to find this button.)
- If you are finished with trigger settings, remove any unwanted triggers, then scroll down to the Actions section to continue.
Actions
In the Actions section, you will select which alert type will be generated by the System Alert, and to whom the alert will be sent.
- Click on the Trigger Action drop-down list to select one of two options: Immediate Email or Daily Email Digest.
If you select Immediate Email, a System Alert will be sent each time a valid trigger event occurs.
If you select Daily Email Digest, a System Alert will be sent at the same time each day (at a selected time). This alert will summarize all of the alerts that were sent in the previous 24-hour period that pertain to this System Alert. This alert will be sent even if no triggered alerts occurred (so you can tell that the system is working).
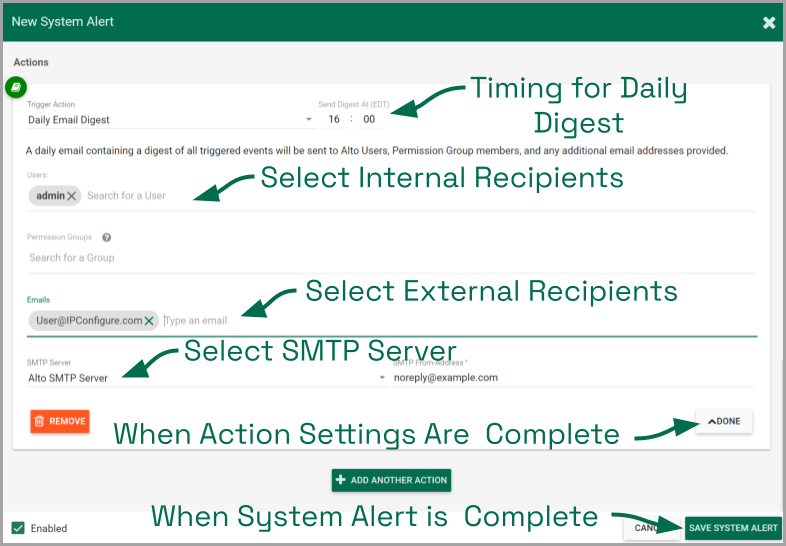
- If you select Daily Email Digest, use the Send Digest At field to define the send time for the daily alert.
- Once the trigger action is selected, you need to select the recipients for the alert.
- Click in the Search for a User field to select individual users as recipients.
- Click in the Search for a Group field to select entire Permission Groups as recipients.
- Click in the Type an Email field to enter the email addresses for external recipients.
- The last action setting allows you to select the SMTP Server that will send the alert. If only one SMTP server was configured, it will already be selected for you. If you need to select a different one, click on the SMTP Server drop-down list to select it. (Remember: IPConfigure Support will need to configure your SMTP server.)
- If you want to include a custom return email address with the alert, click in the SMTP From-Address field to enter it.
- Click the Remove button if you want to delete this action.
- Click the Done button if you want to save this action.
- Click the Add Another Action button to define another action. (You may add multiple actions if, for example, you want to define both an Immediate Email and a Daily Email Digest, or if you are using different SMTP servers. You may have to scroll down to find this button.)
- Mark the Enabled checkbox to activate the System Alert. (Remove the mark from the Enabled checkbox to deactivate the System Alert.)
- When you are finished with all of the settings, click the Save System Alert button to keep this System Alert. This new System Alert will now appear in the System Alert list.
System Alert Status
- To view the status of any of the System Alerts, hover the cursor over the Notification icon at the right end of the System Alert entry.
Post your comment on this topic.