
Add a Stream
| |
This is the Add Stream icon. |
Usually you will not need to add a stream unless your camera does not come configured with any streams by default.
- From the Camera Information screen, press the Add Stream button to add a new stream for the selected camera. The Stream Settings screen will open, allowing you to enter and modify the settings for the stream.
- When all settings have been entered, press the Add Stream button to add the new profile to the Streams list for the selected camera.
Copy Stream to Cameras
| |
This is the Copy Streams icon. |
This feature is a great shortcut to use if you have multiple, similarly configured cameras to set up. Once you complete a stream settings profile for one camera, you can copy all (or part) of that profile to one or more cameras with one click.
- From the list of registered cameras on the Cameras tab, click the name of the camera you want to use as a model.
- Then add or edit a camera stream that contains the settings you would like to copy to other cameras.
- Once your template profile is complete, click the pop-up menu for the stream you want to copy, then click the Copy icon.
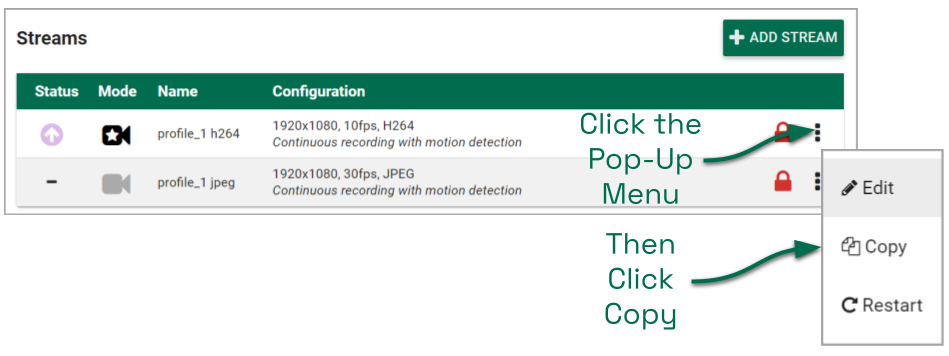
A screen will appear that will allow you to edit and complete the profile transfer to selected cameras.
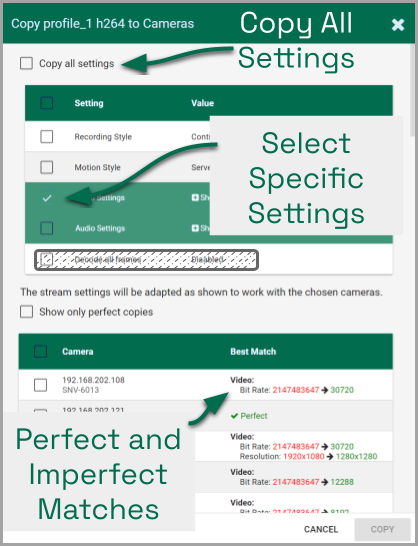
The screen lists all of the cameras that have been added to the system. It also provides comments to show which cameras are good candidates for the stream settings (which may help you decide if you want to copy all of the settings to all of the cameras.) For each camera that is not a perfect match, Orchid Alto VMS will pick the stream setting that is the closest match and indicate how the stream settings will be modified for that camera.
There are several reasons why profile matches might not be perfect. For instance, maybe the model camera is configured to use a higher resolution than is supported by the target cameras. In this case, Orchid Alto VMS will choose the closest available resolution on the target cameras.
The appearance of this screen will change as different settings are selected. Depending on how many cameras have been added and which settings are selected, you may need to scroll down to see all of the cameras and settings.
- Mark the Copy all settings checkbox to copy all of the stream settings. (These will be copied to all of the cameras selected in the lower half of the screen.)
- Leave the Copy all settings checkbox unmarked if you want the ability to choose which settings will be copied.
- Mark the Setting checkbox if you decide to copy all of the settings anyway.
- Mark the checkbox for any of the individual categories that you want to copy (including Recording Style, Video Settings, and Audio Settings).
- You may expand the Video and Audio Settings categories to select individual settings within each, if needed. (Click on the +Show hidden fields link to expand the list and the -Hide fields link to condense the list.)
- Mark the Show only perfect copies checkbox if you want the software to list only those cameras that can implement the new profile settings exactly. (This checkbox will not appear if all or none of the camera streams are a perfect match.)
- Mark the Camera checkbox if you want to copy settings to all of the cameras in the list. Leave the Camera checkbox unmarked if you want the ability to choose which cameras will receive the stream settings.
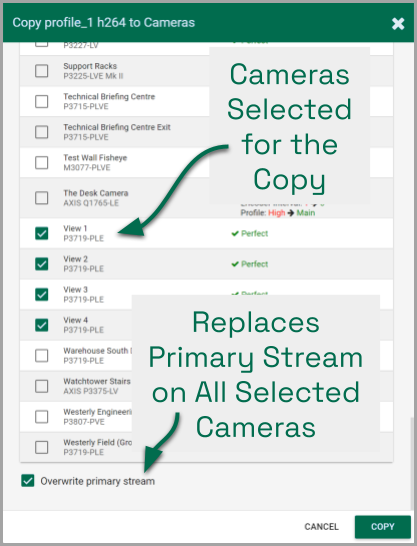
- Mark the Overwrite primary stream checkbox if you want these stream settings to replace the existing primary stream settings on every camera selected. Leave the Overwrite primary stream checkbox unmarked if you simply want to add this as a new stream option for each of the selected cameras. (When left unmarked, the Recording server will not record from this new stream.)
- Once your selections are complete, click the Copy button to send the stream settings to the selected cameras. It may take a few minutes for the settings to change based on the number and type of cameras being updated.
- When the copy process is complete, click the Done button.
Restarting a Stream
| |
This is the Restart icon. |
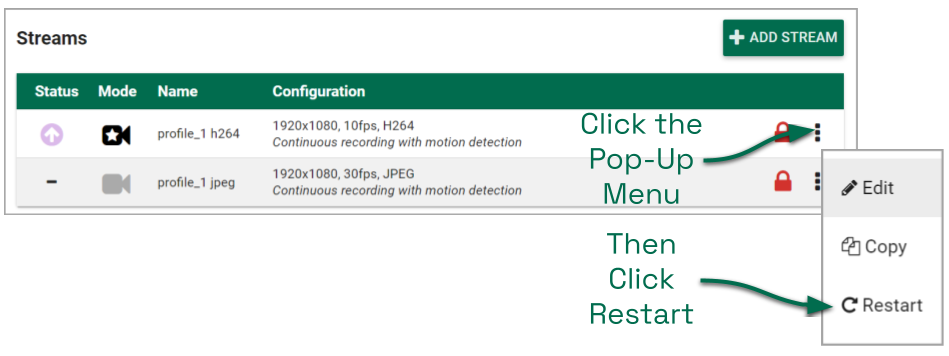
- To restart a camera stream, go to the Streams List for a given camera and identify the stream you want to restart. (You can only perform the restart on the camera stream that is in use.)
- Click the stream’s pop-up menu, then click the Restart icon. The software will reset the connection to the camera stream.
Removing a Stream
| |
This is the Delete / Trash Can icon. |
- To remove a single camera stream, go to the Streams List for a given camera and identify the stream you want to delete.
- Click the stream’s pop-up menu, then click the Trash Can icon. The software will ask you to confirm that you want to delete the stream. Press Delete to confirm. This cannot be undone.

Post your comment on this topic.