
The Users tab contains two sub-tabs:
1. Users List
In this tab, you can create, edit, and delete users.
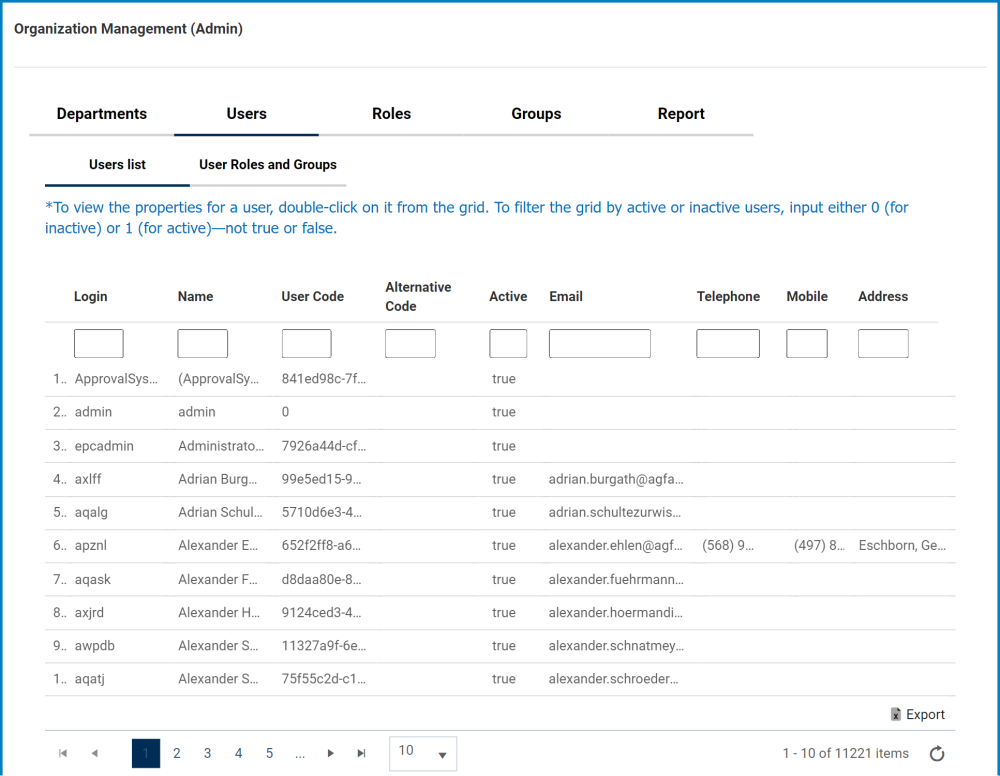
- Export: This button allows you to export the grid and save it either as an Excel file, a Word file, an HTML file, or a CSV file.
- For more details on this function, click here.
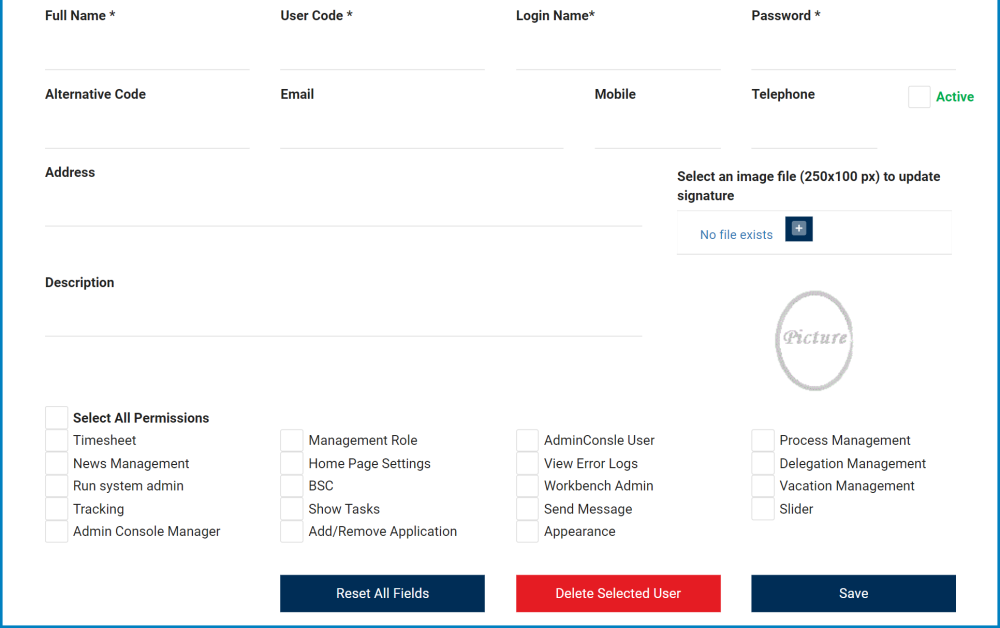
- Full Name: This is a text field that allows you to input the full name of the user. It is a mandatory field.
- User Code: This is a text field that allows you to input the user code. It is a mandatory field.
- Login Name: This is a text field that you to input the login name of the user. It is a mandatory field.
- Password: This is a text field that allows you to input a password for the user. It is a mandatory field.
- Alternative Code: This is a text field that allows you to input an alternative code.
- Email: This is a text field that allows you to input the email of the user.
- Mobile: This is a text field that allows you to input the mobile number of the user.
- Telephone: This is a text field that allows you to input the telephone number of the user.
- Active: This is checkbox which, if enabled, allows you to mark the user as active.
- Address: This is a text field that allows you to input the address of the user.
- Select an Image File to Update Signature: This is an attachment field that allows you to attach an image file.
- To attach a file, click on the
![]() button.
button.
- To attach a file, click on the
- Description: This is a text field that allows you to input a brief description of the user.
- Permissions: These are checkboxes which, if enabled, give the user certain permissions.
- For more details on these permissions, click here.
- Reset All Fields: This button allows you to reset all fields, clearing them of content.**
- Delete Selected User: This button allows you to delete a selected user from the grid.**
- To delete, select the user from the grid (by double-clicking) and then click on the Delete Selected User button. Once this button has been selected, a confirmation message will appear at the bottom of the page to inform you that the user has been deleted successfully.
- Save: This button allows you to save the user.**
- If all mandatory fields have been filled and this button is selected, a confirmation message will appear at the bottom of the page to inform you that the user has been added successfully.
- If mandatory fields have not all been filled and this button is selected, an error message will instead appear at the bottom of the page to inform you of the fields that still need to be filled.
** In the Organization Management version of the application, these fields are not available, preventing unauthorized individuals from creating, editing, or deleting users.
2. User Roles and Groups
In this tab, you can assign a user to a role and/or group. You can also remove roles and/or groups assigned to a user.
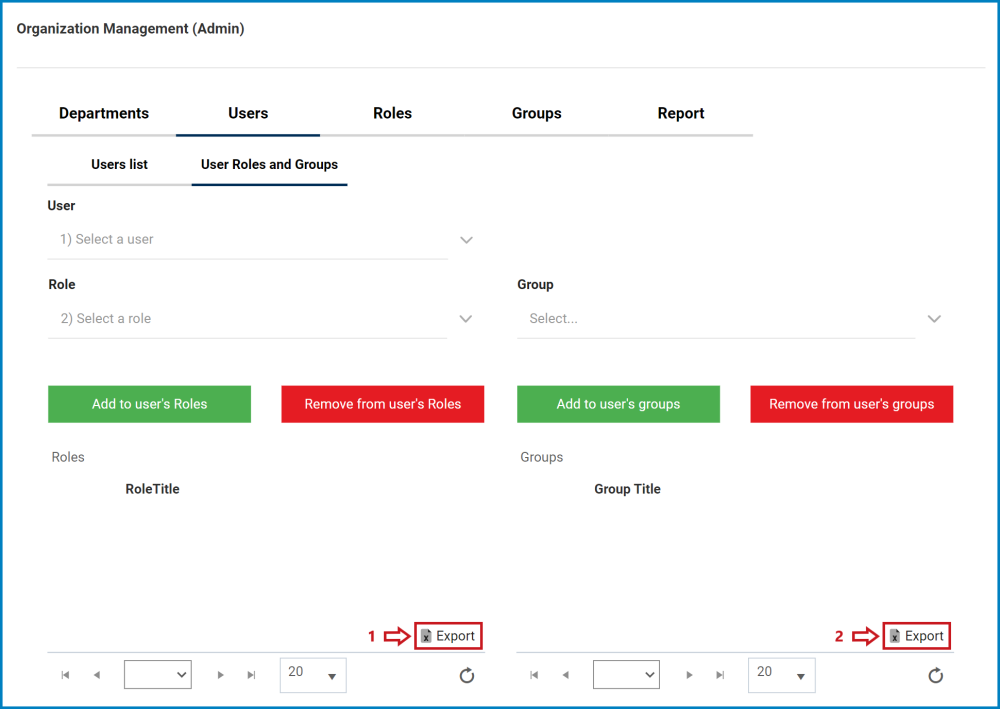
- User: This is a single-select dropdown field that retrieves the list of users.
- Role: This is a single-select dropdown field that retrieves the list of roles.
- Add to User’s Roles: This button allows you to add to the selected user’s list of roles.
- The selected role will then populate the Roles grid.
- Remove from User’s Roles: This button allows you to remove from the selected user’s list of roles.
- To remove, select the role from the Roles grid (by double-clicking) and then click on the Remove from User’s Roles button.
- Group: This is a single-select dropdown field that retrieves the list of groups.
- Add to User’s Groups: This button allows you to add to the selected user’s list of groups.
- The selected group will then populate the Groups grid.
- Remove from User’s Groups: This button allows you to remove from the selected user’s list of groups.
- To remove, select the group from the Groups grid (by double-clicking) and then click on the Remove from User’s Groups button.
- Roles: This field is automatically populated once a user is selected. It lists the roles of the selected user.
- Groups: This field is automatically populated once a user is selected. It lists the groups of the selected user.
- Export 1: This button allows you to export the Roles grid and save it either as an Excel file, a Word file, an HTML file, or a CSV file.
- Export 2: This button allows you to export the Groups grid and save it either as an Excel file, a Word file, an HTML file, or a CSV file.
Post your comment on this topic.