
A customized version of the Animated Lasers effect optimized for use with 360° video. If this effect is applied to normal video, it will look distorted and incorrect.
Designed to create laser bolts which travel from one point to another. The lasers can be constructed from multiple lines, which can be further manipulated into spirals, expanding the effect to also be useful in motion graphics animation.
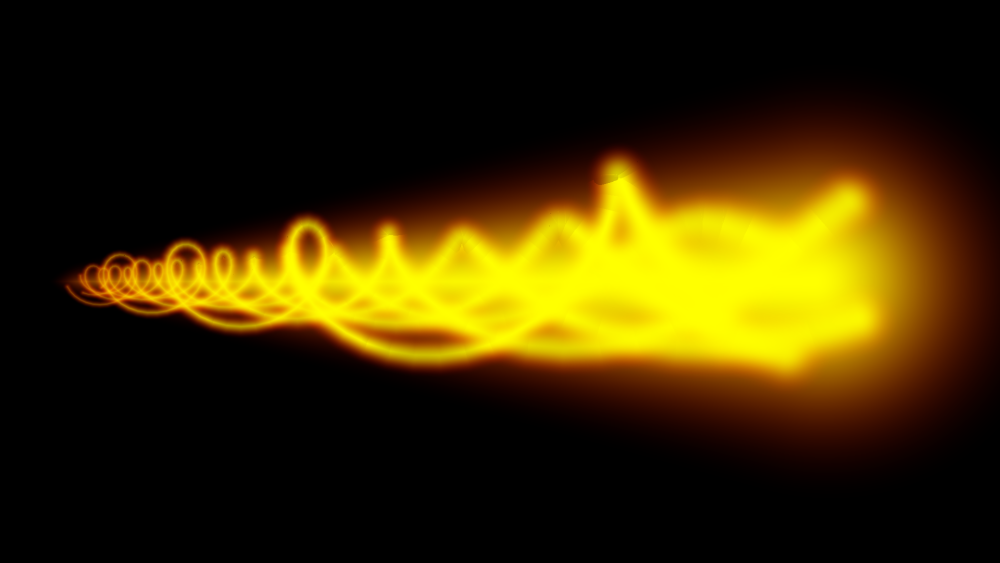
The laser has two position points which define the path along which the laser will travel. These interact with the Laser Length and Location properties, which define the laser bolt’s location between the two points.
- Start Point: Sets the origin point of the path along which the laser will travel.
- Use Layer: Select any other layer on the timeline to use its position as the origin of the laser path. A common example is to select a point layer which contains the tracking data for the muzzle of a prop. When a layer is selected, the Position property below functions as an offset from the selected layer’s position.
- Position: Defines the location of the point from which the laser originates, on the X axis (horizontal) and Y axis (vertical). When the Use Layer option (above) is used, this position value serves as an offset from the position of the selected layer.
- Depth: Adjusts the perspective of the effect along its path. Reduce the depth to make the origin of the laser path appear to be farther away from the camera. Increase the depth to make the origin appear to be closer to the camera.
- End Point: Sets the target point toward which the laser will travel.
- Use Layer: Select any other layer on the timeline to use its position as the target of the laser path. When a layer is selected, the Position property below functions as an offset from the selected layer’s position.
- Position: Defines the location of the point from which the laser originates, on the X axis (horizontal) and Y axis (vertical). When the Use Layer option (above) is used, this position value serves as an offset from the position of the selected layer.
- Depth: Adjusts the perspective of the effect along its path. Reduce the depth to make the target position of the laser path appear to be farther away from the camera. Increase the depth to make the target position appear to be closer to the camera.
- Laser Length: Defines the length of the laster bolt, in pixels.
- Location: Adjusts the position of the laser bolt, along the path from the start point to the end point. Lower values move it closer to the start point, while higher values move it closer to the end point. Keyframing the Location value allows you to animate the laser’s movement along the path.
- Number of Beams: The effect includes one beam by default, but you can add up to 10 unique beams to build more complex effects. Each beam will have a section of numbered Beam controls below.
Beam 1 (duplicate controls will be listed for each beam number)
- Core Color: Choose a color for the laser core. You can use the eyedropper to choose a color from the layer, or click the swatch to open a color picker and choose any color you prefer. You can also manually enter the color values for the red, green, and blue channels.
- Glow Color: Choose a color for the laser glow which surrounds the core. Usually the glow should be a richer, more saturated color than the core, but you can choose any color you need. You can use the eyedropper to choose a color from the layer, or click the swatch to open a color picker and choose any color you prefer. You can also manually enter the color values for the red, green, and blue channels.
- Brightness: Allows you to reduce the brightness of the beam.
- Width: Defines the width of the beam, in pixels.
- Length: Defines the length of the beam, as a percentage of the Laser Length value. When working with multiple beams, adjusting the relative length of each beam provides a massive amount of control for building complex effects.
- Position Shift: Adjusts the position of the beam relative to the Location value.
- Tail Scale: Sets the width of the tail of the beam, as a percentage of the Width value above.
- Edge Size: Adjusts the size of the feather applied to the edges.
- Color Shift: Adjusts the balance between the core and glow colors. Decreasing the value makes the core color more prominent, while increasing the value introduces more of the glow color.
- Tail Color Shift: Adjusts the balance between the core and glow colors in the tail portion of the beam. Decreasing the value makes the core color more prominent, while increasing the value introduces more of the glow color.
- Brightness Noise: Breaks up the beam by introducing a noise texture, which makes small random bits of the beam less visible. This can help make it feel more organic.
- Color Mix Noise: Breaks up the beam and allows the glow color to show through the core, based on a randomized noise pattern. The Noise Scale property in the General controls adjusts the size of the noise used.
- Beam Blend: Choose the blend mode used to combine the beam with the underlying layer. The Noise Scale property in the General controls adjusts the size of the noise used.
- Spiral: Each beam has associated Spiral properties. These are used to twist the beam’s straight line into curving spirals.
- Radius: Sets the radius around which the beam is spiraled.
- Radius Shrink: Tapers the radius from the start point to the end point.
- Path Angle: Increasing this value increases the number of rotations present in the beam.
- Rotation: Adjusts the specific rotation of the beam around the path.
- Rotation Speed: Animates rotation into the beam, at the speed you choose.
Global Controls
- Brightness: Adjusts the overall brightness of the entire effect, including all beams that are present.
- Rotation: Rotates the entire effect, made up of the combination of all beams.
- Rotation Speed: Animates rotation into the entire combined effect, at the speed you choose.
- Noise Scale: Modifies the size of the noise used to break up any beams that include Brightness Noise or Color Mix Noise settings.