
Contents ![]()
![]()
- About Access & Control Rules
- How to…
About Access Control Rules
What are Access Control Rules?
- For virtual printers (used to generate print jobs): They define who will get visibility and the ability to print to the shared queue in the Microsoft Universal Print tenant by defining which user group(s) can view and access the Shared Queue.
- For physical printers: they define who can access what printer function (print, copy, color, scan, fax etc).
The information below describes the Access Control Rules for physical printers.
- Unlock functions for unrestricted use, so that they can be used without authentication.
- Enable functions you are authorized to use, when you authenticate at the printer.
On a printer, the functions that are unlocked are available without you having to authenticate. Once you authenticate the functions you are authorized to use will also become available.
Unlock a Function for Unrestricted Access
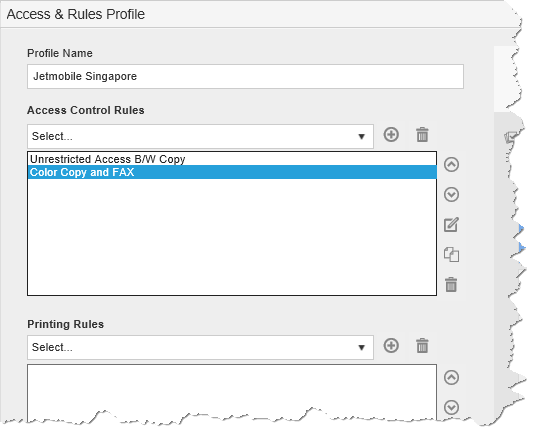
In the example shown below, a company does not want to restrict black and white photocopying. The Access Control Rule unlocks the black and white photocopy function, making it unnecessary for anyone to authenticate at the printer for that function.

Any printer that this rule applies to does not restrict the black and white photocopy function. The other rules that apply to that printer (see the example below) cannot restrict the black and white copy function, because it is already unlocked.

Authorize a Function for a Specific Group of Users
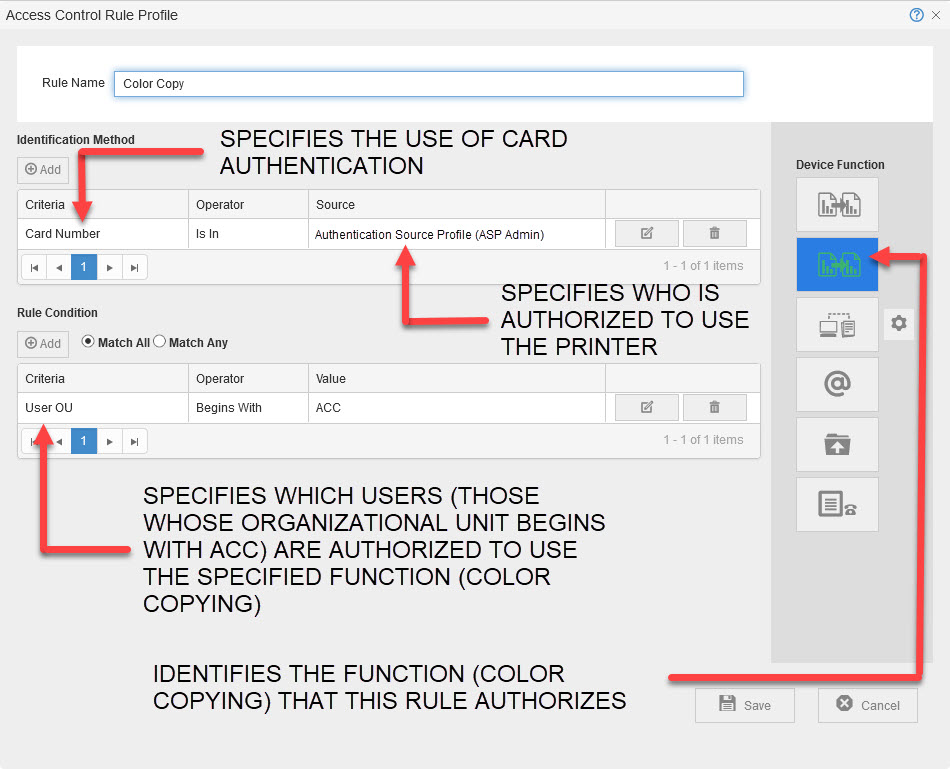
In the example shown below, the Access Control Rule specifies the following:
- Use Card to authenticate at the printer.
- Validate credentials against the identity management system(s) specified by Authentication Source Profile (ASP Admin)
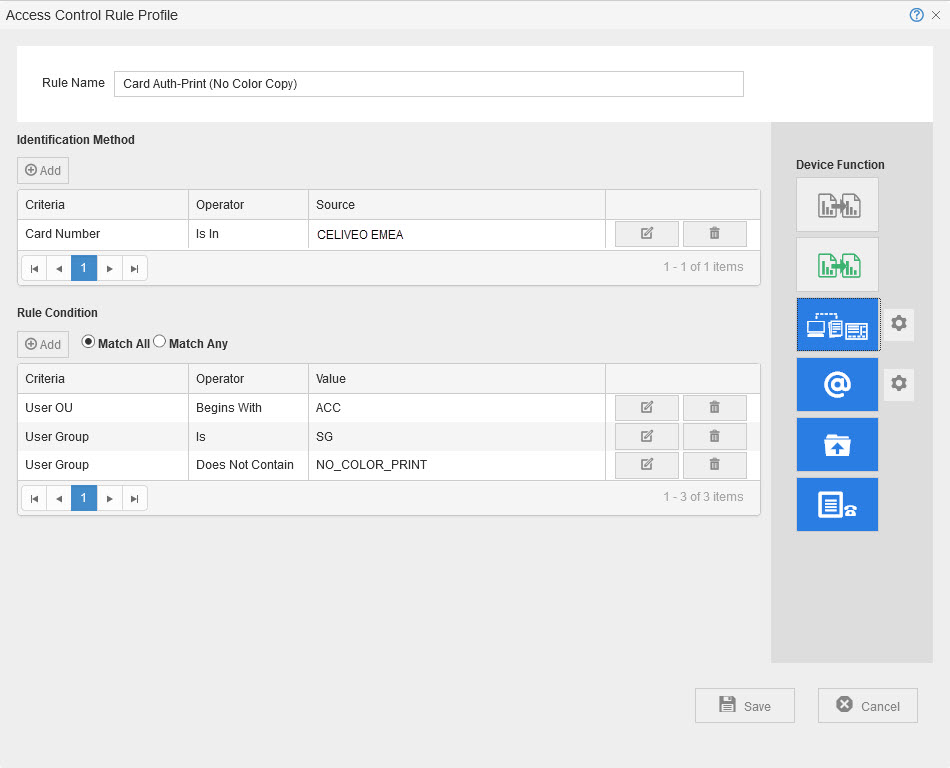
- Upon successful authentication, Authorize Color Copying only for those who belong to Organizational Groups that have names beginning with the letters ACC.
![]()
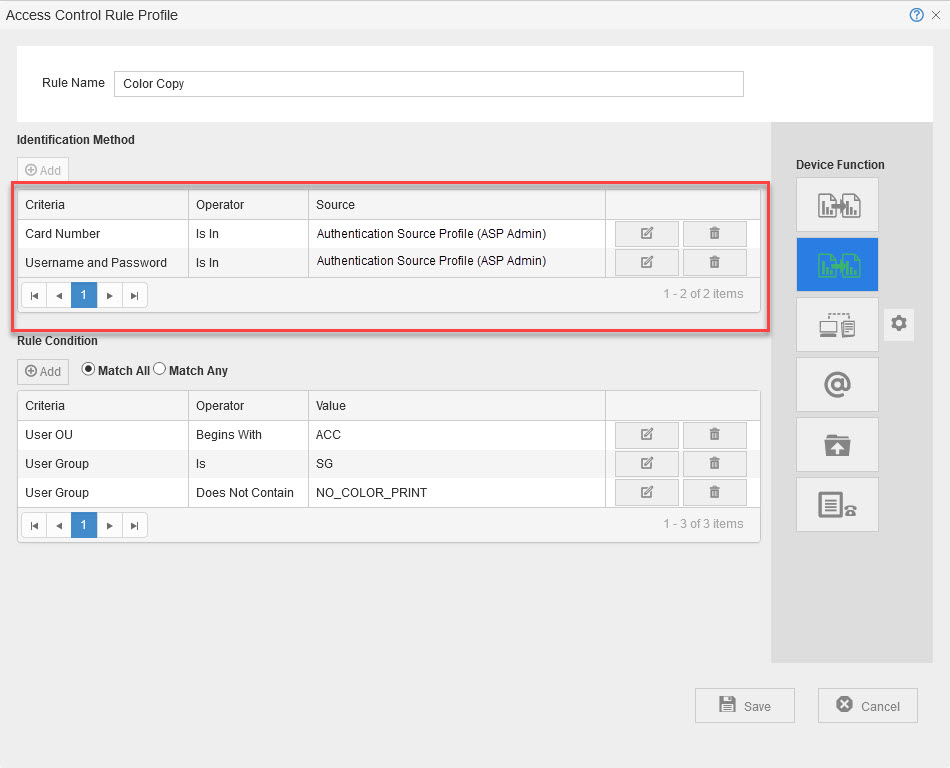
The rule can be expanded to enable more complex scenarios such as:
- Enabling Color Copy for those who belong to Organizational Groups that have names beginning with the letters ACC, and belong to the User Group SG, but not to the User Group NO_COLOR_PRINT.
![]()

Changing the rule condition from Match All to Match Any allows for one who belongs to any one of the specified groups to have authorization to use the Color Copy Feature.
- Allow for Card Authentication as well as User Name / Password Identification Method, so that users who forget their card can still authenticate at the printer.
![]()
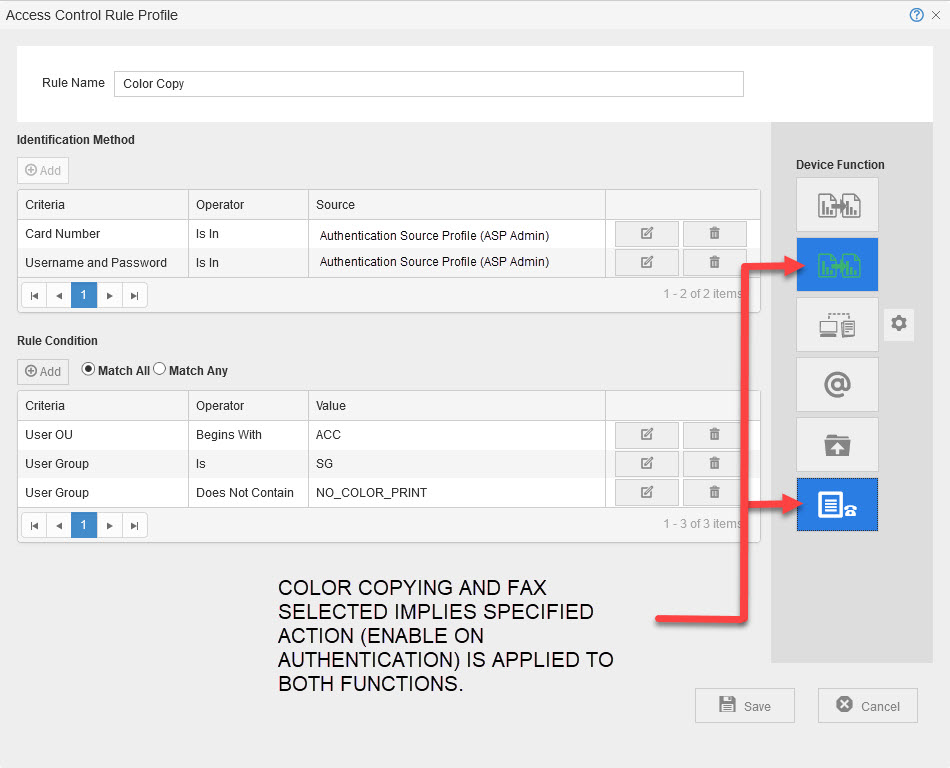
- Enable more than one function within a single rule.
![]()
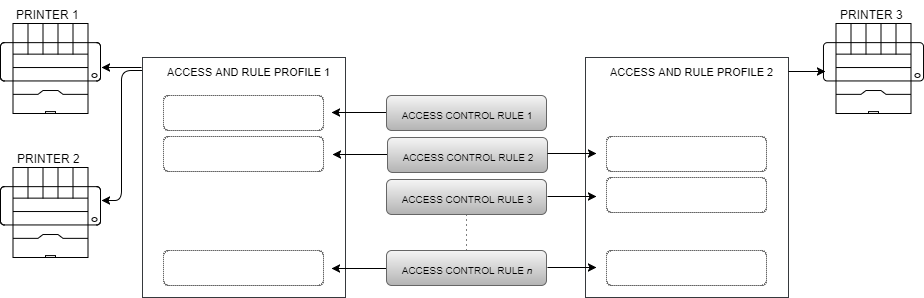
Combining Access Control Rules and Assigning them to Printers
You assign a rule to a printer by adding the rule to the Access & Rule Profile assigned to that printer. An Access & Rule Profile is a named collection of rules. When you authenticate at a printer, the availability of functions is determined by the combination of the Access Control Rules in the Access & Rule Profile assigned to that printer.
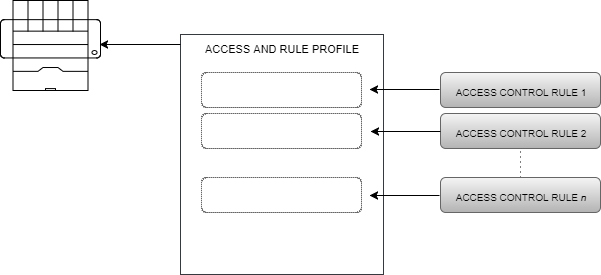
One Access & Rule Profile can be assigned to many printers. This eliminates the need to set rules for each printer individually. Furthermore, if you add, remove or change a rule, all printers controlled by that Access and Rule Profile are updated.
Similarly, one Access rule can be assigned to more than one Access & Rule Profile. Changing the rule will update all such Access & Rule Profiles, and hence, all printers that use those Access & Rule Profiles.
How to…
Create a New Access & Rule Profile
You create a new Access & Rules Profile while assigning it to a printer.
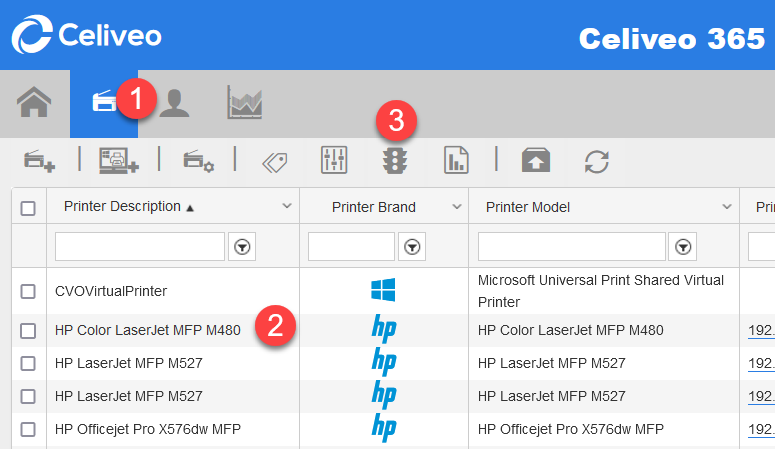
- On the Celiveo 365 Web Admin, at the main menu, click
![]() . The Printer List displays.
. The Printer List displays. - Select the Printer you want to add the new Access & Rules Profile to.
- On the printer menu, click
![]() . Access and Rules is displayed.
. Access and Rules is displayed.
![]()

- To create an empty Access & Rules Profile, click
![]() .
.
To create a new Access & Rules Profile by cloning an existing rule, select the existing rule from the drop-down and click![]() . The Access & Rules Profile is displayed.
. The Access & Rules Profile is displayed.
![]()
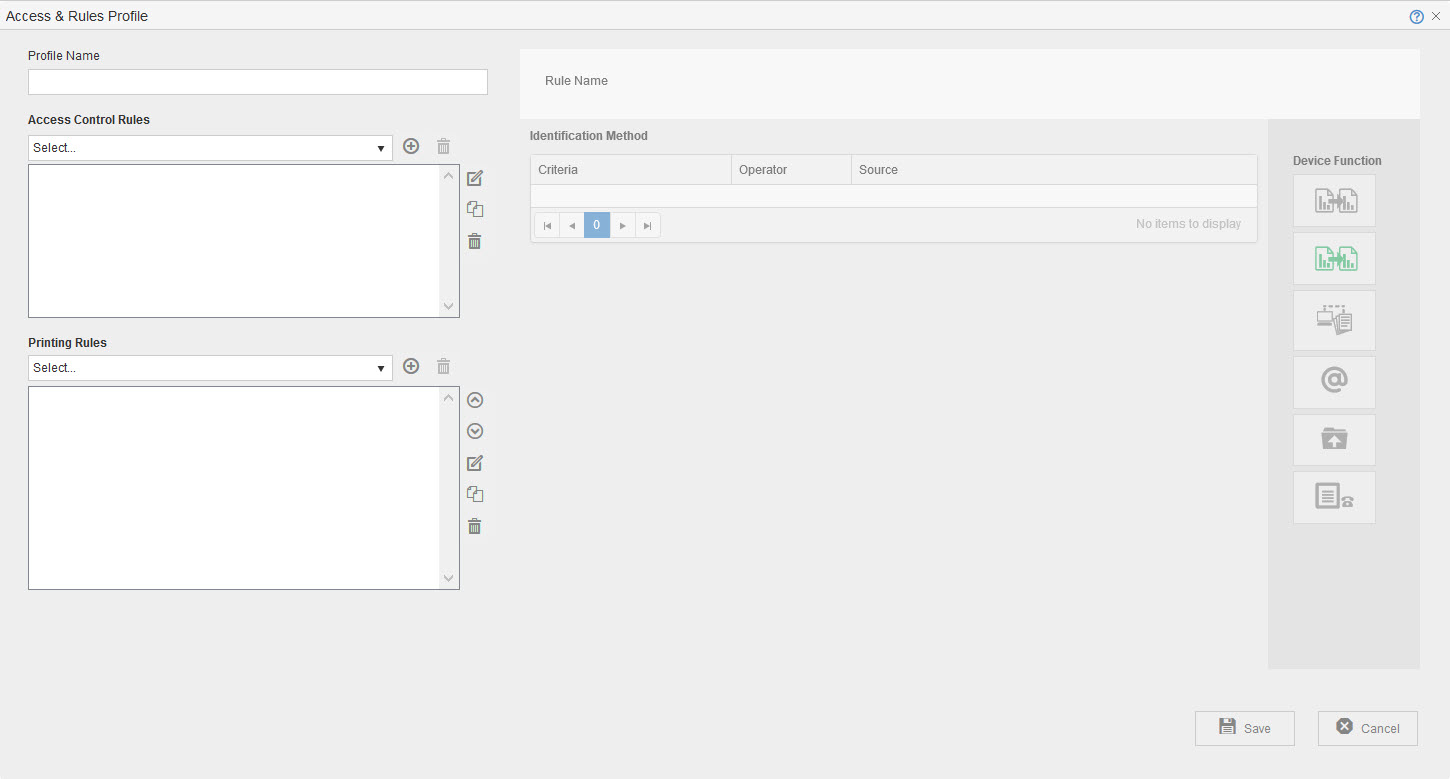
- In the [Profile Name] box, specify a unique name for the Access & Rules Profile.
The new Access & Rules Profile is created when you save it.
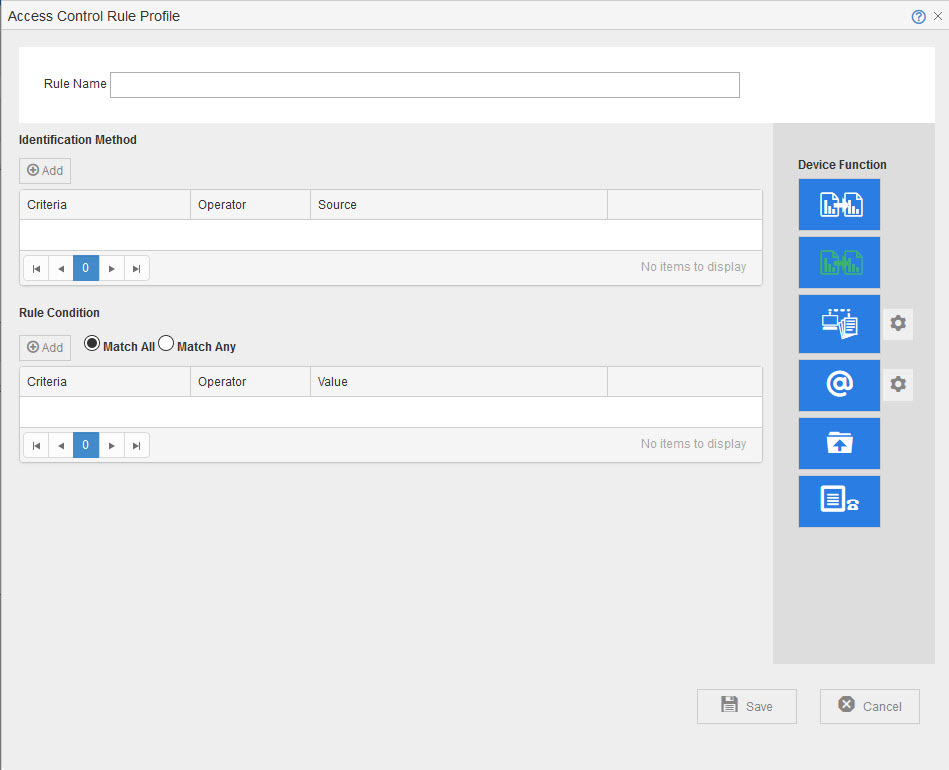
Add a Rule to Unlock a Function
- In Access & Rule Profile, click
![]() adjacent to [Access Control Rules] drop-down. A new rule displays.
adjacent to [Access Control Rules] drop-down. A new rule displays.
![]()

- At [Rule Name] specify a name for the rule.
- In the [Device Functions] section, click the different buttons to deactivate all features but Black and White Copy.
- In the [Identification Method] section, select No identification.
![]()

- Click [Save].
Authorize a Function for Card or PIN Authentication
Authorizing a function, is a 3 stage process.
- Stage 1 – Enable Proximity card or PIN Authentication
- Stage 2 – Specify the function to authorize
- Stage 3 – Specify who is authorized to use the function (If all users who successfully authenticate are allowed to use the function, this stage can be skipped)
Stage 1:
- In Access & Rule Profile, click
![]() adjacent to [Access Control Rules] drop-down. A new rule displays within the Access & Rules Profile.
adjacent to [Access Control Rules] drop-down. A new rule displays within the Access & Rules Profile.
![]()
- At [Rule Name] specify a name for the rule.
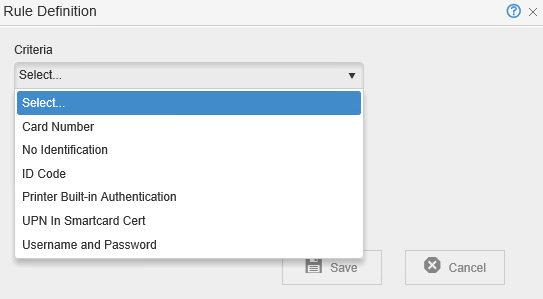
- In the Access Control Rule Profile, In the [Identification Method] section, click
![]() . The Rule Definition is displayed.
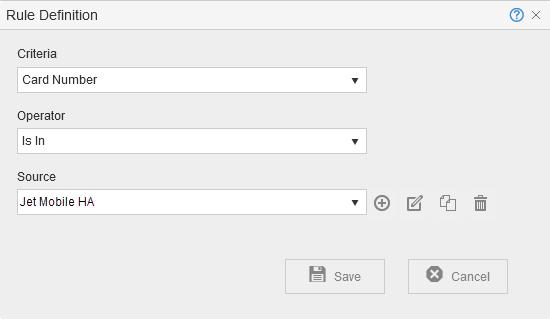
. The Rule Definition is displayed. - In the [Criteria] drop-down, select [Card Number] for Card Authentication, or [ID Code] for ID Code Authentication.
![]()
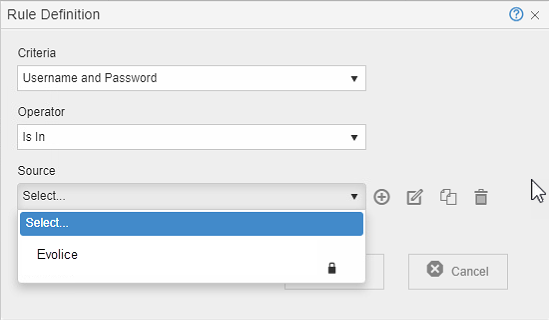
- In the Source drop-down, select the Authentication Source Profile to authenticate against.
![]()
Notes:
- For information on Authentication Profiles, see the article on Authentication Profiles.
- The system ensures that all Card Authentication Access Control Rules for a given printer are authenticated against the same Authentication Profile.
- You can combine Card Authentication with the User Name/Password method in the same Access Control Rule.
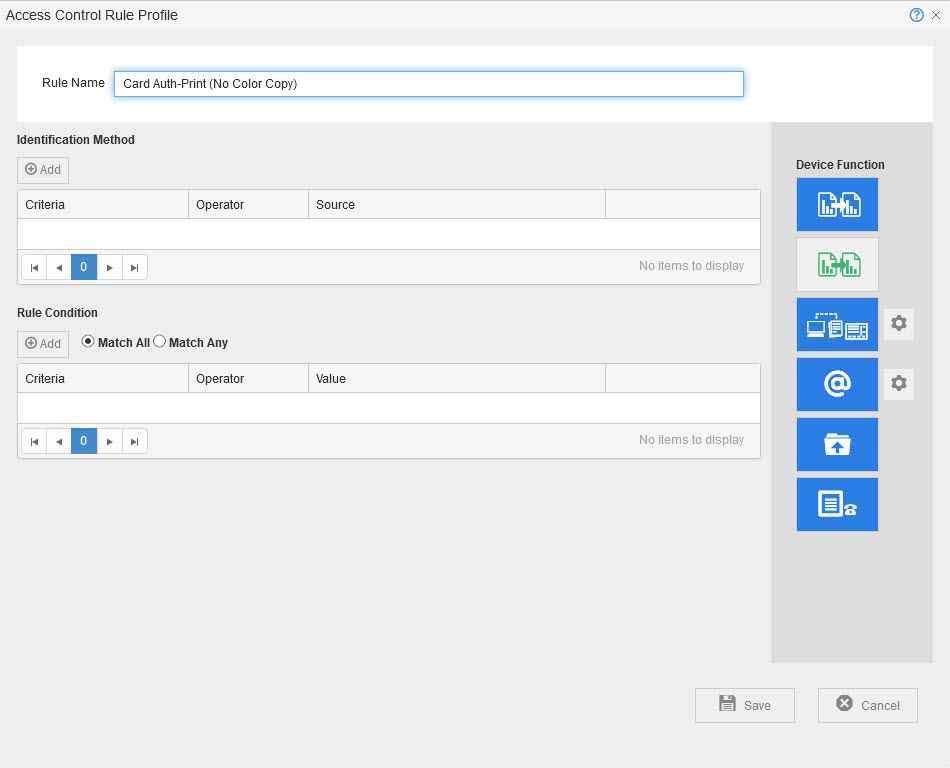
- Click [Save]. You return to the Access Control Rule Profile.
![]()
Stage 2
- In the [Device Functions] section, select the features you want to authorize. The features you select are displayed as blue buttons.
Notes:
- If you selected Scan to Email, click
![]() and specify who to send the scanned image to.
and specify who to send the scanned image to. - If you selected Print, click
![]() and specify the pull print settings.
and specify the pull print settings.
Stage 3
To grant permission for a user group or organizational unit:
- Under [Rule Condition], click
![]() . The Rule Definition is displayed.
. The Rule Definition is displayed.
![]()
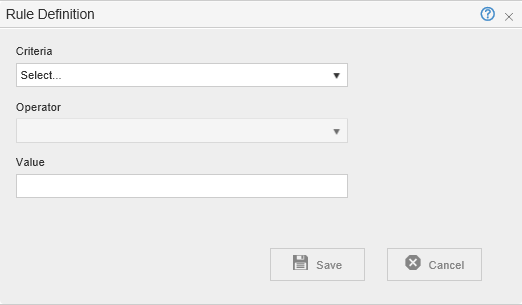
- From the [Criteria] drop-down, select User Group or Organizational Unit.
- In the [Operator] drop-down select the comparison criterion.
- In the [Value] box, specify what to compare against.
- Note: You can specify multiple rule conditions, and select [Match Any] to authorize the features if any one condition is met, or select [Match All], to authorize the features if every condition is met.
![]()
- Click Save until all dialogs close.
Set Up ID Mask and Dual Factor Authorization for Card Authentication
- In Access & Rule Profile, in Access Control Rules, select the rule that implements card authentication.
- Click
![]() under [Access Control Rules]. The rule displays for editing.
under [Access Control Rules]. The rule displays for editing.
![]()
- In the [Identification Method] section, click
![]() in the row containing the Card Number condition. The Rule definition displays.
in the row containing the Card Number condition. The Rule definition displays.
![]()
- Click
![]() in the row containing the Source. The Authentication Source Profile displays.
in the row containing the Source. The Authentication Source Profile displays.
![]()
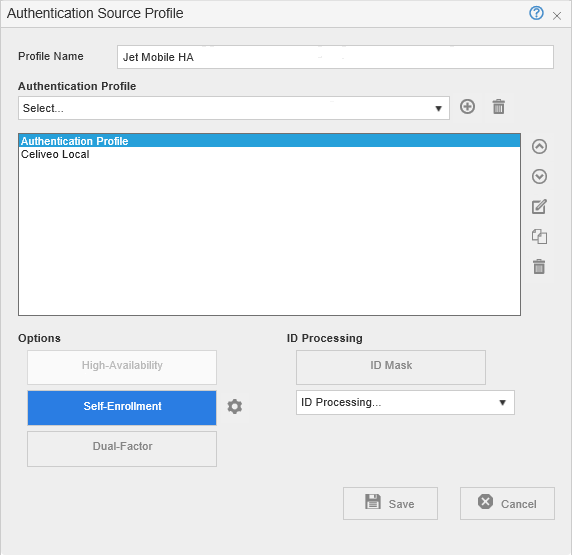
Don’t change the ID Mask for Celiveo 365.
Information about ID Processing:
The ID Processing methods are used to match the number extracted from the card with the one that is written in the back of the card. These conversions are needed when the card ID in Celiveo 365 has to match the numbers in the back of the card or if they need to correspond to an existing number in a database that would be imported to AD or Celiveo 365 SQL DB.
To enable dual factor authentication;
- Click the [Dual Factor] button to turn it on.
- Click
![]() , which is placed next to the [Dual Factor] button.
, which is placed next to the [Dual Factor] button.
![]()

- Specify properties of the password to use and click [Close].
- Click Save.
Enable Self Enrollment for Card Authentication
When self enrollment is enabled, you can log in at the printer using your Windows credentials. Thereafter you can save your card details to Celiveo 365, without the help of a Celiveo 365 Administrator.
- In Access & Rule Profile, in Access Control Rules, select the rule that implements card authentication.
- Click
![]() under [Access Control Rules]. The rule displays for editing.
under [Access Control Rules]. The rule displays for editing.
![]()
- In the [Identification Method] section, click
![]() in the row containing the Card Number condition. The Rule definition displays.
in the row containing the Card Number condition. The Rule definition displays.
![]()
- Click
![]() in the row containing the Source. The Authentication Source Profile displays.
in the row containing the Source. The Authentication Source Profile displays.
![]()
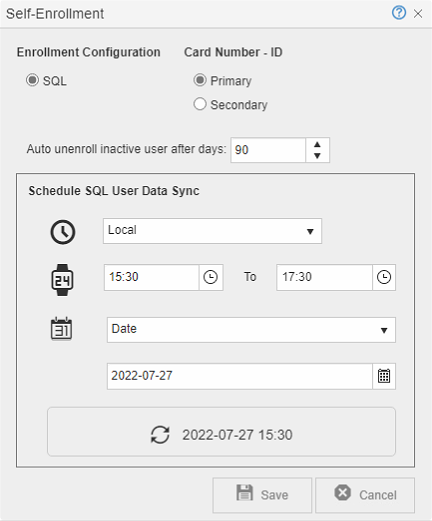
- Verify that the Self Enrollment is turned on (The Self Enrollment button is highlighted in blue when Self Enrollment is on).
- Click
![]() , which is placed next to the [Self Enrollment] button. The Self Enrollment settings display.
, which is placed next to the [Self Enrollment] button. The Self Enrollment settings display.
![]()
Post your comment on this topic.