
This chapter provides and illustrates the necessary instructions needed by the operator on the fitting, adjusting and operation of the Aspida flight helmet. The wearer’s safety and comfort depend on the correct adjustment and fit of the helmet. Proper fit and adjustment assure maximum comfort and stability.
OPERATING INSTRUCTIONS
INDIVIDUAL COMPONENT OPERATION
![]()

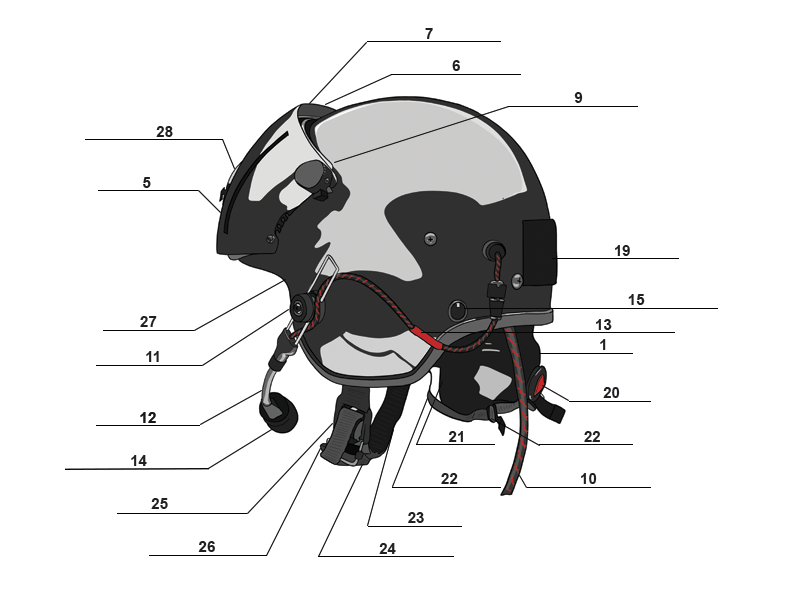
VISORS (6 and 7)
Provides eye protection when in the down position. Three types of visor lenses are available:
(1) Clear
(2) Tinted (Smoke)
(3) High Contrast (Amber)
VISOR LOCK (8)
Move the outer visor lens into the down and secured position by loosening the visor lock. Once free, move the visor into the desired position and retighten the visor lock.
ACTUATOR KNOB (9)
Move the inner visor lens into the down and secured position by pressing the actuator knob in and sliding into the desired detent notch. Repeat the process and move up to secure the inner visor.
COMMUNICATIONS CORD (10)
Plug the communications cord into the airframe to connect to the radio. Pull the plug straight out by holding the plug casing to avoid damaging the cord.
Caution: Unplugging the communications cord by pulling on the wire may damage the cord and cause intermittent communications or complete loss of communications.
MICROPHONE BOOM SUPPORT ASSEMBLY (11)
Loosen the gnarled knob of the boom support assembly to adjust the positioning of the boom. Retighten the gnarled knob to secure.
MICROPHONE (14)
Use the correct microphone to align with the impedance of the communications system.
VOLUME CONTROL (15)
The volume control regulates the resistance of the signal to the earphones. By turning it up the resistance is increased therefore lowering the volume. If the volume on the radio is set to a comfortable and clear level while the volume control is set to a midpoint, the wearer can raise and lower their helmet’s volume independent of the aircraft radio.
EARPHONE (16)
Use the correct earphone to align with the impedance of the communications system.
EAR CUPS (17)
Move the ear-cup such that the ear seal completely surrounds the ear comfortably. Optional thicknesses of ear cups are available to improve comfort and fitting.
EAR SEALS (18)
Ensure that the ear seals are compressed by approximately 50% its thickness to provide adequate noise attenuation and hearing protection.
WEIGHT BAGS/DOVETAIL (19) (Sold Separately)
Variants of weight bags and dovetails are available. Hook and loop fastener is used to secure them to the back of the helmet to offset the weight of NVGs and reduce strain on the neck.
Dial Closure System (20)
Boa® Closure System:
Incrementally tighten and loosen the retention system by turning the dial clockwise or counter-clockwise. The dial can be pulled away from the helmet to fully release the tension.
A-Top Closure System:
Incrementally tighten and loosen the retention system by turning the dial clockwise or counter-clockwise.
p(banner important). WARNING
Headaches can result if the retention assembly is too tight. If they are too loose, hearing protection or noise attention can be affected.
CAM LOCKS AND STRAPS (22)
Tighten the straps until taught. If over-tightened, it may affect the positioning of the nape and ear cups. Press the cam locks in to secure the straps into position. Once the cam locks secure the strap in a comfortable place the wearer will not be required to readjust them.
CHIN STRAP and MAGNETIC BUCKLE CLASP (23 and 25)
When tightened, it secures the helmet to wearer’s head. To remove quickly, pull on the tab located on the left end of the magnetic buckle.
LADDER LOCK (26)
Position the excess chin strap through the ladder lock and bottom of the chin pad webbing. This will maintain the placement of the buckle for ease-of-use.
NIGHT VISION GOGGLE (NVG) QUICK RELEASE (28)
Provides a quick discount option for night vision goggle mounts. There are two options of quick release offered by Paraclete. Both options function in similar ways. Insert the NVG mount pins into the four openings of the release plate. Push down to secure. To release the mount, press the tab in or the button down depending on the model. This will remove the mount from the set position and push the mount up towards the crown of the helmet to free the pins from the slots.
(1) Legacy Quick Release
(2) Paraclete Quick Release Manufactured By Wilcox Industries
NOTE:
Do not pull the mount forward, away from the helmet, this may impede removal of the mount.
CEP (Sold Separately)
CEPs further protect your hearing while flying. These devices are worn inside the ear canal. They are inside the ear to further reduce outside noise from the aircraft and place the aircraft ICS communication directly inside the ear canal.. The CEP plugs connect to the interface on the back of the helmet.
LIGHTSPEED® ANR (Sold Separately)
LIGHTSPEED® Active Noise Reduction (ANR) H-Mod is an audio solution specifically engineered for aviation helmets. This powered equipment reduces background noise, allowing for increased focus, better situational awareness, and less pilot and crew fatigue. Includes Bluetooth capabilities for backup communications, music, and app alerts.
Post your comment on this topic.