
The viewer shows the composited result of all of your layers, masks and effects as you edit. The viewer tools assist with the editing process.
Viewer Toolbar

The tools in the top bar of the Viewer control how your image is displayed.
Selection ![]()

The Select tool is the most commonly used tool in the Viewer Toolbar. When it is active, you can click any layer of your composite to select it, and you can directly interact with each layer on the Viewer to adjust its position, scale, and other properties.
- V: Press the V key on your keyboard to enable the Selection tool.
Panning ![]()

The Pan tool repositions your composite within the viewer, without altering the contents. When the viewer is zoomed in so only part of the composite is visible, you can use the Pan tool to shift the visible portion and view any area of your composite.
- H: Press the H key on your keyboard to enable the Pan tool.
Straighten Tool ![]()

If you have an image that is not level, you can quickly straighten it using this tool. Select the Straighten tool, click on one end of any line or object in the image which should be horizontal, hold the mouse button and drag to the other end of the line or object, and release. The image will automatically be rotated to make the line you selected perfectly level.
Crop Menu ![]()

The Crop Menu provides access to tools for cropping your image.
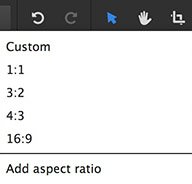
Common aspect ratios are available in the menu, along with a Custom option. If you need the image constrained to a specific aspect ratio, choose it from the menu. If you want free reign to crop to any size and shape you might need, choose the Custom option. Use the Add aspect ratio option to add your own aspect ratio presets to the menu.
- Custom: Allows you to crop the image however you like, without any aspect ratio constraints.
- 1:1: Locks the crop to a square, which you can resize by dragging any corner.
- 3:2: Locks the crop to a 3:2 aspect ratio, which you can resize by dragging any corner.
- 4:3: Locks the crop to the 4:3 aspect ratio used by many cameras and SD television, which you can resize by dragging any corner.
- 16:9: Locks the crop to the 16:9 widescreen video aspect ratio, which you can resize by dragging any corner.
- Add aspect ratio: If there is an aspect ratio you commonly use that is not in the crop menu, you can permanently add it to the menu for easy access. Selecting this option opens the Manage aspect ratios dialog.
- Label: Enter the name that will appear in the menu for the new aspect ratio.
- Width / Height: Enter the aspect ratio you wish to use, with width first, followed by height.
- Add: Click the add button to save your changes and add the new aspect ratio to the menu.
Snapping Menu
Snapping is a powerful tool for quickly and precisely aligning layers, control points, and other items within your project. This menu allows you to enable or disable snapping, and to control which properties of objects will be factored into the snapping process.
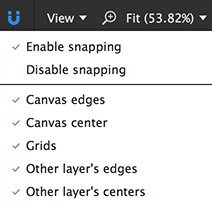
- Enable snapping: Toggles the snapping behavior on.
- Disable snapping: Toggles the snapping behavior off.
The remaining controls toggle specific properties on and off, to determine whether they will snap or not.
- Canvas edges: When enabled, as the selected object approaches any edge of the canvas it will snap into precise alignment with the canvas edge.
- Canvas center: When enabled, as the selected object approaches the center of the canvas it will snap into precise alignment with the canvas center.
- Grids: When enabled, the selected object will snap into alignment with any visible grids in your project.
- Other layers’ edges:* When enabled, the selected object will snap into alignment with the edges of other layers in your project.
- Other layers’ centers: When enabled, the selected object will snap into alignment with the center of other layers in your project.
Align Tools ![]()

The Align tools offer a number of tools for fast and precise layout of layers.

Align to Canvas
![]() Align Left: Aligns the left edge of the selected layer with the left edge of the frame.
Align Left: Aligns the left edge of the selected layer with the left edge of the frame.![]() Align Horizontally: Centers the selected layer horizontally within the frame.
Align Horizontally: Centers the selected layer horizontally within the frame.![]() Align Right: Aligns the right edge of the selected layer with the right edge of the frame.
Align Right: Aligns the right edge of the selected layer with the right edge of the frame.![]() Align Top: Aligns the top edge of the selected layer with the top edge of the frame.
Align Top: Aligns the top edge of the selected layer with the top edge of the frame.![]() Align Vertically: Centers the selected layer vertically within the frame.
Align Vertically: Centers the selected layer vertically within the frame.![]() Align Bottom: Aligns the bottom edge of the selected layer with the bottom edge of the frame.
Align Bottom: Aligns the bottom edge of the selected layer with the bottom edge of the frame.
 Align Left: Aligns the left edge of the selected layer with the left edge of the frame.
 Align Horizontally: Centers the selected layer horizontally within the frame.
 Align Right: Aligns the right edge of the selected layer with the right edge of the frame.
 Align Top: Aligns the top edge of the selected layer with the top edge of the frame.
 Align Vertically: Centers the selected layer vertically within the frame.
 Align Bottom: Aligns the bottom edge of the selected layer with the bottom edge of the frame.
Align to Selection
![]() Align Left: Aligns the left edge of all selected layers with the left edge of the selected layer that is farthest to the left.
Align Left: Aligns the left edge of all selected layers with the left edge of the selected layer that is farthest to the left.![]() Align Horizontally: Centers all selected layers between the left and right edges of the selection.
Align Horizontally: Centers all selected layers between the left and right edges of the selection.![]() Align Right: Aligns the right edge of all selected layers with the right edge of the selected layer that is farthest to the right.
Align Right: Aligns the right edge of all selected layers with the right edge of the selected layer that is farthest to the right.![]() Align Top: Aligns the top edge of all selected layers with the top edge of the selection.
Align Top: Aligns the top edge of all selected layers with the top edge of the selection.![]() Align Vertically: Centers all selected layers between the top and bottom edges of the selection.
Align Vertically: Centers all selected layers between the top and bottom edges of the selection.![]() Align Bottom: Aligns the bottom edge of all selected layers with the bottom edge of the selection.
Align Bottom: Aligns the bottom edge of all selected layers with the bottom edge of the selection.
 Align Left: Aligns the left edge of all selected layers with the left edge of the selected layer that is farthest to the left.
 Align Horizontally: Centers all selected layers between the left and right edges of the selection.
 Align Right: Aligns the right edge of all selected layers with the right edge of the selected layer that is farthest to the right.
 Align Top: Aligns the top edge of all selected layers with the top edge of the selection.
 Align Vertically: Centers all selected layers between the top and bottom edges of the selection.
 Align Bottom: Aligns the bottom edge of all selected layers with the bottom edge of the selection.
Distribute
The Distribute controls allow you to evenly space multiple layers very quickly, along either a horizontal or vertical axis.
![]() Distribute Left: Spaces the selected layers evenly, based on the left-most pixel in each layer. The layers farthest to the left and farthest to the right remain in place, and all other layers will shift horizontally to create even spacing.
Distribute Left: Spaces the selected layers evenly, based on the left-most pixel in each layer. The layers farthest to the left and farthest to the right remain in place, and all other layers will shift horizontally to create even spacing.![]() Distribute Horizontally: Spaces the selected layers evenly, based on the center pixel in each layer. The layers farthest to the left and farthest to the right remain in place, and all other layers will shift horizontally to create even spacing.
Distribute Horizontally: Spaces the selected layers evenly, based on the center pixel in each layer. The layers farthest to the left and farthest to the right remain in place, and all other layers will shift horizontally to create even spacing.![]() Distribute Right: Spaces the selected layers evenly, based on the right-most pixel in each layer. The layers farthest to the left and farthest to the right remain in place, and all other layers will shift horizontally to create even spacing.
Distribute Right: Spaces the selected layers evenly, based on the right-most pixel in each layer. The layers farthest to the left and farthest to the right remain in place, and all other layers will shift horizontally to create even spacing.![]() Distribute Equally Horizontally: Equally spaces the selected layers on the horizontal axis.
Distribute Equally Horizontally: Equally spaces the selected layers on the horizontal axis.![]() Distribute Top: Spaces the selected layers evenly, based on the top pixel in each layer. The highest and lowest layers included in the selection remain in place, and all other layers will shift vertically to create even spacing.
Distribute Top: Spaces the selected layers evenly, based on the top pixel in each layer. The highest and lowest layers included in the selection remain in place, and all other layers will shift vertically to create even spacing.![]() Distribute Vertically: Spaces the selected layers evenly, based on the center pixel in each layer. The highest and lowest layers included in the selection remain in place, and all other layers will shift vertically to create even spacing.
Distribute Vertically: Spaces the selected layers evenly, based on the center pixel in each layer. The highest and lowest layers included in the selection remain in place, and all other layers will shift vertically to create even spacing.![]() Distribute Bottom: Spaces the selected layers evenly, based on the bottom pixel in each layer. The highest and lowest layers included in the selection remain in place, and all other layers will shift vertically to create even spacing.
Distribute Bottom: Spaces the selected layers evenly, based on the bottom pixel in each layer. The highest and lowest layers included in the selection remain in place, and all other layers will shift vertically to create even spacing.![]() Distribute Equally Vertically: Equally spaces the selected layers on the vertical axis.
Distribute Equally Vertically: Equally spaces the selected layers on the vertical axis.
 Distribute Left: Spaces the selected layers evenly, based on the left-most pixel in each layer. The layers farthest to the left and farthest to the right remain in place, and all other layers will shift horizontally to create even spacing.
 Distribute Horizontally: Spaces the selected layers evenly, based on the center pixel in each layer. The layers farthest to the left and farthest to the right remain in place, and all other layers will shift horizontally to create even spacing.
 Distribute Right: Spaces the selected layers evenly, based on the right-most pixel in each layer. The layers farthest to the left and farthest to the right remain in place, and all other layers will shift horizontally to create even spacing.
 Distribute Equally Horizontally: Equally spaces the selected layers on the horizontal axis.
 Distribute Top: Spaces the selected layers evenly, based on the top pixel in each layer. The highest and lowest layers included in the selection remain in place, and all other layers will shift vertically to create even spacing.
 Distribute Vertically: Spaces the selected layers evenly, based on the center pixel in each layer. The highest and lowest layers included in the selection remain in place, and all other layers will shift vertically to create even spacing.
 Distribute Bottom: Spaces the selected layers evenly, based on the bottom pixel in each layer. The highest and lowest layers included in the selection remain in place, and all other layers will shift vertically to create even spacing.
 Distribute Equally Vertically: Equally spaces the selected layers on the vertical axis.
The View Menu
Imerge offers several options for viewing your image to evaluate its content in various ways. The View Menu is where you access them.

Overlays
The Overlays section of the menu contains options that are rendered over the top of your viewer image. Open the menu and select any item to toggle it on or off.
- Highlight warnings – fills all pixels that contain pure white with a solid color. By default the highlight warning color is red, but you can edit the color in the options screen.
- Shadow warnings – fills all pixels that contain pure black with a solid color. By default the shadow warning color is blue, but you can edit the color in the options screen.
- Grid (rule of thirds) – adds an overlay dividing the image into thirds, both horizontally and vertically. If you need help with laying out your image, you can place the focal points of your composite on the intersections of these lines and ensure a pleasing composition.
- Grid (crosshair) – adds center lines to your image, both horizontally and vertically. Especially for graphic design, being able to quickly reference the center for layout is useful.
Channel views
You can also control what channel or channels of the image are displayed through this menu. Individual color channels are displayed as grayscale images.
- All – The standard view, which combines the red, green, and blue channels to create a full color image.
- Red – Shows the values of red in each pixel, from no red (which displays as black) to pure red (which displays as white).
- Green – Shows the values of green in each pixel, from no green (which displays as black) to pure green (which displays as white).
- Blue – Shows the values of blue in each pixel, from no blue (which displays as black) to pure blue (which displays as white).
- Alpha – Displays the transparency data of the image in grayscale. Black areas are completely transparent. White areas are completely opaque. Gray areas indicate partial transparency, with darker grays being more transparent.
- Luminance – Shows the luminance values of the image, in grayscale.
Second monitor
If you wish to display the Viewer contents on a second display, for your clients to preview or any other reason, you can enable the second monitor option. This will open a new window showing only the Viewer, which you can then place on your secondary display.
Zoom menu ![]()
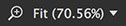
Select the size at which the viewer is rendered. Reduce the scale to see the entire image, or increase the scale to focus on a specific portion of the image.
- Scale to fit: Auto-fits the canvas to the largest size that will fit in the available space.
- Scale to extent: Auto-fits the largest layer in your project to fit into the available space. When working with layers that are larger than your project, and extend beyond the edges of the canvas, this option scales everything to the edges of the largest layer are accessible in the viewer area.
Canvas controls
The images and layers contained in your project can be directly manipulated using the controls displayed on the canvas. This allows you to view the changes as they are made, and dial in the exact results you want. The controls displayed on the canvas will vary based on the current selection. Different kinds of layers, masks, and effects each have their own controls, specific to the adjustments available for the selection.
- Transform: Canvas controls can be used to adjust the position, rotation, and scale of the layer.
- Masks: Canvas controls can be used to edit the position, rotation, corner radius, scale, and edge feather of a mask. The direction of linear gradient masks can also be adjusted on the canvas.
- Effects: Some effects benefit from canvas controls. Distortion effects, zoom blur, and gradients, for example, provide intuitive controls on the canvas to dial in the exact results you require.
Need more help with this?
Don’t hesitate to contact us here.