
Presets allow you to quickly add predefined groups of settings, effects, or adjustments, greatly speeding up your workflow and making it simple to apply the same settings to multiple images, in multiple projects. Presets are beneficial in a number of different situations:
- Canvas size templates
- Project templates
- Layer presets
- Effects stack presets
- Effect presets
- Contour presets
- Export output presets
- Output filename pattern presets
The details of where you find presets and how you create your own presets vary based on the type of preset involved. Each is explained in detail below.
Canvas size templates
Canvas size contain preconfigured details of the project canvas: canvas dimensions, color handling, and background color. When creating a new project, select any canvas size preset to assign the project the specific combination of settings contained in that preset. Users can create custom canvas presets as well, so if there are particular settings that you use repeatedly, creating a preset with those settings will save you some time.
Using canvas size templates
The location where you find canvas size templates varies based on what screen you are currently viewing in the software.
- On the projects screen: Open the New menu, and select your desired canvas size template from the menu.
- On the edit screen: In the menu at the top left, select Project > New from template and select your desired canvas size template from the menu.
Creating canvas size templates
Custom canvas size templates can be created from the Edit screen.
- At the bottom of the layer stack, open the canvas settings, and adjust them to your desired values.
- Open the Dimensions menu in the canvas settings, and select Save preset at the bottom of the menu.
- In the dialog which opens, enter a name for the new template, and click save.
Project templates
Project templates are a more comprehensive template option than the canvas size presets. Project templates store everything in the project, including layers, layer content, effects, and masks. You can then set up a template with a specific overlay, text label, color adjustment, and background, for example, and slot in different green screen foregrounds at any time.
Using project templates
The location where you find project presets varies based on what screen you are currently viewing in the software. Project templates are listed at the bottom of the menu, below the horizontal dividing line. There are no project templates included by default, so you need to create one before any will be listed in the menu.
- On the projects screen: Open the New menu, and select your desired project template from the menu.
- On the edit screen: In the menu at the top left, select Project > New from template and select your desired project template from the menu.
Creating project templates
Custom project templates can be created from the Edit screen.
- Configure your entire project to use the settings you want to store in the template.
- At the top left of the interface, select Project > Save as template
- In the dialog which opens, enter a name for the new template, and click save.
Layer presets
Each kind of layer in Imerge can contain layer presets, for creating layers with preconfigured properties and settings. Some kinds of layers include presets when installed, and you can create custom presets for any kind of layer.
Using layer presets
Layer presets can be used when creating a layer.
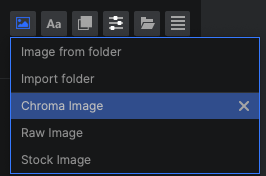
- At the top of the layer stack, click the New layer button for any kind of layer. A menu listing all available layer presets for that kind of layer will open, so you can select one. In this example, the presets for an image layer are shown.
![]()
Creating layer presets
Any time you have a layer whose settings would be useful to access again in the future, you can create a layer preset to store those settings, so they won’t need to be manually configured next time. This could be an adjustment layer with specific effects applied, a solid layer containing a specific color and blend mode, a group layer with certain blend and passthrough settings, or any other layer configuration you find useful.
- At the top right of the layer sidebar, click the save layer preset
![]() button.
button.
![]()
- In the dialog that opens, enter a name for the new layer preset, and click save.
 button.
Effects stack presets
Effects stack presets allow you to store a combination of multiple effects, each with specific settings, for use in any project. Effects stack presets are most commonly used to create ‘looks’, or specific color and tonal adjustments, which can easily be applied to any image in the future. But they can also be beneficial for common utility tasks, such as chroma keying.
Effects stack presets are created, accessed, organized, and otherwise managed in the presets sidebar. See the Presets sidebar page for full details.
Effect presets
Effect presets are similar to effects stack presets, but store settings for a single effect, rather than a combination of effects. When you find a combination of settings for any effect which you are quite happy with and would like to be able to use again, save it as a preset for future use.
Using effect presets
- Click the Preset menu
![]() icon to the right of the effect name, and select any preset from the list inside. The settings for the effect will be adjusted to use the values stored in that preset.
icon to the right of the effect name, and select any preset from the list inside. The settings for the effect will be adjusted to use the values stored in that preset.
![]()

Creating effect presets
- Click the Preset menu
![]() icon in the Effects header and at the bottom of the menu, select the Save Preset command to create a new preset, containing all effects currently applied to the layer.
icon in the Effects header and at the bottom of the menu, select the Save Preset command to create a new preset, containing all effects currently applied to the layer. - In the dialog that opens, enter a name for the new effects stack preset, and click save. The values currently selected in the effect settings will be stored in the preset, which will be listed in the preset menu.
Contour presets
Contour presets are used by the bevel & emboss effect. Bevel & emboss adds illumination and shading to simulate depth, and the contour defines the profile shape of the edges which catch the shadows and light. See the Stylize page of this manual for full details on using the bevel & emboss effect.
Using contour presets
- In the bevel & emboss effect, open the Contour menu and select any preset from the list. See the Stylize page of this manual for full details on using the bevel & emboss effect.
Creating contour presets
- In the controls for the bevel & emboss effect, edit the contour curve to create your desired shape.
- Open the bevel menu, and select Save preset at the bottom of the list.
- In the dialog that opens, enter a name for the new contour preset, and click save.
Output presets
Output presets store a configuration of output settings, including format, compression, filenaming and resizing details. They allow you to easily export images for specific purposes, such as uploading to the web, print, or delivering client previews.
Using output presets
Output presets can be accessed in two places, both of which are in the output section of the batch export tab.
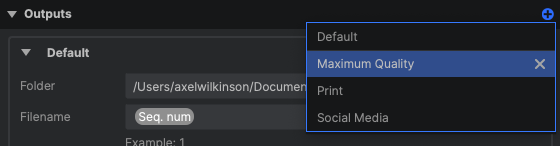
- Adding a new output item: In the header of the Output section, click the plus icon
![]() to add a new output item from the list. A new output will be added, using the settings stored in your selected output preset.
to add a new output item from the list. A new output will be added, using the settings stored in your selected output preset.
![]()
- Editing an existing output item: Presets can also be applied to any existing output item. Click the Preset menu
![]() icon in the header of the output item, and select a preset from the list.
icon in the header of the output item, and select a preset from the list.
![]()
Creating output presets
When you have a specific output configuration that you would like to be able to reuse in future projects, you can save it as an output preset.
- Edit the output settings as you want them to be stored in your new preset.
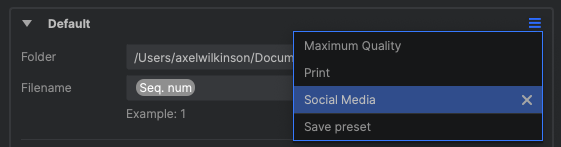
- Click the Preset menu
![]() icon in the header of the output item, and select save preset from the bottom of the list.
icon in the header of the output item, and select save preset from the bottom of the list. - In the dialog that opens, enter a name for the new output preset, and click save.
Filename pattern presets
Outputs use filename patterns to generate names for each exported image. Filename pattern presets give you direct access to any naming patterns you create.
Using filename patterns
- Within the output item, click the Filename presets menu
![]() icon to select a preset from the list.
icon to select a preset from the list.
Creating filename presets
- Configure the filename pattern you want by entering any combination of text and tags into the filename field.
- Within the output item, click the Filename presets menu
![]() icon and select Save preset from the bottom of the list.
icon and select Save preset from the bottom of the list. - In the dialog that opens, enter a name for the new filename preset, and click save.
Need more help with this?
Don’t hesitate to contact us here.