
Clone Stamp
The clone stamp allows you to sample from one location in your image, and paint the sampled area elsewhere in the image. This is effective for removing unwanted objects from the scene.
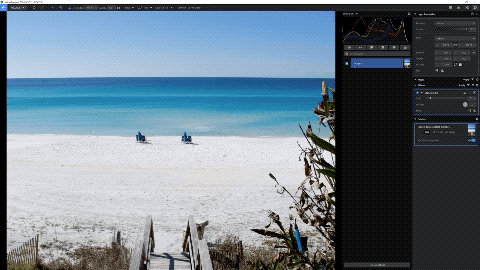
Using Clone Stamp
There are two fundamental steps to using the clone stamp, which take place on the canvas:
- Sample the area you wish to copy: Place the cursor for the Clone Stamp tool on the area of your selected layer which you wish to copy. Hold down Alt (Option on Mac) and the cursor will change to crosshairs to indicate sample mode. Click to sample that area, then release the Alt button.
- Paint over the area you wish to conceal: When you move the cursor, a reticle will remain to indicate the sample source. Brush anywhere else in the image, and the sampled area will be painted in there. Once you start painting, the reticle will move in tandem with your brush, to indicate the current sample source.
Top Toolbar Controls

When the Clone Stamp is active, the top toolbar will show several tools for defining the brush shape used by the effect.
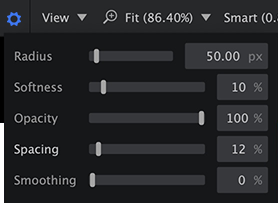
- Radius: Adjusts the size of the brush.
- Opacity: Controls how opaque the brush is, when used to paint in the clone stamp.
![]() Settings: The settings menu contains additional controls for the clone stamp.
Settings: The settings menu contains additional controls for the clone stamp.
- Radius: Defines the radius of the brush, in pixels.
- [ key will reduce the radius.
- ] key will increase the radius.
- Softness: Controls the width of the feathered edge around the brush.
- Shift + [ will decrease the softness.
- Shift + ] will increase the softness.
- Opacity: Determines how opaque the brush stroke is. 100% is fully opaque, while 0% is completely transparent.
- Alt + [ will decrease opacity.
- Alt + ] will increase opacity.
- Spacing: Controls the distance, as a percentage of the radius, between each instance of the brush shape, as you paint. For a continuous line a low value should be used. Increasing the value will create a visible scalloped edge, and once you exceed 100% there will be gaps between the separate instances of the brush shape.
- Smoothing: Adjusts the overall smoothness of the brush path, to reduce unwanted shake or jitter and create a smoother line.
- Radius: Defines the radius of the brush, in pixels.
Sidebar Controls
The sidebar controls adjust the contents of the clone stamp, rather than the brush used to sample or apply the effect. Areas already painted will not be affected. The current settings in the sidebar apply to the next brush stroke.
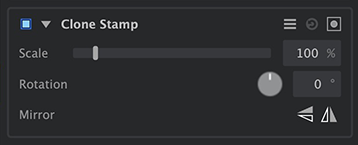
- Scale: Adjusts the size of the sampled image within the brushed area. A value of 100% exactly matches the size of the original sample.
- Rotation: Changes the rotation of the sampled image within the brush area. This allows you to compensate for perspective in the image, or match the angle of lines which are not parallel.
- Mirror: Allows you to flip the sampled image horizontally or vertically.
![]() Mirror Vertical: Flips the image so the bottom becomes the top and the top becomes the bottom.
Mirror Vertical: Flips the image so the bottom becomes the top and the top becomes the bottom.![]() Mirror Horizontal: Flips the image so the left side becomes the right side and the right side becomes the left side.
Mirror Horizontal: Flips the image so the left side becomes the right side and the right side becomes the left side.
Healing Brush
The healing brush is used to replace the texture in an area of your image, while retaining the original color data. It is effective for removing blemishes from skin. To use it, you take a texture sample from one location in your image, and paint the sampled texture elsewhere in the image.
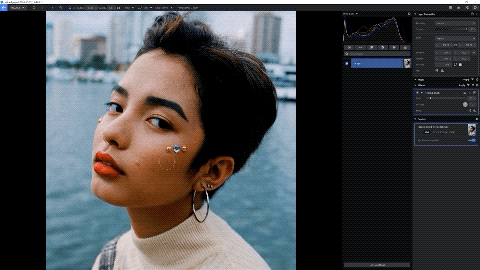
Using Healing Brush
There are two fundamental steps to using the healing brush, which take place on the canvas:
- Sample the texture you wish to copy: Place the cursor for the Healing Brush tool on the area of your selected layer which you wish to copy. Hold down Alt (Option on Mac) and the cursor will change to crosshairs to indicate sample mode. Click to sample the texture of that area, then release the Alt button.
- Paint over the area you wish to conceal: When you move the cursor, a reticle will remain to indicate the sample source. Brush anywhere else in the image, and the texture from the sampled area will be painted in there. Once you start painting, the reticle will move in tandem with your brush, to indicate the current sample source.
Top Toolbar Controls
When the Healing Brush is active, the top toolbar will show several tools for defining the brush shape used by the effect.
- Radius: Adjusts the size of the brush.
- Opacity: Controls how opaque the brush is, when used to paint in the healing brush texture.
![]() Settings: The settings menu contains additional controls for the healing brush.
Settings: The settings menu contains additional controls for the healing brush.
- Radius: Defines the radius of the brush, in pixels.
- [ key will reduce the radius.
- ] key will increase the radius.
- Softness: Controls the width of the feathered edge around the brush.
- Shift + [ will decrease the softness.
- Shift + ] will increase the softness.
- Opacity: Determines how opaque the brush stroke is. 100% is fully opaque, while 0% is completely transparent.
- Alt + [ will decrease opacity.
- Alt + ] will increase opacity.
- Spacing: Controls the distance, as a percentage of the radius, between each instance of the brush shape, as you paint. For a continuous line a low value should be used. Increasing the value will create a visible scalloped edge, and once you exceed 100% there will be gaps between the separate instances of the brush shape.
- Smoothing: Adjusts the overall smoothness of the brush path, to reduce unwanted shake or jitter and create a smoother line.
- Radius: Defines the radius of the brush, in pixels.
Sidebar Controls
The sidebar controls adjust the contents of the healing brush, rather than the shape of the brush used to sample or apply the effect. Areas already painted will not be affected. The current settings in the sidebar apply to the next brush stroke.
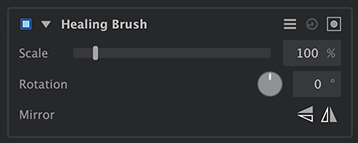
- Scale: Adjusts the size of the sampled image within the brushed area. A value of 100% exactly matches the size of the original sample.
- Rotation: Changes the rotation of the sampled image within the brush area. This allows you to compensate for perspective in the image, or match the angle of lines which are not parallel.
- Mirror: Allows you to flip the sampled image horizontally or vertically.
![]() Mirror Vertical: Flips the image so the bottom becomes the top and the top becomes the bottom.
Mirror Vertical: Flips the image so the bottom becomes the top and the top becomes the bottom.![]() Mirror Horizontal: Flips the image so the left side becomes the right side and the right side becomes the left side.
Mirror Horizontal: Flips the image so the left side becomes the right side and the right side becomes the left side.
Need more help with this?
Don’t hesitate to contact us here.