
Project files created by Imerge use a unique file format, and are saved with the .imerge file extension. Imerge scans your file system to find all .imerge files on your machine and lists them on the projects screen.
Backward compatibility
Project files created by Imerge are backward compatible, meaning that any project files saved with an older version of the software can be opened in a newer version of Imerge. However, projects saved with a new version, cannot be opened in older versions of the software.
Therefore, if you have a project file that was created in an older version, and want to open it in the current version, you can do without issue. However, if you think you may have any reason to open the file later in the previous version, then it is recommended to copy the project file first, so the original remains intact, and you can open the copy in the current version, and save it to the updated format.
Image referencing
When you import images into your project, the actual images are not copied or stored in the project file. Instead, Imerge uses referencing – it stores the location of the source file, so it can open the file into the project. The original source image remains unchanged on your drive. Any adjustments made to the image, such as color adjustments or keying, are stored in the Imerge project file, so the adjustments can be applied each time the project is opened.
Transferring project files
Image referencing has a decided advantage in that the editing process in Imerge is non-destructive, and never alters or damages your source images. However, it also means that if you want to transfer the project from one computer to another, you need to remember to transfer the source images as well.
Integrating projects with HitFilm
Imerge projects can be exported as HitFilm composite shots (.hfcs), for use in FXhome’s video editing products, HitFilm Express and HitFilm Pro. This allows you to retain all layers in your Imerge project, so they can be edited independently in HitFilm to create motion graphics. Each layer in your Imerge project will be rendered to a new image, factoring any transformations, effects and masks applied to the layer. The layers will then be combined as layers in the HitFilm comp.
To export a HitFilm comp:
- Open the Export Canvas dialog, by clicking the export canvas button
![]() , by pressing CTRL+E on your keyboard (CMD+E on Mac), or selecting Project > Export in the top menus.
, by pressing CTRL+E on your keyboard (CMD+E on Mac), or selecting Project > Export in the top menus.
![]()
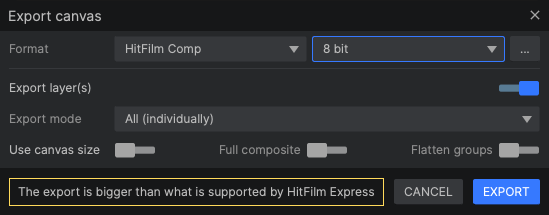
- In the Format menu, select HitFilm Comp, then adjust the settings as needed.
- Bit depth: Select the bit depth used to render the project.
- 8-bit: 8-bit color is the standard for video delivery formats. It provides good color reproduction and relatively small file sizes.
- 8-bit (w/o file): This option saves the separate layer images using 8-bit color, but does not write the .hfcs file. It is useful for updating the components of a project which was previously exported, and is already being worked on in HitFilm. Enable this option to update the layers in place, within the existing HitFilm project where the comp has been imported.
- 16-bit: 16-bit color is preferred for intermediate stages of editing, as it provides better quality retention through a greater range of color or tonal adjustments. It also allows for high dynamic range (HDR), for more lifelike color reproduction.
- 16-bit (w/o file): This option saves the separate layer images using 16-bit color, but does not write the .hfcs file. It is useful for updating the components of a project which was previously exported, and is already being worked on in HitFilm. Enable this option to update the layers in place, within the existing HitFilm project where the comp has been imported.
- Export layer(s): Exports each layer of the Imerge project as a separate layer in the HitFilm comp. If you disable this option, then the entire Imerge project will be flattened into a single layer in the HitFilm comp.
- Export mode: Determines which layers in the Imerge project are included in the export.
- All (individually): All layers in the Imerge project are included in the exported HitFilm composite shot.
- Selected layer(s): Only the selected layers are included in the exported HitFilm composite shot.
- Use canvas size: Enable this option to export all layers at the canvas size. Layers smaller than the canvas will be filled with transparency around the image, so they match the canvas size. Layers larger than the canvas will be trimmed, and any area outside the canvas will be removed. When this option is disabled, each layer will use its original size.
- Full composite: Enable this option to include a rendering of the complete Imerge project, in addition to the individual layers.
- Flatten groups: Enable this option to flatten all groups in the Imerge project into single layers in the exported HitFilm composite shot.
- Bit depth: Select the bit depth used to render the project.
- Once the settings are correct, click the Export button.
- In the file browser which opens, enter a name and select a location where the .hfcs file should be saved.
Need more help with this?
Don’t hesitate to contact us here.