
The outputs section of the export tab is used to define specific configurations of settings for use when exporting. This can include the destination, file name, and formatting details.

![]() Add output item: Use this menu in the outputs header to add a new out put item. Clicking the plus icon will open a list of all available output presets for you to choose from.
Add output item: Use this menu in the outputs header to add a new out put item. Clicking the plus icon will open a list of all available output presets for you to choose from.![]() Output presets: This menu provides access to preset output configurations, for quickly changing the settings in the output item.
Output presets: This menu provides access to preset output configurations, for quickly changing the settings in the output item.![]() Folder: Select the destination where your image(s) will be saved. You can type in a specific file path, or click the folder icon
Folder: Select the destination where your image(s) will be saved. You can type in a specific file path, or click the folder icon ![]() to open a file browser and browse to your desired folder.
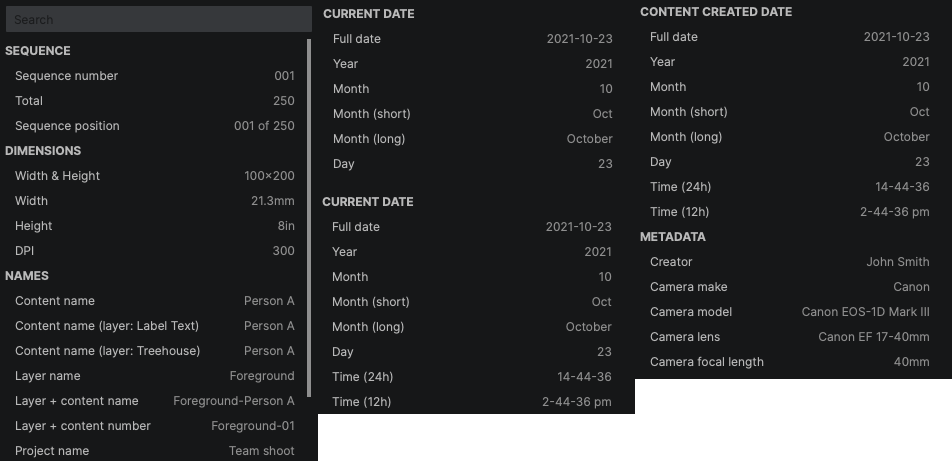
to open a file browser and browse to your desired folder.- Filename: Enter the filename used to save your image(s) here. In addition to simply typing in a name, you can add predefined tags to configure a custom name for each image. Custom text and tags can be combined in any sequence.
![]() Filename presets: This menu provides access to preset naming patterns.
Filename presets: This menu provides access to preset naming patterns.![]() Add tag: Use this menu to access all available tags and select tags to add to the file name configuration.
Add tag: Use this menu to access all available tags and select tags to add to the file name configuration.- Example: An example name, using your chosen filename configuration, is displayed.
- Format: Choose a format for your exported image(s). Details of each format are covered farther down, in the Format section of this page.
- Preset: The preset menu to the right of the format lists presets for specific quality and compression settings within that format.
- … (Settings): The settings menu provides full access to the settings for the chosen format, and allows you to create your own presets for future use. Details of each format are covered farther down, in the Format section of this page.
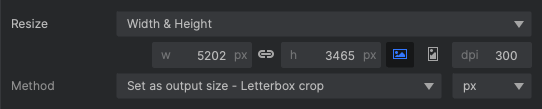
- Resize: Control the size of the exported image.
Filename
Define the filename structure to be used for your exported images. Enter specific text, or create a naming pattern using predefined tags, or any combination of both. When you enter text, the exact text you enter is used for every image, without modification. Tags, on the other hand, take info directly from each image being processed, so when working with batches of images, they can generate unique identifiers for each image. When using multiple tags in a filename, separating them with text elements such as hyphens or spaces, can help differentiate the tag components in the file name and make the name easier to read.

This example combined two tags (Project and Sequence Number), and text (Final). Text is also used to separate the tags in this example, which can make the final name more readable.
![]() Filename presets: This menu, to the right of the filename field, provides access to preconfigured naming patterns. You can also create your own presets, by setting up a specific naming pattern, then selecting the Save preset option in this menu.
Filename presets: This menu, to the right of the filename field, provides access to preconfigured naming patterns. You can also create your own presets, by setting up a specific naming pattern, then selecting the Save preset option in this menu.![]() Add tag: Use this menu to access all available tags and select tags to add to the file name configuration. Select any tag in the list to add it to the filename patter at the current cursor location.
Add tag: Use this menu to access all available tags and select tags to add to the file name configuration. Select any tag in the list to add it to the filename patter at the current cursor location.
Formats
Specify the format and compression details which will be used to encode the exported image.

- Format: Choose a format for your exported image(s).
- Preset: The preset menu to the right of the format lists presets for specific quality and compression settings within that format.
- … (Settings): The settings menu provides full access to the settings for the chosen format, and allows you to create your own presets for future use. The settings vary based on the selected format, as follows:
- JPEG: JPEG is a universally compatible 8-bit format which combines small file sizes with acceptable image quality.
- Quality: The quality slider determines how much compression will be applied to the image. Higher settings provide better reproduction of fine detail, but create larger file sizes. Lower settings reduce file size, but also reduce the image quality. Find a balance which suits your needs.
- Color profile: The color profile determines how colors are reproduced in the exported image.
- None: No color profile is assigned.
- sRGB: sRGB is the most common color profile, and is typically used for general viewing of digital images.
- Adobe RGB (1998): Adobe RGB is an alternate color profile which maps colors slightly differently than sRGB.
- ROMM RGB: A popular wide gamut profile designed specifically for photography, which supports a larger range of colors.
- Progressive: Toggles between Baseline or Progressive JPEG. Progressive is generally better for internet use. When progressive is disabled, the image loads from the top down, one line at a time. This is the standard, or baseline, JPEG option. Enabling Progressive loads the entire image at once, first at low resolution then at full resolution as soon as possible.
- Matte color: Specify the color that will be used to fill in areas of alpha transparency. Since the JPEG format does not support transparency, any transparent areas of the canvas must be filled in when exported. Click the color swatch to open a color picker and select any color of your choice.
- Color profile: The color profile determines how colors are reproduced in the exported image.
- PNG: PNG is a widely compatible format which supports alpha channels and transparency. PNG supports 8-bit or 16-bit color.
- Bit depth: Select between 8-bit or 16-bit color for the exported image. 16-bit creates larger file sizes, but stores more colors for higher quality.
- Color profile: The color profile determines how colors are reproduced in the exported image.
- None: No color profile is assigned.
- sRGB: sRGB is the most common color profile, and is typically used for general viewing of digital images.
- Adobe RGB (1998): Adobe RGB is an alternate color profile which maps colors slightly differently than sRGB.
- ROMM RGB: A popular wide gamut profile designed specifically for photography, which supports a larger range of colors.
- Include transparency: Toggle this option on to embed transparency data in the exported image. Toggle it off to fill transparent areas with a matte color and reduce the file size.
- Compression: Choose the level of compression used by the exported file. Each provides a different balance of file size and speed.
- None / Fastest: Largest file size, fastest loading and saving.
- Large / Fast: Slightly smaller files, which load and save a bit slower than Uncompressed.
- Small / Slow: A good balance of file size and performance speed.
- Smallest / Slowest: Smallest file size, slowest loading and saving.
- Matte color: Specify the color that will be used to fill in areas of alpha transparency. Since the JPEG format does not support transparency, any transparent areas of the canvas must be filled in when exported. Click the color swatch to open a color picker and select any color of your choice.
- TIFF: TIFF is a high quality format which is popular for image editing. TIFF supports alpha channel transparency, and 8-bit, 16-bit, or 32-bit color.
- Bit depth: Select between 8-bit, 16-bit, or 32-bit (float) color for the exported image. 8-bit is the most common depth used for images, and provides acceptable quality. 16-bit stores more colors for higher quality. This will most often be visible in subtle gradients. 32-bit is able to store a much wider range of colors, and is therefore useful for storing high dynamic range images where multiple exposures have been combined.
- Color profile: Select the profile to be assigned to the exported images.
- None: No color profile is assigned.
- sRGB: sRGB is the most common color profile, and is typically used for general viewing of digital images.
- Adobe RGB (1998): Adobe RGB is an alternate color profile which maps colors slightly differently than sRGB.
- ROMM RGB: A popular wide gamut profile designed specifically for photography, which supports a larger range of colors.
- EXR: EXR saves to the OpenEXR format, the primary image format used by ILM and many major visual effects studios. It is a high quality format that is able to store HDR (high dynamic range) color information. EXR format will flatten the entire canvas to a single layer on export.
- Bit depth: Select between 16-bit (float) or 32-bit (float) color for the exported image. 16-bit (float) allows for high quality images with a large range of colors. 32-bit (float) is able to store a much wider range of colors, and is therefore useful for storing high dynamic range images where multiple exposures have been combined.
- HDR: HDR Exports to the RGBE format, an HDR (high dynamic range) format which uses Red, Green and Blue channels, plus a fourth Exponent channel.
- Matte color: Specify the color that will be used to fill in areas of alpha transparency. Since the JPEG format does not support transparency, any transparent areas of the canvas must be filled in when exported. Click the color swatch to open a color picker and select any color of your choice.
Resize
The resize controls define the size of the exported image, and how the contents of the canvas fit into the exported image.
- Resize: Select the method used to resize the canvas to create the exported image.
- None: The canvas size is used, without modification.
- Width & Height: Specify an exact width and height for the exported image. This works best for batches where all images use a single orientation (portrait or landscape).
- Width: The width of the exported image, in pixels.
- Height: The height of the exported image, in pixels.
![]() Link aspect ratio: Enable this option to retain the ratio between the width and height. When linked, editing one value automatically updates the other to retain the current aspect ratio.
Link aspect ratio: Enable this option to retain the ratio between the width and height. When linked, editing one value automatically updates the other to retain the current aspect ratio.![]() Landscape: Indicates the width is greater than the height. When disabled, clicking this button will swap the height and width values.
Landscape: Indicates the width is greater than the height. When disabled, clicking this button will swap the height and width values.![]() Portrait: Indicates the height is greater than the width. When disabled, clicking this button will swap the height and width values.
Portrait: Indicates the height is greater than the width. When disabled, clicking this button will swap the height and width values.- DPI: The number of pixels per inch in the exported image.
- Megapixels: Specify a total image resolution in megapixels. The aspect ratio of the canvas will be used.
- Percentage: Define the export size as a percentage of the canvas size.
- Long edge: Define the length, in pixels, of the longer edge of the image. This is useful for batch exports which include images in both portrait and landscape orientation.
- Short edge: Define the length, in pixels, of the shorter edge of the image. This is useful for batch exports which include images in both portrait and landscape orientation.
Need more help with this?
Don’t hesitate to contact us here.