
Configuring Imerge Pro to automatically import images as you capture them can be very useful for shooting at events, for real-time evaluation of images in a studio setting, and in other situations. For example, when shooting green-screen photography at an event, you can set up your final composite as a project, then auto-import each photo into that project as soon as it is shot, to immediately view the photo in the context of your finished composite.
In overview, this is the basic process:
- Tethering your camera. The auto-import process requires setting up a tethered camera, and configuring a Hot Folder. When you tether a camera to your computer, you will configure it so that each time you press the shutter button, the image is saved directly to your computer. Popular applications for configuring a tethered camera are Adobe Lightroom CC and Canon EOS Utility, but there are many others as well. The specific steps for setting up the tether will vary based on the specific software you are using.See the documentation for your tethering software to find detailed instructions.
- Configuring a hot folder. In Imerge, select the folder or directory where your tethered camera is saving captured images as a hot folder. When you set up a hot folder, all images currently in the folder are imported into Imerge Pro as content variations. The folder is then continuously monitored for changes, and any time images are added to or removed from the folder, the content list for the layer in Imerge is updated accordingly.
- Shoot images. Now each time you press the shutter button on your camera, the image is imported into Imerge as soon as it is saved to your hard drive. Any effects, masks, and transformations applied to the image layer are applied immediately, and the canvas updates to show you the result.
Configuring a hot folder in Imerge Pro:
Option 1: The add image layer button. ![]()

- At the top of the layer stack, click the Add image layer button
![]()
- Select Import folder. Navigate to the folder whose contents you wish to import, then click the Select Folder button.
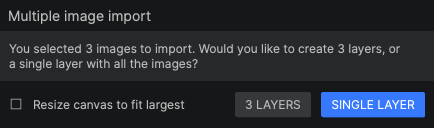
- If there are multiple images in the folder, you will see the Multiple Image dialog:
![]()
- X layers: This option imports each image in the folder into its own image layer. The number will vary based on how many images are in the folder.
- Resize canvas to fit largest: Enable this option to ensure that your images all fit within the canvas. The canvas dimensions will be resized to match the largest image in the selected folder. To leave the canvas at its current size, leave this option disabled.
- Single layer: Select this option to create a Hot Folder. All images in the selected folder will be imported into a single layer, as content variations.
- X layers: This option imports each image in the folder into its own image layer. The number will vary based on how many images are in the folder.
- If there are multiple images in the folder, you will see the Multiple Image dialog:
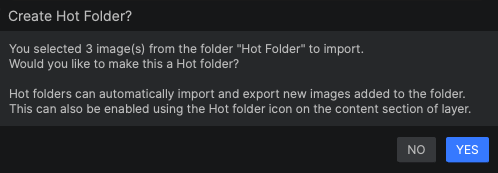
- In the Create hot folder? dialog, click Yes to enable the hot folder status for the image layer.
![]()
- When the layer is created, the hot folder icon
![]() will be enabled.
will be enabled.
![]()
Option 2: Convert an existing layer using the hot folder button ![]()
- In the layer stack, select the layer you want to convert to hot folder status.
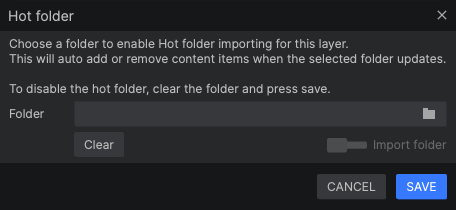
- In the content list for the layer, click the set a hot folder
![]() button.
button.
![]()
![]() Folder: Click the folder icon to navigate to the folder whose contents you want to import, or manually enter a file path.
Folder: Click the folder icon to navigate to the folder whose contents you want to import, or manually enter a file path.- Clear: Deletes the current file path from the folder property. If you wish to disable hot folder export, use this button to do so.
- Import folder: Enable this option to import all images currently in the selected folder. Leave it disabled to only import images added to the folder in the future.
- Cancel: Closes the dialog without implementing any changes to the layer status.
- Save: Stores the file path and enables the selected folder as a hot folder.
Last modified:
1 September 2021
Need more help with this?
Don’t hesitate to contact us here.