
The chroma key tool in Imerge Pro is among the best in the world for processing green screen photography. It makes stunning results almost effortless for most images, while at the same time providing intuitive yet powerful adjustments to bring even the most problematic images into line.
The interface of the chroma key effect is made up of three tabs, available at the top of the effect’s controls:
- Basic: Here is where you make the primary adjustments to your key.
- Refine Key: If you need to fine tune the results further than the Basic settings allow, this tab gives you full control over the range of colors that are removed.
- Spill Suppression: Complete tools for removing any color spill from the backdrop, and ensuring accurate color in the final image.
Each will be discussed in detail in the sections below.
Basic controls
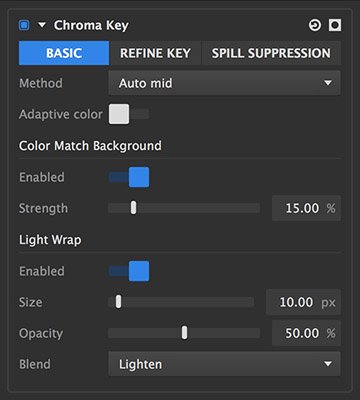
- Method: Chroma Key offers several methods for auto-selecting the color to be removed.
- Auto low: Best for darker backdrops, with low color values
- Auto mid: The default option, best for most images.
- Auto high: Better for bright or over-lit images
- Manual: Allows you to manually select the color.
- Color to remove: After selecting manual, click the pipette and drag onto your image to select the color you want to remove from the image.
- Adaptive color: This option is particularly helpful when working with uneven green screens. If your initial key leaves unwanted semi-transparent areas where the green screen was, try enabling the adaptive color to see if it improves things.
Color match background
- Enabled: Enabling this option auto-adjusts the colors in your subject, to match the colors of the image below and improve the realism of your composite.
- Strength: Changes the intensity of the color match adjustment.
Light wrap
- Enabled: Enabling light wrap will alter the edges of the result of your key, based on the colors present in the background. Specifically in cases where the background is bright, this creates a more realistic result, but light wrap is also useful in various other situations.
- Size: Defines the width, in pixels, of the swath of the edge that will be affected.
- Opacity: Sets the opacity of the light wrap effect. Increase the value for a more powerful effect.
- Blend: Select the blend mode used to combine the light wrap with the keyed image. See blend modes for more information.
Refine key controls

- View: While refining the key, it can be useful to switch between different views to ensure accurate results.
- Status: Status view shows all transparent pixels as black, all opaque pixels as white, and all semitransparent pixels as a single shade of gray. This makes it very easy to see exactly what areas in your image are completely removed, or are only semi-transparent.
- Matte: Matte view maps the full range of transparency to a full range of greyscale values. White represents complete opacity, and black represents complete transparency. The more transparent an area is, the darker it appears in the matte view.
- Result: Displays the actual image resulting from the key, in full color.
Key color selection
- Color selection spectrum: This spectrum provides a direct visual reference to what color range is currently being removed. The process of keying is, at its core, nothing more than selecting a specific range of colors to be removed from your image. You want to remove the smallest range of colors possible that still allows you to remove the entire background. As you adjust the key settings, the spectrum will dynamically update to reflect the current selection.
- Sensitivity: Set the distance from the basic key color that will be removed. If areas of your green screen are not being removed, try increasing the sensitivity.
- Hue range: Expands the key selection to hues adjacent to the basic color selection. In the case of a green screen, this means some yellow and cyan tones can also be removed along with the green.
- Shift to primary: Slides the selection horizontally through the spectrum, to alter the colors that are removed.
- White point: If your source image has a color cast, setting the white point allows Imerge Pro to compensate for the color shift. Click the pipette and drag onto your image to select a pixel which should be white or neutral grey.
Matte adjustments
- Gamma: Adjusts the transition between hues that are unaffected and tones that are completely removed. Negative values increase the range of color that is completely removed. Positive values reduce the range of colors that are removed, allowing for a more precise key
- Clip background: Quickly removes areas from your background that remain after keying, to clean up the key. Increasing this setting pushes areas that are slightly semi-transparent into complete transparency.
- Clip foreground: Quickly restores areas in your subject that are partially removed by the key. Decreasing this setting pushes areas that are slightly transparent into complete opacity.
Edges
- Subtract color: Desaturates the basic key color at the edges of the image. Useful for restoring edge detail in some cases.
- Recover color: Samples color from slightly inside the edge of the subject, and uses that color to replace the edge pixels. If your image has a thin dark edge after keying, this can help to remove the outline. Recover color should always be used at the lowest setting that serves the purpose, as higher values will visually impact the image.
- Smoothing: Eliminates roughness along the edge, to create a smoother, flowing line. This is often useful for product photography, but can remove details that you want to keep on human subjects.
Spill suppression controls

- Enabled: Color spill occurs when light is reflected off of the backdrop and onto your subject, resulting in an unwanted color cast. Enabling this option removes the unwanted color spill from your image.
- Amount: Sets the intensity of the spill suppression.
Despill area
- Show: Enable this option to view a greyscale map of the ares that will be affected by spill suppression. Black areas are unaffected, and other areas are more powerfully affected the lighter they are. Adjust the settings below until only the areas that contain spill are white.
- Hue range: Defines the range of colors affected by the spill suppression. This should be set to the lowest setting that still handles the spill.
- Hue shift: Adjusts the hue affected by the spill suppression, through the color spectrum. The default 0 value is the basic key color selected for removal.
- Hue offset: Offsets the color of the source image prior to applying the spill suppression. This can be useful for images that contain a color cast.. for example, if your green screen image has an overall green cast, the offset can help limit the spill to only affecting the green screen areas, rather than the entire image.
Replacement
- Type: The spill color found within the spill area is removed by replacing it with another color. Select the type of replacement you wish to use from this menu.
- Background: Uses colors from the background layer to replace the spill color. This powerful option allows for different spill replacement colors in different areas of the image, based on what colors are in the background. If you have the despill area set too large, so it affects substantial areas of your subject, then it might appear that the background is showing through those areas. To correct this, adjust the despill map settings to limit the despill to only the areas where it should be applied.
- Color: Replaces the spill color with a specific color of your choice. A common option is to neutralize the spill by replacing it with neutral gray. For problematic hair detail, it is sometimes effective to sample a color from the air to use for replacement.
- Color: When the type is set to color, this option appears. Click the swatch to open a color picker and chose any color.
- Blur background: When the type is set to background, this option softens the background detail before the color is applied to the spill areas.
- Luminance change: Adjusts the brightness of the replacement color, which can sometimes help with realism.
Last modified:
2 November 2018
Need more help with this?
Don’t hesitate to contact us here.