
An instant way to get perfect Star Wars and Flash Gordon-style openings, complete with separate sections for the teaser, main title and the crawl itself.
The text is entered into the Teaser, Movie Title, Episode Number, Episode Title and Text Crawl properties. Clicking the font ‘A’ symbol opens a new window for editing the Movie Title and Text Crawl text.
The formatting and animation of the teaser, movie title and text crawl can be adjusted in separate property groups, with the text reflowing automatically to suit the classic pulp look.

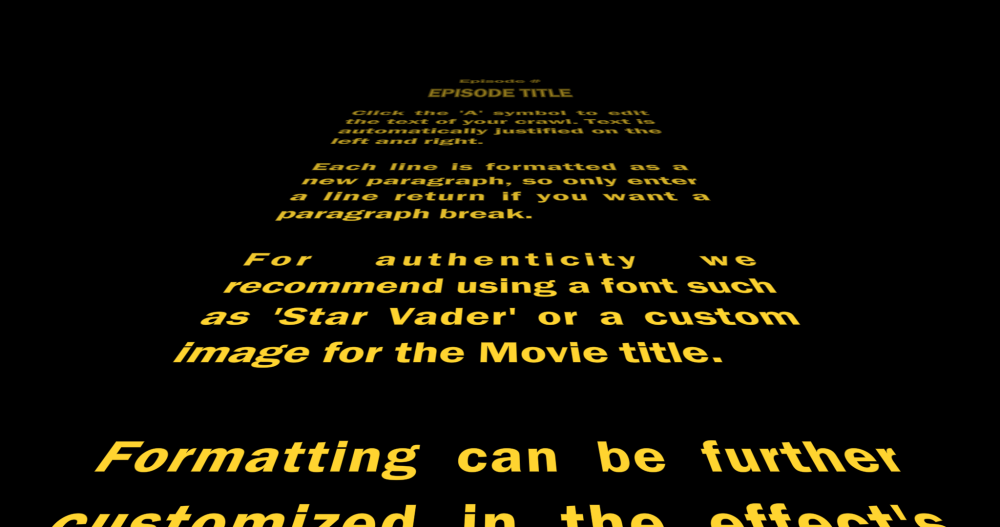
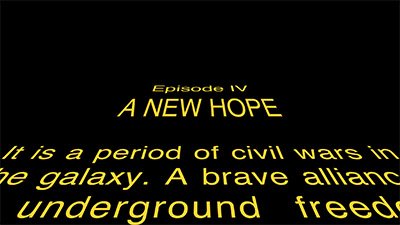
The Pulp Sci-Fi Title Crawl creates a series of elements which are displayed sequentially. On the left is the Teaser, followed by the Movie Title, and then the main Text Crawl, which includes the Episode Number, Episode Title, and Story.
The Movie Title can also be switched to use an image instead of text. This can be useful for creating a more authentic appearance when recreating movie logos, or for creating titles that incorporate graphic elements.
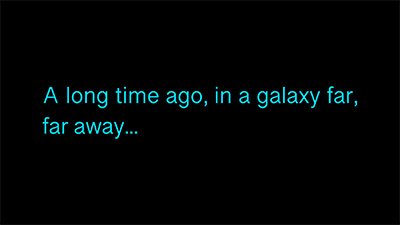
- Teaser: A stationary title, which is the first element shown. Think, “A long time ago, in a galaxy far, far away…“Enter the text you wish to use directly into the text box to the right of the property name.
- Movie Title: The title of your film. Click the A icon to open the text box where you can enter your movie title. The separate text box allows you to easily enter line breaks and see what each line will contain.
- Episode Number: The first line of the text crawl, typically used to display the episode number. Leave the text field blank to remove this element. Enter the text you wish to use directly into the text box to the right of the property name.
- Episode Title: The second line of the text crawl, typically use4d to display the specific name of this episode. Leave the text field blank to remove this element. Enter the text you wish to use directly into the text box to the right of the property name.
- Text Crawl: The main body of the text crawl. Click the A icon to open the text box where you can enter your text crawl. The separate text box allows you to easily enter line breaks and separate paragraphs, and preview the text layout while editing its contents.
Teaser
Use these controls to adjust the appearance and timing of the Teaser element.
Appearance:
- Color: Select a color for the Teaser element. You can use the eyedropper to choose a color from the layer, or click the swatch to open a color picker and choose any color you prefer. You can also manually enter the color values for the red, green, and blue channels.
- Font: Choose a font for the Teaser element. All fonts currently installed on your system, will be available in this menu.
- Style: Select a style for the currently selected font. Some options may not work, depending on what styles are installed for the current font.
- Font Size: Adjust the size of the font.
- Word-wrap Width: Set the width at which text will be wrapped to a new line, as a percentage of the total frame width.
- Line Spacing: Adjusts the distance between lines, when text is wrapped to a new line. This setting has no effect if the text fits on a single line.
Animation
- Duration: Sets the overall duration of the Teaser element, in seconds.
- Fade In: At the start of the effect, the Teaser fades in. Use this control to adjust the timing of the fade in, as a percentage of the total duration.
- Fade Out: At the end of the teaser duration, the Teaser fades out. Use this control to adjust the timing of the fade out, as a percentage of the total duration.
- End Time Gap: Set the gap between the Teaser and the Movie Title. This gap occurs after the Duration set above.
Movie Title

Use these controls to adjust the appearance and timing of the Movie Title element.
- Use: Choose whether the Movie Title element will use text or a layer.
- Text: When this option is selected, the Movie Title property above will be used to define the contents fo this element.
- Layer: When this option is selected, you can choose any other layer on the timeline to use its contents as the Movie Title element.
Appearance:
- Color: Select a color for the Movie Title element. You can use the eyedropper to choose a color from the layer, or click the swatch to open a color picker and choose any color you prefer. You can also manually enter the color values for the red, green, and blue channels.
- Font: Choose a font for the Movie Title element. All fonts currently installed on your system, will be available in this menu.
- Style: Select a style for the currently selected font. Some options may not work, depending on what styles are installed for the current font.
- Font Size: Adjust the size of the font.
- Line Spacing: Adjusts the distance between lines, when text is wrapped to a new line. This setting has no effect if the text fits on a single line.
- Outline: Creates an outline of the text, which allows you to use fonts that are not an outline already. When this property is set to 0.0%, the original font will be displayed. When the value is increased, the font is filled with black, and an outline is created using the color chosen above.
Animation
- Duration: Sets the overall duration of the Movie Title element, in seconds.
- Start Distance: Adjusts the distance from the camera to the Movie Title element when it first appears. Lower values make it appear closer to the camera.
- End Distance: Adjusts the distance from the camera to the Movie Title element when it disappears. Lower values make it appear closer to the camera.
- Fade Out: As the Movie Title recedes into the distance, it fades out at the end of its duration. Use this control to adjust the timing of the fade out, as a percentage of the total duration.
- Text Crawl Overlap: Adjust the overlap between the Movie Title and the Text Crawl elements. Higher values increase the amount of time for which both elements are visible simultaneously.
Text Crawl
Use these controls to adjust the appearance and timing of the Text Crawl elements. There are three elements which combine to make the crawl: the Episode Number, the Episode Title, and the Story. The Appearance controls affect all three elements, to retain consistent styling among them. Additional controls are available for each element, to customize its appearance further.
Appearance:
- Color: Select a color for the Teaser element. You can use the eyedropper to choose a color from the layer, or click the swatch to open a color picker and choose any color you prefer. You can also manually enter the color values for the red, green, and blue channels.
- Font: Choose a font for the Teaser element. All fonts currently installed on your system, will be available in this menu.
- Style: Select a style for the currently selected font. Some options may not work, depending on what styles are installed for the current font.
- Font Size: Adjust the size of the font.
- Angle: Adjusts the angle at which the text appears to recede from the camera.
- Word-wrap Width: Set the width at which text will be wrapped to a new line, as a percentage of the total frame width.
- Episode Number: Fine tune the layout of the Episode Number element.
- Stretch: Changes the height of the Episode Number element, without altering its width. Values above 100% increase the height.
- Line Spacing: Changes the size of the gap between the Episode Number and the Episode Title below it.
- Episode Title: Fine tune the layout of the Episode Title element.
- Font Scale: Adjusts the size of the Episode Title text.
- Stretch: Changes the height of the Episode Title element, without altering its width. Values above 100% increase the height.
- Line Spacing: Changes the size of the gap between the Episode Title and the Story below it.
- Story: Fine tune the layout of the Story element which makes up the bulk of the Text Crawl.
- Stretch: Changes the height of the Story element, without altering its width. Values above 100% increase the height.
- Line Spacing: Changes the size of the gap between lines of text within the Story element.
- Paragraph Spacing: Defines the amount of space created between paragraphs, when there is a line break in the text.
- Character/Word Justification: Controls whether justification is applied to individual characters, to words, or to both. At 0.0%, each character is repositioned to justify each line. At 100.0%, the spacing within each word remains unchanged, and entire words are repositioned to create the justification.
- Justify Last Story Line: When enabled, the final line of the story will be justified to fill the word-wrap width. When disabled, the final line will not be justified, but will display as a partial line.
Animation
- Speed: Sets the rate at which the Text Crawl scrolls past the camera. The speed selected here and the duration of the layer to which the Pulp Sci-fi Title Crawl is applied can both be adjusted to ensure the entire effect is visible.
- Fade Start: Select the point in the total duration of the Text Crawl at which it will start to fade out.
- Fade End: Select the point in the total duration of the Text Crawl at which its fade out will be completed.