
The Control bar contains buttons for commonly used commands and functions. Each is explained in detail below.

Open ![]()
The Open button allows you to open previously saved projects. They can be stored anywhere on your computer or network, and accessed by clicking this button and navigating to their location.
Save ![]()
Projects can be saved with this button. The first time you Save a project, you will be asked to select a location and name for the file. Subsequent saves will update the file in the previously selected location.
Action Pro Settings ![]()
There are a number of settings you can modify that will affect behavior of the software globally, regardless of what project you are working in. Click the Settings icon in the top toolbar to open the Action Pro Settings dialog:
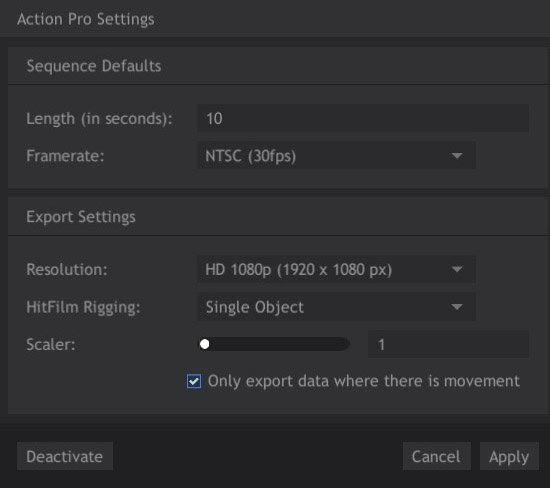
Sequence Defaults
- Length (in seconds): Determines the default duration applied to each Sequence when it is created.
- Framerate: The movement recorded by Action Pro is frame independent, but to be used in video editing programs it needs to be converted to frames on export. This setting defines the default frame rate that will be used for each sequence wen it is created. Regardless of the setting used here, you can edit the Framerate of individual Animations later, through their properties.
Export Settings
- Resolution: The movement recorded in Action Pro is resolution independent, and needs to be scaled to fit into the video project you intend to use it in. This setting defines the default resolution that will be used when exporting the file. Regardless of the setting used here, you can edit the Resolution of individual Animations later, through their properties.
- HitFilm Rigging: Use this menu to chose how the motion will be rigged for use in HitFilm.There are two rigging options.
- Single Object: Stores all the motion in a single point, which controls movement on the X, Y and Z axes. This is the simplest option in many cases, as you have all the movement in one layer.
- Multiple Parented Objects: This option separates the X, Y and Z movement into individual points, so they can be manipulated or controlled separately in your video editor. A slightly more complicated setup gives you a finer degree of control over editing the movement later on.
- Scaler: Adjusts the overall size of the area covered by your movement, within the export resolution. In most cases, a setting of 0.1 is best for exporting to HitFilm.
- Only Export data where there is movement: Enabling this toggle will export only the section of the timeline that contains movement, so if any extraneous frames at the start or end, before or after the movement, will automatically be trimmed.
General
- Deactivate/Activate: Provides access to the activation information for the software. If the software is not yet activated, the Activate button will appear here, and allow you to enter your license information. If the software is already activated, you can use the Deactivate button to deactivate the license, if you need to move the software to a different computer or re-install.
- Cancel: Closes the Settings dialog without applying any changes made to the settings while it was open.
- Apply: Saves the changes made within the settings dialog, and closes the dialog.
Undo/Redo ![]()
![]()
You have probably used these commands in the past, in other applications. Undo removes the effects of your most recent action. You can press this button repeatedly to move backward through your Undo History. Redo restores the results of these actions after they have been undone.
Select Background Image ![]()
You can select an image to place within the Canvas area of the interface, behind your motion path. Using a frame of the video file or project that you want to import the motion path into can be very helpful for positioning and scaling the motion path.
- Click the Background Image… button.
![]()
- In the file browser window that opens, navigate to the image file that you wish to import and select it.
- Click Open to import the image into Action Pro, and it will appear in the Viewer area.
- Adjust the Viewer scale and position to get the view you desire.
Clear Background Image ![]()
Click this button to remove the current background image from the Viewer.
Camera Angle Menu ![]()
The Camera Angle menu is the primary control for adjusting your 3D view. The menu contains multiple options for your camera placement, which can be divided into two categories: Free View, which allows you full control over positioning of the camera, and Orthographic views, which includes all the other options that let you quickly access any specific side of the 3D environment.
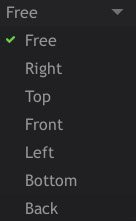
- Free: Allows you to move the camera about freely to view your paths from any angle. There are specific controls that you can use to control the camera, depending on how you want the camera to move.
- Orthographic Views (Right, Top, Front, Left, Bottom, Back): Orthographic views represent the 3D environment from a direct-on 2-dimensional view, without any perspective being applied. The lack of perspective prevents distortion, so that the relative size and position of different points on the object, or different parts of the object, can be accurately understood.
Moving the camera.
The cameras position and angle can be edited in any view, to control what area is visible. Orthographic views can be Translated and Trucked, but not Panned.
- Right-click-drag to move the camera up, down, left or right. This is known as Translating the camera.
- CTRL+Right-click-drag to rotate the camera. This leaves the camera in its current position and simply rotates it, giving the same result as moving a tripod head with the camera attached. This is called Panning. You can pan around in any direction, but the camera’s actual position doesn’t change. Orthographic views cannot be panned.
- Rolling the Mouse Wheel slides the camera forward or backward, depending on the direction you roll the wheel. This type of movement is known as Trucking the camera.
Reset Camera ![]()
This button resets the currently selected camera to its default position and angle.