
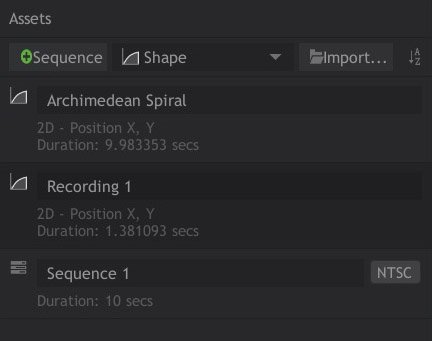
The Assets panel is where you store all of the components that you work with in Action Pro. It is similar to the Media panel or Media bin in a video editor, only instead of video and audio files, it stores assets used to contain and process motion paths, including Recordings and Sequences.
Controls
The top of the Assets panel contains several buttons and controls.
![]() The New Sequence button creates a new sequence, using the Default settings currently selected in the Application Settings. The settings of the sequence can be edited after its creation by right-clicking the sequence and selecting Properties from the menu that opens.
The New Sequence button creates a new sequence, using the Default settings currently selected in the Application Settings. The settings of the sequence can be edited after its creation by right-clicking the sequence and selecting Properties from the menu that opens.![]() The Shape Menu gives you access to specific predefined shapes. Select any shape from the menu to create a recording containing a path in that specific shape.
The Shape Menu gives you access to specific predefined shapes. Select any shape from the menu to create a recording containing a path in that specific shape.
- Circle: Creates a simple circle.
- Sine Curve: Creates a sine wave, or a line which curves back and forth at regular intervals and a fixed amplitude.
- Archimedean Spiral: Creates a spiral emanating from a central point and expanding at a constant angular velocity.
![]() The Import button enables you to select Recordings that have been saved out of other projects, and import them into your current project.
The Import button enables you to select Recordings that have been saved out of other projects, and import them into your current project.![]() You can change what Sorting is used within the Asset panel. Toggling this button changes the order of the list between alphabetical and reverse alphabetical order.
You can change what Sorting is used within the Asset panel. Toggling this button changes the order of the list between alphabetical and reverse alphabetical order.
Types of Assets
There are two types of Assets you will work with in Action Pro:
- Recordings
- Sequences
The purpose, features, and other details of each are discussed below.
Sequences ![]()

Sequences are timelines, where you can sequence, edit and combine recordings. You can create as many Sequences in a project as you wish. By default they are named sequentially (Sequence 1, Sequence 2, etc.), but you can click on the name of any sequence to rename it if you wish. If you are working with multiple sequences within a project, it is advisable to rename them logically as you create them, so you can easily identify the contents of each sequence by its name.
You can edit the settings of any sequence by right-clicking the sequence and choosing Properties from the menu.
Sequence Settings
The Sequence Settings allow you to view and edit properties of the individual sequence file. The default values for these properties are set in the main Application Settings window, but if you want to change the settings for a single animation file, you can do so here.
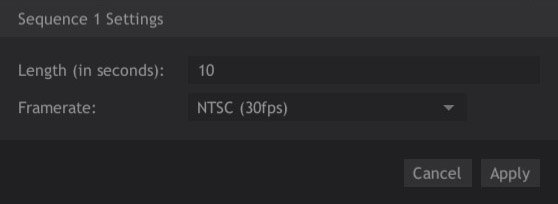
- Length (in seconds): Sets the overall length of the Animation in seconds.
- Framerate: The movement recorded by Action Pro is frame independent, but to be used in video editing programs it needs to be converted to frames on export. Framerate defines the frame rate that will be used to generate the keyframes in the exported file.
Recordings ![]()

Recordings are individual motion paths which can be added into Sequences. Each path you create in Action Pro, regardless of the input device used to create it, is a Recording. By default recordings are named sequentially (Recording 1, Recording 2, etc.) but you can rename any recording by clicking on its name and typing in a new one. It is advisable to rename recordings as you create them, so you can easily identify each one in the Asset Panel at a glance.
Organization
You can control how the assets are organized within the Asset Panel, to ensure you can easily find everything you need within your project.
Sorting ![]()
Toggling this button in the control bar at the top of the panel changes the order of the list, between alphabetical and reverse alphabetical order.
Renaming Assets
You can rename any Sequence or Recording by clicking on its name, and typing in the new name you wish to use.
Deleting Assets
Any Sequence or Recording contained in the Assets panel can be deleted by clicking on the asset to select it, then pressing Delete on your keyboard. You can also right-click any asset and select Delete from the contextual menu to remove it.
Exporting
To use the data you record and edit in Action Pro, you need to Export it to a format that can be used by external software. At present, Export is only available to HitFilm but more formats and support for other programs will be added as development of the software continues.
Exporting a Sequence for use in HitFilm
- Right-click the sequence in the Asset panel, and select Save as HitFilm Composite Shot…
- In the dialog that opens, enter a name and location for the saved file.
- Click Save to export the file.
- For details on using the exported file in HitFilm, see Using Your Animation in External Software.
Exporting a Recording for use in other Action Pro projects
- Right-click the recording in the Asset panel, and select Export Recording…
- In the dialog that opens, enter a name and location for the saved file.
- Click Save to export the file.
- The Import button at the top of the Asset Panel can now be used to import the file you just created into any project.