
Before you begin…
While adding a printer, you may need to upload its driver to the Celiveo database. The Add Printer wizard launches the Discovery Agent to enable you to import the driver from the workstation you are running the wizard on. So before you start, make sure that the workstation you are working on has all the required printer drivers installed on it.
Note: Celiveo cannot import class drivers, so ensure that the drivers installed on the workstation is not a class drivers.
Stage 1: Start Add Printer Wizard
- At the Main menu
![]() , click Display Printers.
, click Display Printers. - At the Printer menu, click
![]() .
. - At the Add Printer menu, click
![]() . The Add Printer dialog displays.
. The Add Printer dialog displays.
Stage 2: Specify Printers
You can specify IP addresses of printers, by directly entering them to the Web Admin, or importing them from a comma separated values (CSV) file.
2.1 Specify Printers by IP Address or Hostname
![]()
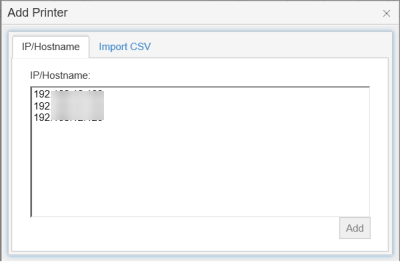
- At [IP/Hostname], enter the IP address or host names of the printers.
- Click [Add].
- When prompted to start the Discovery Agent, click [Open].
Note: If the Discovery Agent has not been installed earlier, the system downloads the installer and prompts you to install the Discovery Agent. Once installed, the Discovery Agent starts.
2.2 Specify Printers by Importing their IP Addresses from a CSV File
![]()
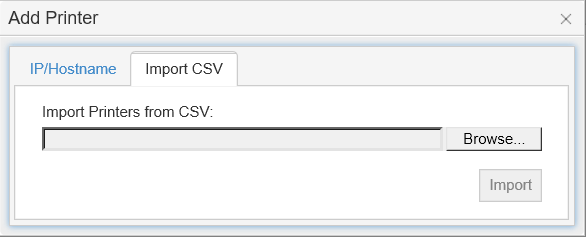
- Click the [Import CSV] tab.
- Click [Browse].
- Select the CSV file to upload and click [Open].
- Click [Import].
- When prompted to start the Discovery Agent, click [Open].
Note: If the Discovery Agent has not been installed earlier, the system downloads the installer and prompts you to install the Discovery Agent. Once installed, the Discovery Agent starts.
Stage 3: Select Printers
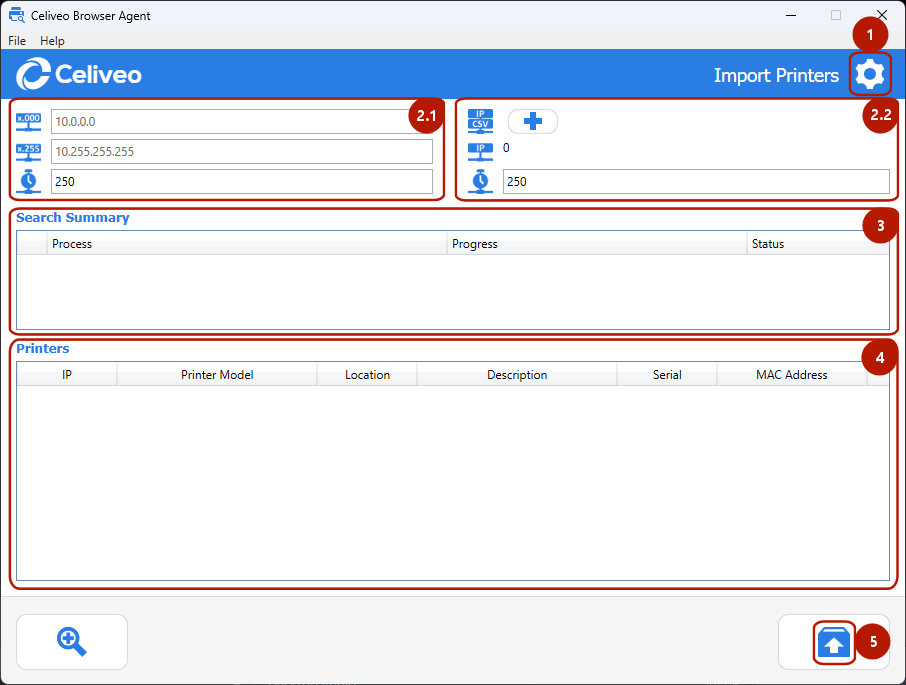
The Discovery Agent validates the IP Addresses / Hostnames you provided. If any of them are not reachable, a message is displayed to inform you what IP Addresses / Hostnames are invalid.
Note: Validation is performed by executing an SNMP query. To change the SNMP settings, click on the ![]() settings icon.
settings icon.
- From the list of valid printers, select the printers you want to add.
- Click
![]() at the bottom-right.
at the bottom-right.
You are returned to the Add Printer wizard. - Click [Next].
Stage 4: Configure Printer Specific Information
The next stage displays a tabbed dialog box, where each printer type has a separate tab. Repeat the instructions below for each tab.
Stage: 4.1: Basic Information
- Ensure that the [Celiveo Print Direct] check box is selected.
- If the printer you are adding is an HP printer, and a PJL password had been set in the HP Embedded Web Services, in the [PJL Password] box, specify the password.
Stage 4.2: Specify Driver
Typically, when you import printers from a Print Server, it imports the required drivers and default preferences as well. However, if you add printers by scanning IP addresses, you must import the printer drivers from the workstation you are running the Add Printer wizard from.
From the [Driver + Settings] drop-down, select a printer driver.
If the driver that matches the printer is not on the list:
- Click the [+] icon adjacent to the [Driver + Settings] drop-down . The Discovery Agent displays.
- In the area marked 1, click on the
![]() Search icon. The search results are displayed in the area marked 3.
Search icon. The search results are displayed in the area marked 3. - Select the driver to use.
- Click
![]() at the bottom-right (see 4 in illustration above).
at the bottom-right (see 4 in illustration above). - From the [Driver + Settings] drop-down, select the printer driver you just added.
You are returned to the Add Printer wizard.
Stage 4.3: Specify Celiveo Version
The Celiveo Version refers to the Celiveo firmware that runs on a printer or Celiveo Smart Appliance agent (CSA). Typically, the CSA agent comes pre-loaded with the correct firmware. However, if you are adding a printer that does not require a CSA (for example, a HP FutureSmart printer or Ricoh Android SOP 2.x printer) you must explicitly upload the Celiveo Version.
If the printer you are adding requires a CSA:
At [Celiveo Version], select [Keep Existing Settings].
If the printer you are adding does not require a CSA:
- Click the [+] icon adjacent to the [Celiveo Version] drop-down. The Add Celiveo Version dialog displays.
- Click [Select Files].
- Pick the .mc /.mh /*.bmc /*.mr file provided for the printer.
Note: If not already provided, you can download the Celiveo Version files from the Downloads section.
Stage 4.4 (Optional) Enter Comments
Enter any information for reference later. You can also use this field to define a reference code and opt to include it in the tracking information for Print-Direct printers.
To do so:
In the Printer Settings, enter a reference code in the Comments section and enable the > TGS checkbox.

Stage 5: Finalize
- Set up Access
- The remaining steps on the Add Printer wizard can be specified later, and not essential for Celiveo to be functional. For the purpose of this tutorial, we will skip these steps.
- Click [Next] until you arrive to the Save Confirmation dialog.
- Click [Save].
Post your comment on this topic.