Overview
This section will cover working with the Squawks and Corrective Actions of a job. In many cases, a squawk refers to a Deficiency, a Malfunction, or a Defect that would need to be corrected (fix short in a handset). In AMI, squawks can also represent Tasks for a job (install autopilot).

From the Squawks/CA tab, you can add more squawks, corrective actions, label the repair type, log labor, and log on-the-job (OTJ) training hours. When the job has been initially created, the AMI system will automatically create Squawk ID: 001 with Job Description, set the Maintenance Record to Airframe, and fill the Est. Hrs with the total amount of the Hours Estimate for that job or task.
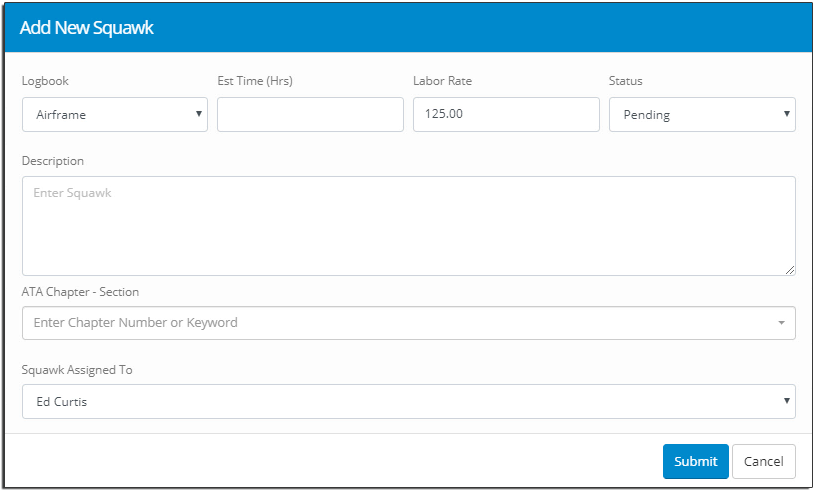
Add a New Squawk

If the squawk is something that your shop has previously performed in the AMI system, select the Add New Squawk from Library – this will open a search window. Type in the squawk description and press the Seach icon.

Once you have identified the job, press the Plus button 
Squawk Card
Each squawk (Squawk 001, Squawk 002, etc.) will be displayed on a Card. Click the Collapse Card icon to expand or collapse the card. The top of each Card will display the Squawk Number, Squawk, Description, and the Status of the squawk.
Use the following fields to edit the squawk:
- Maintenance Record – This field determines which Logbook Entry the corrective actions of the squawk will be populated too.
- Est. Hrs – This is an editable field that is used for the Estimated Hours of this squawk only.
- Labor Rate – This field is populated by default with the labor rate set in the Rates & Fees section. This is an editable field that can be changed and will reflect on the Customer Documents for the job.
- Status – This field refers to the staus of the squawk. See Squawk Definitions below.
- Description – This is an editable field for the description of the squawk.
- Corrective Action – This is an editable field for the corrective action of the squawk. The information ented in this field will be used to populate maintenance records for logbook entries Form 337’s.
- Technician Internal Notes – This field allows technicians to add any useful notes about the squawk (for example, technician progress notes or problems encountered). These internal notes are only displayed here on the squawk card and on the shop Work Order Traveler. They do not display on Customer Documents.
- Inspection Notes – When a squawk has been dispositioned to the Inspection Required status, this field will appear on the squawk card. Only an AMI user with “inspection permissions” is able to edit this field (see User Permissions).
Squawk Assigned To – This is a drop-down field listing your AMI users. This field can be left blank. The name of the Assigned To will also be displayed in the Time Clock List page. - Repair Type – This is a drop-down field listing the types of “repair” for the squawk. For repair type “Major 337”, the corrective actions will be automatically populated to the Form 337.
- ATA Chapter Section – This is an input field for ATA Chapter Code. Enter in the chapter, and subchapter number to assign a chapter code to the squawk. All technicians who log time against the squawk will accrue hours for that particular ATA Chapter Code. This can be used for OTJ training record-keeping purposes.
The Log Labor Hours, Hrs, and Work Date fields are used for manually logging labor hours to a squawk. Select the employee name from the drop-down menu, enter the number of hours to be added, then select the date the hours will be logged against. Press the blue Save button to save any change to the squawk. The Tot Hrs field will display the summation of all hours logged to that squawk.
To delete the squawk, press the red Delete button.
Status Definitions:
- Pending – The Squawk has not been started yet.
- Open – The Squawk has been started and the Actual Start Date has been entered.
- Inspection Required – The Squawk has reached a state where an Inspection must be performed. No further work can be performed and the squawk cannot be dispositioned as Completed until the inspection has been performed.
- On Hold – The Squawk is Open but might be awaiting parts or customer approval.
- Completed – Squawk work has been finished, however, there is possibly final paperwork that needs to be completed such as filing a Form 337.
- Closed – The Squawk has been completed, and all final paperwork has been submitted.
Inspection Required Status For Squawks
This status is for squawks that have been completed and need to be inspected before moving to Completed or Closed. Once statused as “Inspection Required”, users must possess inspection permissions to proceed. Go to User Permissions and change the Inspection Authorized to Allow or Denied.
When the squawk is moved to Inspection Required, a drop-down menu will appear with the names of all users who have Inspection Authorized privileges. Select a user and press the blue Save at the bottom of the squawk card. This will send an email to the selected user, informing them that the squawk is ready for inspection.
Once the squawk has been inspected, the inspector can add any Inspection Notes and change the status. Press the blue Save Inspection button to commit your changes.


Post your comment on this topic.