
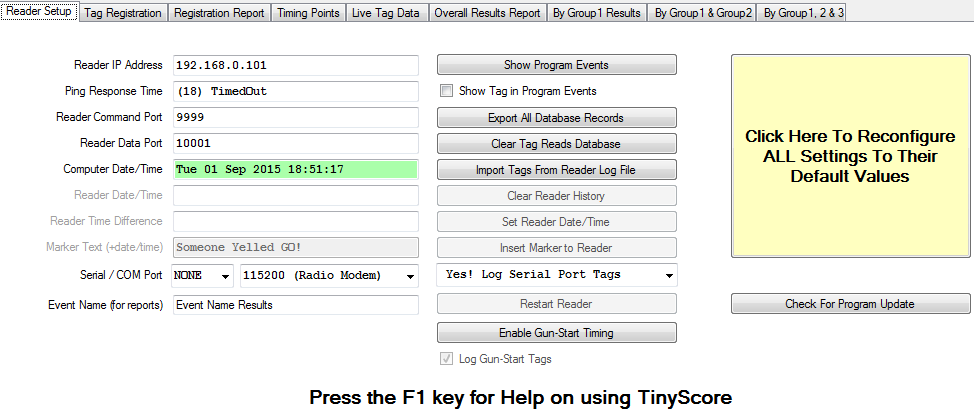
This screen looks a little complicated but don’t worry about it too much as the default settings will allow communication between the TimeMachine reader and your computer via an Ethernet cable, or Wi-Fi connection. If any of the information boxes have a RED background, you are unlikely to be connected to the reader. A GREEN background indicates that particular setting is OK.
Most functionality in this screen requires connection to the reader via Ethernet cable or Wi-Fi. Some of the functions on this screen will be greyed out (disabled) if TinyScore is not connected to the readers “Command Port”, like when you are only using a Serial Port connection.
If you have changed a setting and you can no longer receive tag reads from the reader, feel free to use the “Click Here To Reconfigure All Settings To Their Default Values” button, and it will do as it says! TinyScore program will be closed and restarted, but now with the default reader communication settings.
Reader IP Address:
The reader’s default IP address is 192.168.0.101 and your computer will likely be automatically assigned the next available IP address of 192.168.0.102. Just make sure your computers network adapter TCP/IP settings are set to “Obtain IP Address Automatically” which they are unless you had previously modified these settings.
Ping Response Time:
TinyScore will continually send out network tests to the reader every second or so and display the response time. If TinyScore does not see a response from the reader for more than 10 seconds, it will consider the network connection as failed and therefore automatically disconnect from the reader until it sees successful network ping tests. You cannot modify this information as it is populated automatically.
Reader Command Port:
The reader command port is used to send and receive configuration commands to the reader. You will normally leave this set to the default setting 9999.
Reader Data Port:
The reader data port is used to receive tag read messages from the reader. You will normally leave this set to the default setting 10001 to receive “filtered” tag read messages. If required, you can change this to 10000 to look at the “raw” tag read messages to view every single tag read but this is usually not required and sends a large amount of irrelevant information.
Computer Date/Time:
Pretty self-explanatory… This shows your computers current date & time. You cannot modify this information as it is populated automatically.
Reader Date/Time:
The reader’s date & time is retrieved approximately every second and displayed here. The reader time is only available when connecting to the reader using Ethernet cable / Wi-Fi and the readers’ IP Address & Command Port are valid. The reader time is unavailable when connecting using a serial port (eg. USB Radio Modem adapter). You cannot modify this information as it is populated automatically.
Reader Time Difference:
Displays the difference between your computer’s time and the reader’s time. If it’s more that 2 seconds difference then it will be highlighted with a RED background. Use the adjacent “Set Reader Date/Time” button to synchronize the reader to your computer’s time. You cannot modify this information as it is populated automatically.
Marker Text:
This function can be used to insert a timestamp, and text from the “Marker Text” field, into the reader’s tag logging file stored on its internal micro SD card. You can enter text here which is written to the reader’s internal tag logging file when you click the adjacent “Insert Marker” button.
Serial/COM Port:
This allows TinyScore to receive tag read messages from the reader’s Radio Modem using the Trident USB Radio Modem adapter. It can also be used to receive tag read messages from the Trident USB Registration Reader adapter. Just plug in the required USB adapter, load Windows drivers if required, and select the detected COM port in TinyScore. Also select the appropriate speed in the adjacent box – A Trident USB Radio Modem uses a speed of 115200 baud, a Trident USB Registration Reader uses a speed of 9600 baud so set this to match the device you are using. You will likely want to log tag reads to the TinyScore database so also ensure the adjacent “Yes! Log Serial Port Tags” is selected. If you just want to use the serial port communication for automatic tag registration into the “Tag Registration” database, select “Don’t Log Serial Port Tags” and they won’t be logged as “Tag Reads”.
Important notes on using serial port communication follow:
- If you are ONLY using the USB Radio Modem adapter to communicate with the reader, set the “Reader IP Address” to your computers loopback address of 127.0.0.1 so TinyScore’s Ethernet connectivity tests will have something to talk to.
- If you are not using either of these USB serial port devices, set the COM port to “NONE” and TinyScore won’t nag you about serial port connection problems.
- Currently you cannot send any commands to the reader via a serial port connection, and these options and buttons will be greyed out. The serial port connection can only be used to receive tag read data into your computer. This means TinyScore won’t be able to check/set the reader date & time (and most other functions) via serial port connection – Commands can only be sent using the reader’s IP Address and Command Port over Ethernet / Wi-Fi connection.
Event Name (for reports):
The text entered here is displayed at the top of the Results Report screens. Use this to customise the report titles.
Show Program Events:
Opens a background window showing progress of some of the TinyScore background processes. This can be used to diagnose why you are not communicating with the reader, or not receiving tag reads.
Export All Database Records:
Opens a report showing all logged tag reads in the TinyScore database. You can export this data to a spreadsheet for customised reporting, or to save the event tag reads so you can look at them after clearing logged tag reads from TinyScore’s tag read database.
Clear Tag Reads Database:
Deletes logged tag reads from the TinyScore database. This may be useful to clear out your “test” tag reads before actually timing an event. This does NOT delete Tag Registration or Timing Points information.
Import Tags From Reader Log File:
This can be used to retrieve tag data directly from the reader’s internal logging files, which you may find useful if your computer stopped communicating with the reader while timing an event. Just connect the reader to your computer using the microUSB cable, browse for the readers’ detected “Removable Disk” drive and click OK to start the import. Any tags not already in the TinyScore database will be imported, any duplicates will be ignored.
Clear Reader History:
Clears all tags reads from the reader’s internal logging file, stored on the readers internal microSD card.
Restart Reader:
Sends a “restart” command to the reader. This causes the reader to restart as if you had just turned it on, the mats will be automatically retuned etc. and TinyScore will automatically reconnect as soon as the reader has completed its restart procedure.
Enable Gun-Start Timing
Enabling Gun-Start Timing mode changes the way tag reads are time-stamped. Basically a “stopwatch” is started at 00:00:00 when TinyScore receives an External Trigger (Gun-Start) message from the reader and all subsequent tag reads are logged using this “stopwatch” time as the tag read timestamp (as opposed to using the current date & time from the reader’s tag read message when Gun-Start mode is disabled). When Gun-Start Timing mode is enabled, you will notice a “Start” picture in the top-left corner of TinyScore.
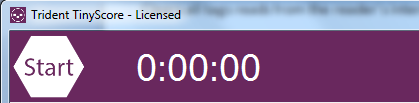
The stopwatch timer is shown adjacent to the Start picture. Clicking the Start picture has exactly the same effect as if TinyScore received an External Trigger message from the reader – it will start or stop the stopwatch timer in the same way. Whenever the Gun-Start stopwatch is started, all logged tag reads are deleted from the TinyScore database (exactly as if you clicked the “Clear Tag Reads Database” button) so timing the event starts with no tags logged. This does not affect tags in the Tag Registration database, they stay as-is. You will get a warning when the Gun-Start stopwatch is stopped, as starting the stopwatch again will delete all logged tag reads – this is to help prevent accidental stop/restart of the stopwatch which will delete all tag reads… You don’t really need to stop the Gun-Start stopwatch after timing the event is finished (as you may accidentally start the stopwatch again) unless you have saved or printed the results reports.
Log Gun-Start Tags:
This function enables or disables logging a Gun-Start tag record for all registered tags (tags registered in the Tag Registration tab) when a gun-start message is received. Disabling logging of these Gun-Start tag messages can make the reports look better by not having the Start time listed.
Click Here To Reconfigure All Settings To Their Default Values:
If you have changed a setting and you can no longer receive tag reads from the reader, feel free to use the “Click Here To Reconfigure All Settings To Their Default Values” button, and it will do as it says! TinyScore program will be closed and restarted, but now with the default reader communication settings.
Check For Program Update
From time to time we may publish bug fixes or add features to TinyScore. As it suggests this button will check for any update to the TinyScore program, and download/install as necessary. You will need an internet connection to check for updates. To avoid disappointment, don’t install an update while timing an event as something may go wrong… We are dealing with computers after all. Also you should test operation of TinyScore after you have performed an update to make sure it works as expected.