
Step 1. Log on to the computer.
Step 2. Click the ‘Start’ button (it should be located at the lower-left corner of your screen), then click ‘Control Panel’.
- A. Click ‘View Network Status and Tasks’, and then click ‘Manage Network Connections’
- B. Right-click ‘Local Area Network’, then select ‘Properties’
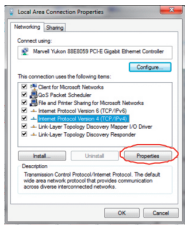
- C. When the ‘Local Area Connection Properties’ window appears, select ‘Internet Protocol Version 4 (TCP/IPv4)” and then click ‘Properties’
Step 3. To set the IP address manually, Type the following IP address: 192.168.10.x (x is from 2 to 254), and the following Subnet Mask: 255.255.255.0.
- Next, type the Omega WiFi Amp’s LAN IP address (the default IP is 192.168.10.1) into the Default Gateway field.

Step 4. The Network IP Address is now fixed! Please connect to the Omega WiFi Amp and log into the Management Page via 192.168.10.1
*NOTE: Never forget to restore your PC IP address automatically after you finish setting up the Omega WiFi Amp
Feedback
Copyright © 2025 Support
—
Powered by 
Post your comment on this topic.