
| |
This is the Add icon. |
| |
This is the Export icon. |
There are a couple of ways to add an item to the Library (for permanent storage or sharing). The first method is to export the Library item directly from the Stage, much like you would perform an export to your client device. The second method allows you to add the item from the Library screen.
Beginning in version 22.3, when multiple recording streams are available for a selected Player, the system will export the highest resolution stream, by default. The user will also have the ability to choose which stream to export.
Add Library Item via Export
If you want to add an item to the Library from the Stage, you’ll need to start by using the Export feature. While the export feature typically saves files to the client system hard drive, with the addition of the Library, Administrators will have the option to export video to the Orchid Fusion/Hybrid VMS server hard drive (or to an external cloud storage service, if configured).
- First, be sure that the Players you need are on the Stage.
- Click the Export icon on the Timeline Bar. The Save Video screen will appear.
- Select the Library tab.
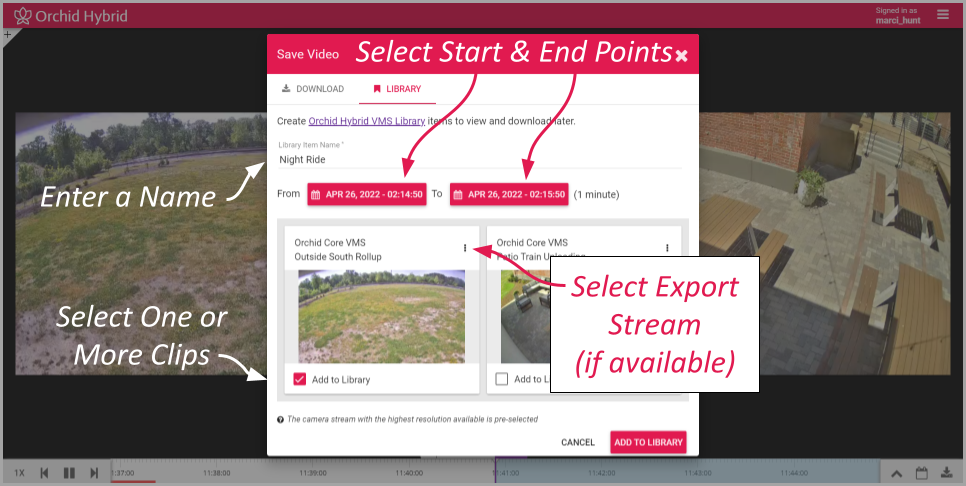
The Library tab will display a thumbnail representing each of the Players that were on the Stage. For each one, you will see a check box that allows you to select the Player for export.
- First, enter a name for the Library item.
- Click the first Calendar button (on the left) to select the date and time at which the video export will start.
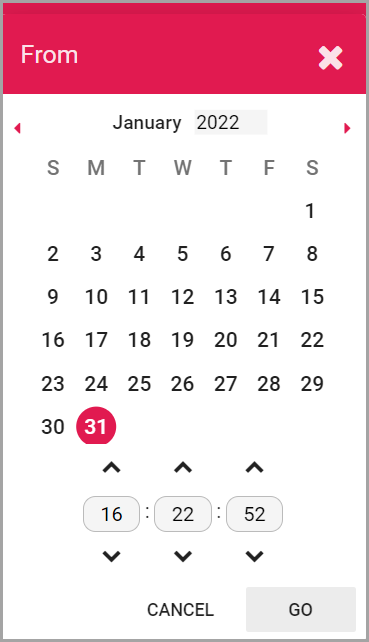
When the calendar opens, you have the ability to select the date and time for the starting point for your video export.
- Select the date and time, then click Go. (You may receive a warning that your selected range exceeds the allowable export duration. For now, proceed to the next step.)
- Click the second Calendar button (on the right) to select the date and time at which the video export will end. Select the date and time, then click Go. (The export duration of the selected range will appear on the screen. If a warning still appears, you will need to shorten the export duration by selecting a new start or end time. The maximum allowable export is 48 hours per Player.)
- Now that you have selected the range, select the Players you want to export by clicking on the check box associated with each Player. (If you select multiple Players, each of these Library items will have the same name.)
For some Players, you may also see a pop-up menu (to the right of the camera name). This menu allows you to select which of the camera streams you want to select for the export. (This menu will only be available if multiple recording streams have been configured by the Administrator. If you don’t select anything, the system will export the highest resolution stream by default.)
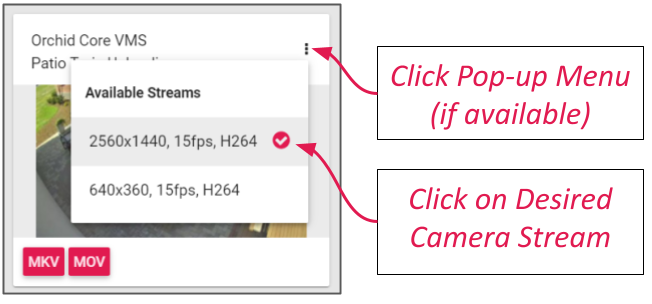
- If available, click on the pop-up menu, then click on the stream resolution you want to export.
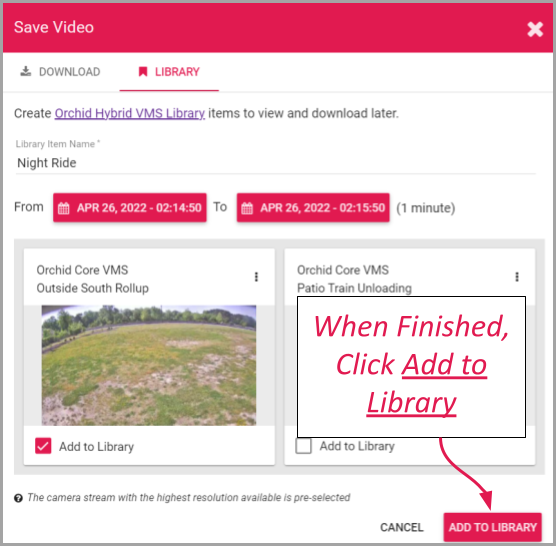
- Click the Add to Library button to begin the export. You will see a message that says the video is being sent to the Library.
- Press the Cancel button to exit the Save screen without saving video.
- To access the Library from here, do either of the following:
- Click the Go to Library link contained in the message (pictured below).
- Go to the System Menu and select Library.

Add Library Item via the Library
- From the Library screen, click the Add Library Items button. The Add Library Items screen will appear.
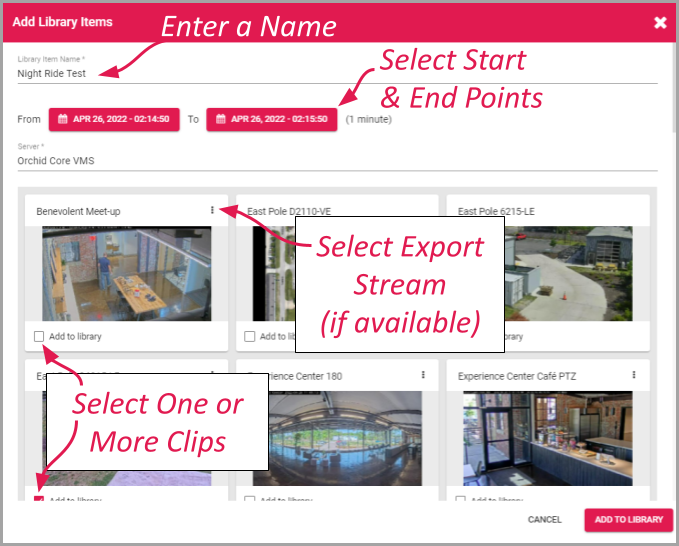
- First, enter a name for the Library item.
- Next, you need to set the start and end times for the video clip.
- Click the first Calendar button (on the left) to select the date and time at which the video export will start.

- Select the date and time, then click Go. (You may receive a warning that your selected range exceeds the allowable export duration. For now, proceed to the next step.)
- Click the second Calendar button (on the right) to select the date and time at which the video export will end. Select the date and time, then click Go. (The export duration of the selected range will appear on the screen. If a warning still appears, you will need to shorten the export duration by selecting a new start or end time. The maximum allowable export is 48 hours per Player.)
- Next, select the server from which you want to capture video for the Library. Once you have selected a server, the screen will display a thumbnail representing each of the Players on the selected server.
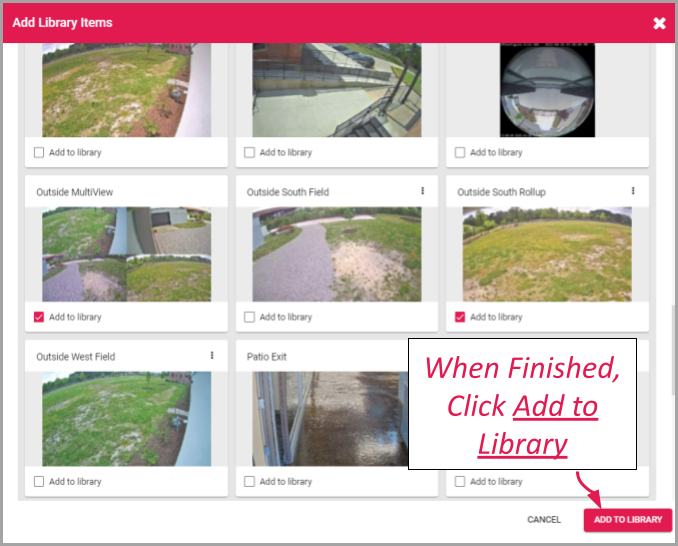
- Select the Players you want to export by clicking on the check box associated with each Player. (If you select multiple Players, each of these Library items will have the same name.)
For some Players, you may also see a pop-up menu (to the right of the camera name). This menu allows you to select which of the camera streams you want to select for the export. (This menu will only be available if multiple recording streams have been configured by the Administrator. If you don’t select anything, the system will export the highest resolution stream by default.)
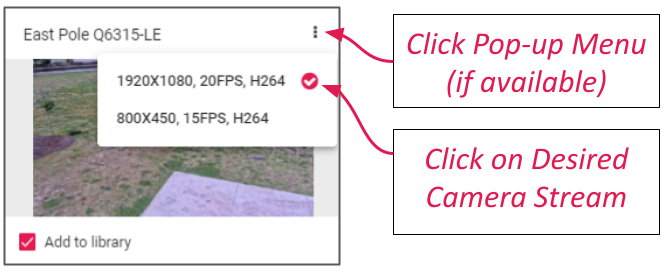
- If available, click on the pop-up menu, then click on the stream resolution you want to export.
- Click the Add To Library button to begin the export. You will be able to watch the progress of the export on the Library screen.
- Press the Cancel button to exit the screen without saving video.
Post your comment on this topic.