
The Retention Policy feature in Orchid Core VMS allows Administrators to manage video archive retention on a stream by stream basis as well as review current and projected disk utilization.
About Video File Retention
To maintain a system for video file retention, Orchid Core VMS determines how much disk space is available on the server. By default, Orchid Core VMS will retain videos until your hard disk is 85% full (the Cleaner Threshold), at which point it will begin deleting the oldest videos to make room for new videos. The available video storage space is divided among all the cameras that have been added to Orchid Core VMS based on equal days of retention; however, based on individual camera settings, this doesn’t mean that each camera will require the same amount of server storage space.
If no camera-specific retention settings have been entered, Orchid Core VMS will grant each camera the same number of days of video retention. Since each camera may have different settings (such as recording style, frame rate, etc.), and those settings impact video file size, the amount of space required for the same number of days will vary.
In some applications, there may be cameras for which increased file retention is critical. For these cameras, the Administrator may set specific, minimum retention settings. In these cases, the retention settings for the remaining cameras will be adjusted automatically to share the remaining balance of available storage before the Cleaner Threshold is met.
When disk usage reaches the retention limit, Orchid Core VMS will create free space by removing the oldest archives first. The system will ensure, however, that the minimum desired retention settings that have been set are maintained, assuming sufficient disk space is available.
To change the 85% Cleaner Threshold setting, use the Advanced Settings feature.
Accessing the Retention Policy
- From the Servers page, select a server and click on the Retention Policy tab.
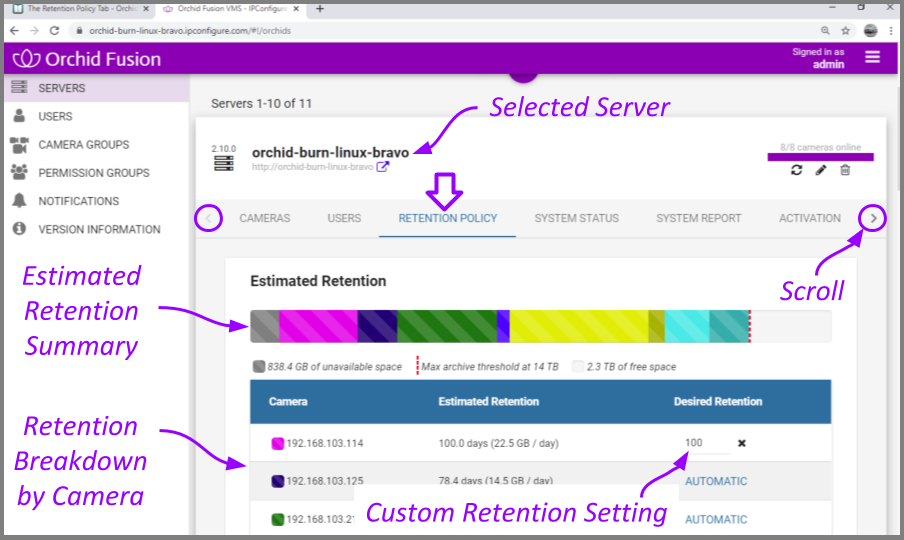
At the top of the Retention Policy tab, Orchid Core VMS displays a summary of estimated server space usage. Use the cursor to hover over the colored regions of the summary graphic to view the estimated server space usage for each camera.
- Unavailable space: This space on the disk is marked in grey. It is already in use by other applications and is unavailable to Orchid Core VMS for storing video.
- Video data: This space on the disk is marked in various bright colors representing each camera. This space is filled with videos that are managed by Orchid Core VMS. To make space for new video, the oldest videos are continuously and automatically deleted as the Cleaner Threshold is reached.
- Cleaner Threshold: By default, Orchid Core VMS will attempt to make sure that no more than 85% of your disk space is used. This threshold is marked on the bar by a red dotted line. To change the 85% Cleaner Threshold setting, use the Advanced Settings feature.
- Free space: This disk space is not in use by Orchid Core VMS or any other program.
Changing Desired Retention Settings
- To edit the minimum Desired Retention setting for any given camera, click on the corresponding Automatic button.
- Type in a new setting to represent the number of days of video that will be kept for this camera. The remaining estimated retention will automatically be recalculated for all cameras that do not have a manually specified retention setting.
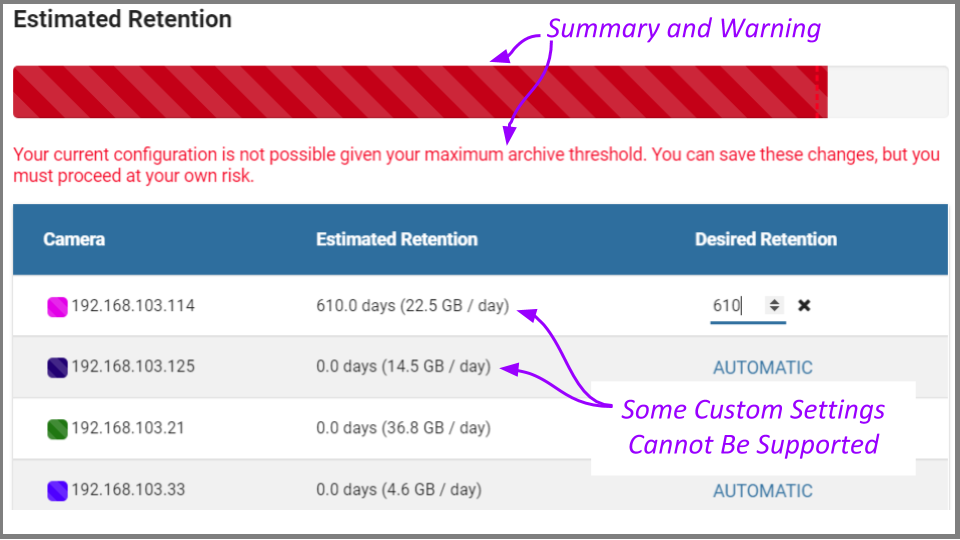
If your new setting requires more storage than is physically available on your disk, Orchid Core VMS will flag an error (as pictured below). To fix this, you’ll need to reduce the desired retention to an acceptable level or add more available storage.
- Repeat steps 1 and 2 for each camera that requires minimum retention settings.
- To undo the last setting you changed, press the Cancel Changes button at the bottom of the list. (You can only use this feature before you save the new configuration.)
- Once all settings have been entered, press the Save Configuration button at the bottom of the list.
- To quickly change any setting back to Automatic, click the X button next to the setting and then press the Save Configuration button.
Reviewing the Current Disk Utilization
The bottom half of the Retention Policy tab displays how the server space is actually being used. Use the cursor to hover over the colored regions of the summary graphic to view the actual server space usage for each camera.
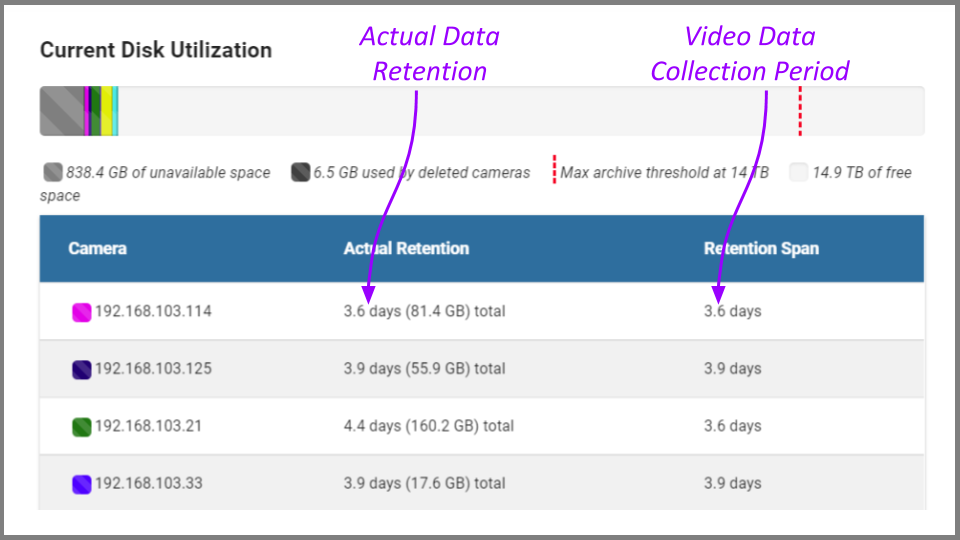
The Current Disk Utilization section displays a summary of actual server space usage which includes unavailable space (space used by the operating system and other files), space occupied by video files, and a buffer of free space. It then provides a usage breakdown by camera. This information can be very helpful in diagnosing retention issues.
The Actual Retention column shows how many days worth of video is being stored per camera. It also includes how much disk space each camera is consuming. The Retention Span column shows the number of days over which the video files have been recorded. This data point is especially helpful for those cameras that are set to record only when motion is detected. For example, let’s say that one of the cameras has an actual retention reading that is 0.5 days (compared to the others which have 3.6 or more). The Retention Span should confirm that the system has been monitoring the camera for about the same amount of time as the other cameras.
You may also use this breakdown to determine if any of the cameras are using excessive disk space. If this is the case, you can then take steps to re-configure the camera (by changing either the minimum desired retention settings or the camera stream settings) and fix the problem.
Post your comment on this topic.