
The Cameras tab provides you with a list of all the cameras registered to the Orchid Core VMS server, and allows you to add and delete cameras and configure camera stream settings.
- Once you access the Servers page, select a server and click on the Cameras tab.
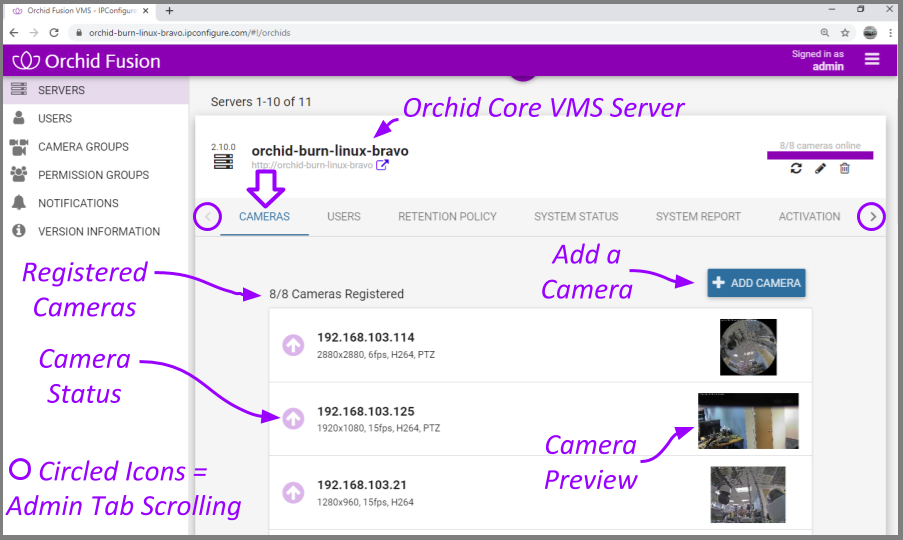
The Cameras tab opens with a list of cameras that have already been registered, if any. The process for adding most cameras is fairly simple, especially if the camera supports ONVIF auto-discovery.
Adding One or More Cameras (using Auto Mode)
| |
This is the Add icon. |
- From the list of registered cameras on the server’s Cameras tab, press the Add Camera button to access the Register Cameras screen. The software will open the Register Cameras screen in Auto mode by default. This screen displays a list of all the cameras Orchid Core VMS was able to auto-discover.
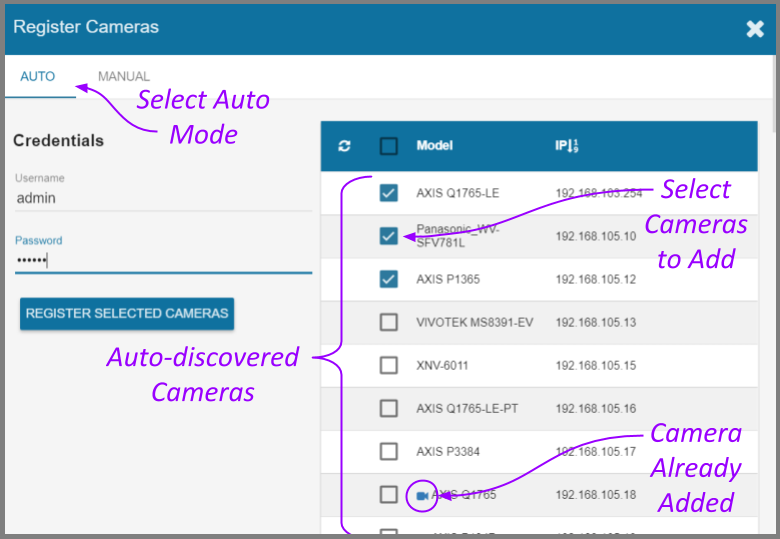
- To add a new camera, mark the checkbox next to the camera. (You may select multiple cameras as long as they all use the same ONVIF username and password.)
- Enter the ONVIF username and password that is setup on the camera(s) you would like to add.
- Press the Register Selected Cameras button to add selected cameras to the Orchid Core VMS server.
Depending on the number of cameras being added, it may take a few minutes for Orchid Core VMS to add them successfully. When complete, the software will display a list of all cameras that were successfully and unsuccessfully added. If Orchid Core VMS fails to add a camera, an error message will appear.
- Go to each of the newly added cameras and enter a unique, descriptive name for each one. (Good camera names are important because they are searchable in Orchid Fusion VMS.) You should also review or edit the camera stream settings.
Adding a Single Camera (in Manual Mode)
If Orchid Core VMS cannot autodiscover a camera, it can be added manually.
- At the server’s Cameras tab, press the Add Camera button to access the Register Cameras screen. The Register Cameras screen will open in Auto mode.
- Select Manual mode.
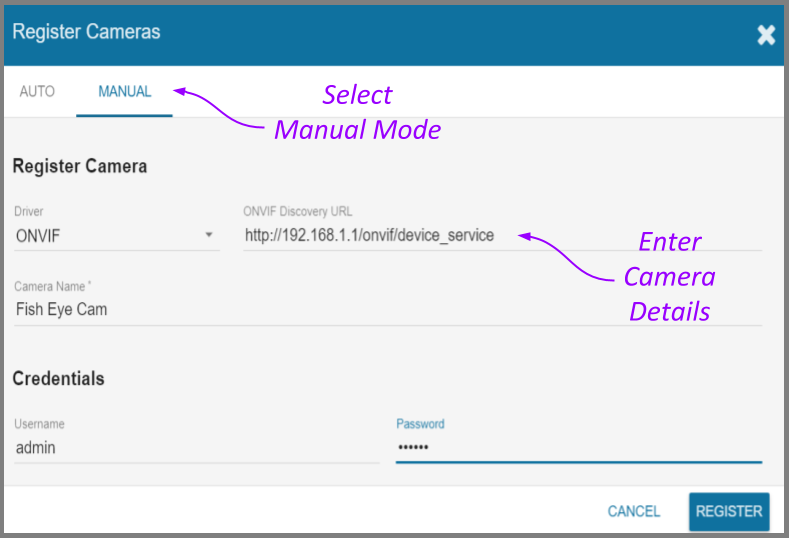
- Select the appropriate driver (ONVIF or RTSP) from the drop-down list.
- Enter the ONVIF Discovery URL, or the RTSP Stream URL (depending on the driver you specified) to match the correct address for the camera being added. Consult with the camera manufacturer’s user guide, as needed, for the correct syntax of the address.
- Enter a unique name for the camera. This will allow you to distinguish the camera from other cameras set up within the Orchid Core VMS server.
- Enter the username and password that is setup on the camera being added.
- Press the Register button to add the camera to the Orchid Core VMS server.
When complete, Orchid Core VMS will add the new camera to the list of registered cameras. If Orchid Core VMS fails to add a camera, an error message will appear explaining the issue. - Once the camera has been added, review or edit the camera stream settings.
Editing Camera Stream Settings
| |
This is the Edit pencil icon. |
After a camera has been added to an Orchid Core VMS server, settings such as the stream resolution and frame rate can be updated through the camera stream’s configuration. While this is true for most cameras, cameras added using the RTSP driver (old cameras and cameras that don’t support ONVIF) cannot be edited through Orchid Core VMS or Orchid Fusion VMS. You will need to access those cameras directly to edit settings. (Refer to the camera manufacturer’s documentation for more details.)
- From the list of registered cameras on the server’s Cameras tab, click the name of the camera you want to edit. (The list will expand to display all of the information for the selected camera. This includes the camera name, IP address, and all of the available streams.)
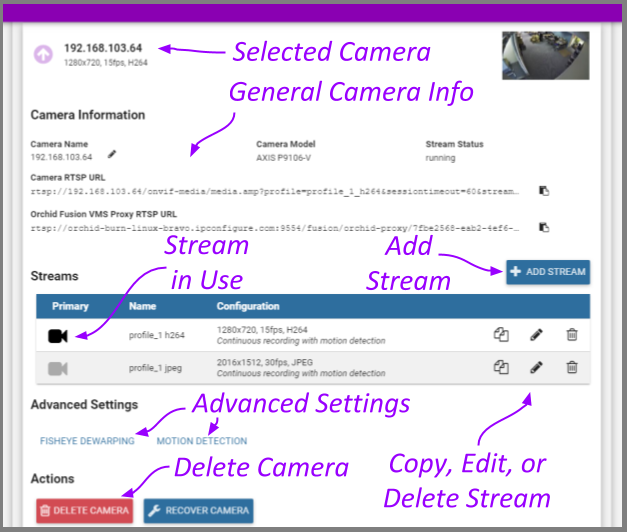
- To change the camera name, click the Edit pencil to the right of the camera name. Enter a new name in the Camera Name field and press the Update Camera button.
- This screen also displays the camera model and the status of the camera stream in use. These settings are informational and cannot be altered here; please refer to the System Status section for status descriptions.
- The RTSP URL status fields are typically used for troubleshooting. These allow for a comparison of the video coming from the camera and the video as received by Orchid Core VMS to determine where a problem might be occurring.
- The Camera RTSP URL (which contains the camera’s IP address) represents the video stream that Orchid Core VMS is recording.
- The Orchid Proxy RTSP URL represents the video that Orchid Core VMS is showing on the Stage. (For more details, please refer to the section titled How Orchid Fusion VMS’s Proxy Works, and the two topics that follow it.)
![]()
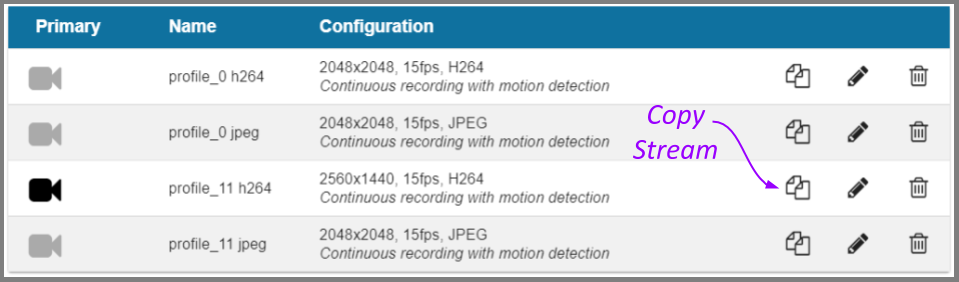
A camera stream is a profile with all of the basic settings used by Orchid Core VMS to record video from the camera. The stream currently being used by Orchid Core VMS, the primary stream, is indicated by a darkened camera icon.
- To select a new stream, click the Camera icon located to the left of the name of the stream you want Orchid Core VMS to record with.
- To edit a stream, click the Edit pencil icon which is located to the right of the stream name. After clicking the Edit icon, a screen will appear with all of the stream settings available for editing.
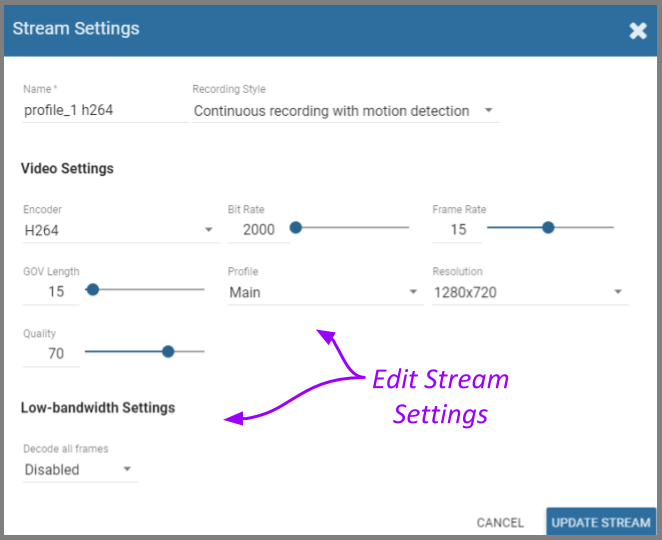
- Review or change the stream name so users can easily identify the camera stream.
- Review or change the Recording Style for the camera stream.
You may choose between one of five different recording styles. Refer to the descriptions below (and the table that follows) before making your selection.
- Continuous Recording with Motion Detection: Orchid Core VMS will continuously record video from the camera and perform motion detection. This is the default and recommended setting.
- Continuous Recording without Motion Detection: Orchid Core VMS will continuously record video from the camera, but will not perform motion detection. This option offers a modest reduction in CPU load on the Orchid Core VMS server.
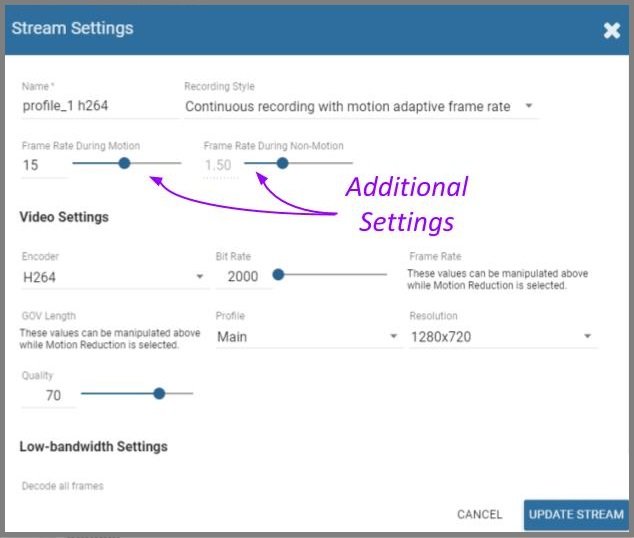
- Continuous Recording with Motion Adaptive Frame Rate: Orchid Core VMS will record at a higher frame rate while motion is detected, and a different (slower) frame rate while no motion is detected. These frame rates are user-selectable (as shown in the screenshot following the table). Due to the way H264 compresses video, this recording style typically shows significant savings in disk usage only for inexpensive cameras with noisy sensors, or cameras in low-light environments.
- Proxy Only: Orchid Core VMS will provide live video from the camera but will not record video.
- Recording Only When Motion Detected: Orchid Core VMS will only record video from the camera when motion is detected. This may result in a reduction in disk usage on the Orchid Core VMS server, however, motion detection accuracy may vary and result in video loss.
| Continuous recording with motion detection – Default | Continuous recording without motion detection | Continuous recording with motion adaptive frame rate | Proxy only, no video will be recorded | Recording only when motion is detected | |
|---|---|---|---|---|---|
| Recording and playback are available | Yes | Yes | Yes | No | Yes – When motion is detected |
| Live view is available in low-bandwidth mode | Yes | No | Yes | No | Yes |
| Thumbnail previews are available | Yes | Yes | Yes | No | Yes |
If you select the Continuous recording with motion adaptive frame rate recording style, you will need to set both the Frame Rate During Motion and the Frame Rate During Non-Motion. (The Frame Rate During Motion will dictate the available settings for the Frame Rate During Non-Motion. Allowable settings for the Frame Rate During Non-Motion range from 1 up to a setting that is less than or equal to the Frame Rate During Motion.)
- Continue to review and change camera stream settings for video, audio and bandwidth as needed. Refer to the definitions below for help in selecting settings.
Video Settings
Each camera type reports its own default values provided by the camera manufacturer. Use those default values unless otherwise noted.
- Encoder: The type of compression used for the camera’s video. In WebRTC mode, Orchid Core VMS only supports H264 video. In Low-bandwidth mode, Orchid Core VMS supports JPEG, MPEG4, and H264 (recommended). (Available selections depend on the camera.)
- Bit Rate: The target data size (in kilobits per second) of the compressed video. Increasing this value will typically improve image quality at the expense of increased disk usage and reduced retention. In WebRTC mode, bit rates of 2000 kbps or less tend to work best. The default value is recommended.
- Frame Rate: The number of frames per second transmitted within the video stream. Most Orchid Core VMS users are best served by values between 7 and 12. Higher frame rates provide more video detail at the expense of reduced video retention and increased bandwidth usage.
- GOV Length: When using H264 compression, this value specifies how often the camera sends a full image frame (instead of a “change frame” which only describes differences between frames). For example, if this is set to 15, Orchid Core VMS will send a full image frame once every 15 frames. Be aware of how this setting may impact video quality. As the GOV length decreases, the system will need to send more keyframes of video (within the set bit rate). This may result in a loss of quality for those keyframes. The default value is recommended.
- Profile: When using H264 compression, this specifies an H264 Profile of either Baseline, Main, or High. Higher profiles offer better compression (which means increased retention and lower bandwidth usage) at the expense of increased CPU utilization when decoding video. The highest available profile is recommended.
- Resolution: The resolution of video transmitted by the camera. Higher values increase video detail at the expense of reduced video retention and increased bandwidth usage. Most Orchid Core VMS users are best served by resolutions between 1280×720 and 1920×1080.
- Quality: This value affects how much the video is compressed. Higher values increase video quality at the expense of increased storage requirements (and thus reduced video retention). The default value is recommended.
Audio Settings (if supported)
Beginning in Orchid Fusion VMS version 2.10, audio control is no longer supported at the Player/Stage level. However, the Orchid Core VMS server is still recording audio for those cameras that support it, and this audio will be available in exported video files. Future versions of Orchid Fusion VMS will support audio over WebRTC.
These Audio Settings will appear on the screen only if the camera supports audio and will determine how the Orchid server records the audio. Each camera type reports its own default settings. Use those default values unless otherwise noted.
- Encoder: The type of compression used by the camera’s audio. Orchid Core VMS supports “None” (audio is disabled), G711, and AAC (recommended if audio is desired).
- Bit Rate: The target data size (in kilobits per second) of the compressed audio. The default value is recommended.
- Sample Rate: Affects the quality of recorded sound. The default value is recommended.
Low-bandwidth Settings
- Decode all frames: This setting applies to viewing Live video in Low-bandwidth mode. When Decode all frames is disabled, Orchid Core VMS will display only full frames (per the configured GOV length) when viewing live video in Low-bandwidth mode. When Decode all frames is enabled, Orchid Core VMS will display every available frame from the camera (regardless of GOV length) when viewing live video in Low-bandwidth mode, assuming sufficient bandwidth exists. Decode all frames is disabled by default because enabling this setting will increase CPU use on your Orchid Core VMS server. (For more details on Low-bandwidth mode, please refer to the Advanced Topics section.)
- Once the stream settings have been updated, click the Update Stream button to save the new stream settings. It may take a few seconds for the settings to change based on the camera being updated.
- You may review the impact that the stream settings have on video playback for each camera. Simply click on the corresponding thumbnail to watch a current live video feed.
Advanced Settings: Fisheye Dewarping
Starting in Orchid Core VMS version 2.8, the Camera Configuration screen includes Fisheye Dewarping which allows you to manipulate video from fisheye cameras for display on the Player. This feature provides three viewing options: Off , Perspective, and Panorama. This means that you can view the standard fisheye view, or one of two “flattened” views.
For any fisheye camera, the Dewarp Settings allow you to enable or disable the dewarping features, and set a default view for the associated Player.
Perspective
- At the Camera Configuration screen, click the camera you want to edit. Then click the Fisheye Dewarping link to open the Dewarp Settings screen.
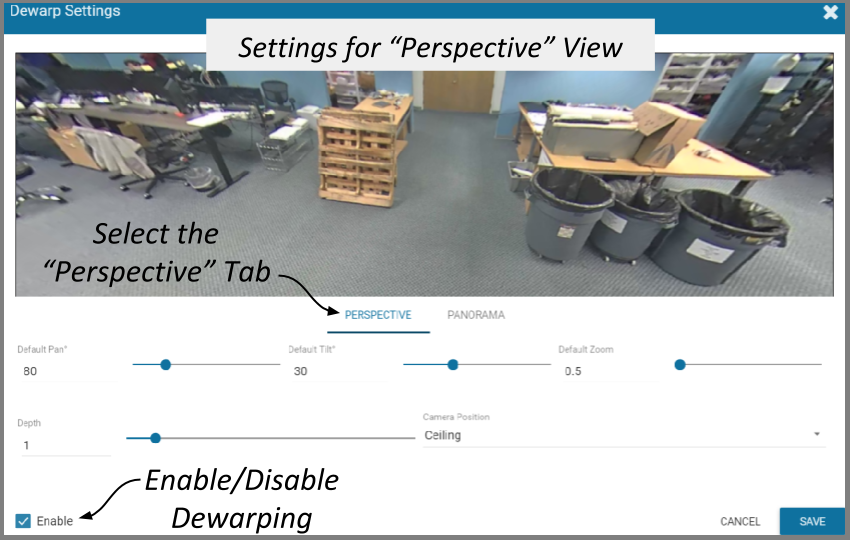
- Select the Perspective tab.
Use the Perspective screen to enter settings for the Perspective view of the selected camera. The Perspective view is a flattened version of the available video from the fisheye camera for which you select a portion of the image as the default view to be displayed on the Player. (The perspective view can also be changed at the Player, but that will not change the default.)
- Mark the Enable checkbox to activate the Dewarp Settings (both Perspective and Panorama ) for this camera. (If this is not marked, Dewarping features will not be available at the Player.)
- Use the Default Pan slider to move the camera to the right and left to set the default view.
- Use the Default Tilt slider to move the camera up and down to set the default view. (Be aware that it is possible to tilt the view beyond the capability of the camera; if this happens, portions of the screen will appear black.)
- Use the Default Zoom slider to zoom into or out of the image to set the default view. (Be aware that it is possible to zoom beyond the capability of the camera; if this happens, portions of the screen will appear black.)
- Use the Depth slider to stretch or compress the image height to set the default view. (This can cause extreme image distortion at the bottom and top ends of the scale. The default value is likely the best setting.)
- Use the drop-down list to select the camera’s mounting location as Ceiling, Floor, or Wall. (This setting will impact how the software displays the camera image.)
- Press the Save button to save your settings, or Cancel to exit without saving.
Panorama
- Select the Panorama tab.
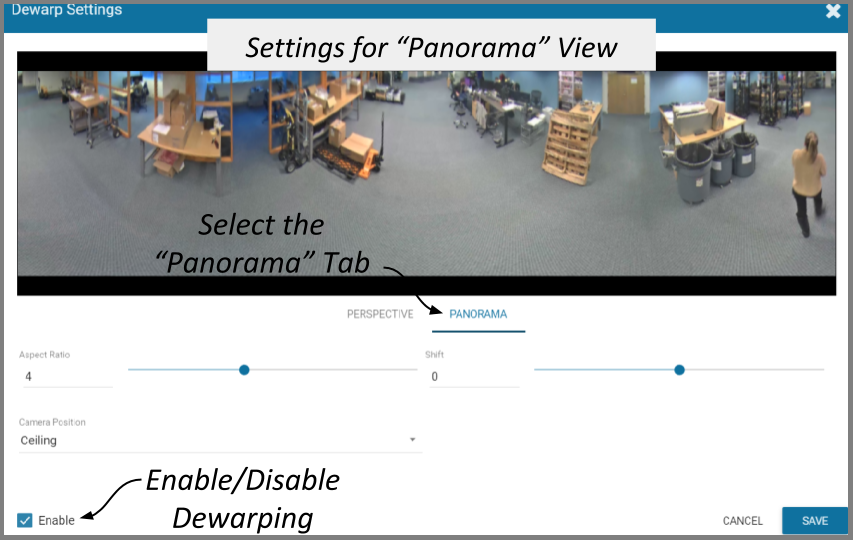
Use the Panorama screen to enter settings for the default Panorama view of the selected camera. The Panorama view is a flattened version of the available video from the fisheye camera. This view displays the entire image and cannot be altered at the Player.
- Mark the Enable checkbox to activate the Dewarp Settings (both Perspective and Panorama ) for this camera. (If this is not marked, Dewarping features will not be available at the Player.)
- Use the Aspect Ratio slider to change the amount of Player area the image will fill. You might take some time to experiment with this setting, but the points below describe how it works.
- At the high end of the scale, the image will fill the length of the Player, but the height of the image will be condensed.
- At the center of the scale, the image will fill the length of the Player, and the height of the image will be at its least distorted.
- As you move from the center of the scale to the low end, the height of the image will stretch toward the top and bottom of the Player.
- From the point that the image fills the Player, if you continue to move to the bottom of the scale, the image width will shrink until the image disappears.
- Use the Shift slider to adjust the center point of the image. (If there is a certain part of the image that you prefer at the center of the Player, use the slider to make this adjustment.)
- Use the drop-down list to select the camera’s mounting location as Ceiling, Floor, or Wall. (This setting will impact how the software displays the camera image.)
- Press the Save button to save your settings, or the Cancel button to exit without saving.
Advanced Settings: Motion Detection
Starting in Orchid Core VMS version 2.6, the Camera Configuration screen includes Motion Detection Settings which allow you to apply camera-specific motion detection settings. The Motion Detection Configuration screen provides two tools to reduce the number of “nuisance” motion captures: Motion Mask and Object Size.
Motion Mask
- At the Camera Configuration screen , click the camera you want to edit. Click the Motion Detection link to open the Motion Detection Configuration screen.
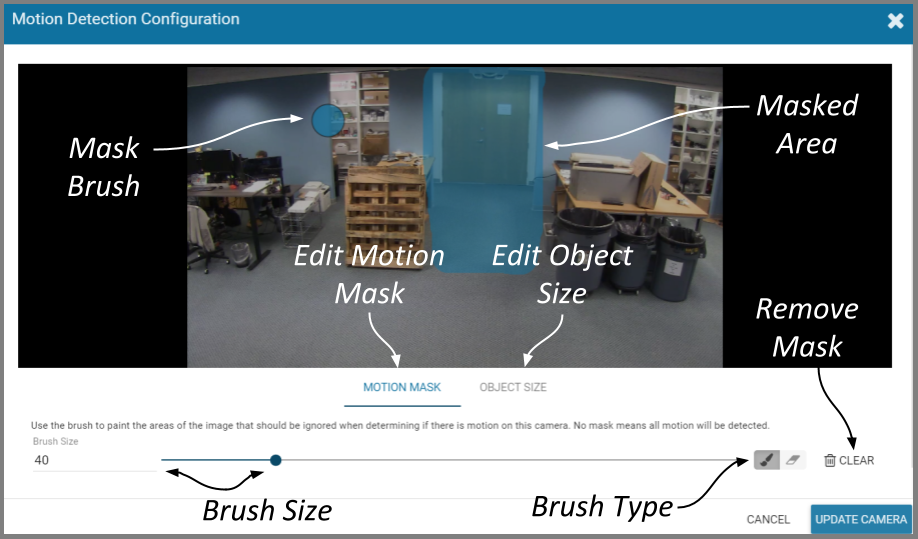
- Select the Motion Mask tab (just underneath the video image). Use this screen to change the way motion detection is applied to the selected camera.
By default, all cameras are set to detect motion. When motion is detected, a motion event is recorded and will appear on the Timeline Bar (which is intended to make video review easier). But sometimes, the camera captures too much motion. There may be objects in the video, like trees, banners, or balloons, that move constantly, increasing the number of motion events to such a degree that it actually makes video review more tedious.
The Motion Mask tool allows you to “paint” over one or more areas of the video image, making those areas invisible to motion detection. (You will still see all of the video, but the motion capture feature will ignore the masked area.)
- Select the Brush Type.
- The paint brush will add a masked area to the video image. This area will be ignored by the motion detection feature.
- The eraser will remove masked area from the video image. This area will now be evaluated during motion detection.
- Adjust the Brush Size using either of the following methods.
- Click in the Brush Size field and enter a new number or use the up and down arrows to increase or decrease the size of the brush.
- Click and drag the slider to increase or decrease the size of the brush.
- Position your cursor over the video image and you’ll see a blue circle (the mask paint brush) or a pink circle (the mask eraser). (Adjust the brush size if needed.)
- Click and drag the brush across the video image to change the masked area.
- If you selected the paint brush, you will add masking to the image.
- If you selected the eraser, you will remove masking from the image.
- To remove the entire mask, click the Clear button.
- To save the mask (or the cleared image), click the Update Camera button.
Object Size
The Object Size tool allows you to modify motion detection based on area. This tool instructs the software to ignore the movement of any objects with a smaller area than the selected object size (like small animals and robot vacuum cleaners). (You will still see all of the video, but the motion capture feature will ignore the small stuff.)
- Select the Object Size tab (just underneath the video image). Notice the blue square in the center of the video image. This represents the defined object area. Objects of equal or lesser area will be ignored by motion detection.
For example, if the selected object size (area) is 100, the software will ignore objects with an area of 100 or less. This includes objects that are 10 × 10, 20 × 5, 30 × 3, 45 × 2 and so on (each of which have an area of 100 or less).

- Adjust the Object Size using either of the following methods.
- Click in the Size field and enter a new number or use the up and down arrows to increase and decrease the area.
- Click and drag the slider to increase and decrease the area.
- To activate motion detection for objects of all sizes, set the Size to zero.
- To save the Object Size settings, click the Update Camera button.
Add a Stream
| |
This is the Add Stream icon. |
Usually you will not need to add a stream unless your camera does not come configured with any streams by default.
- From the Camera Information screen, press the Add Stream button to add a new stream for the selected camera. The _Stream Settings _screen will open, allowing you to enter and modify the settings for the stream.
- When all settings have been entered, press the Add Stream button to add the new profile to the Streams list for the selected camera.
Copy Stream to Cameras
| |
This is the Copy Streams icon. |
This feature is a great shortcut to use if you have multiple, similarly configured cameras to set up. Once you complete a stream settings profile for one camera, you can copy all (or part) of that profile to one or more cameras with one click. This shortcut is especially useful if you have added multiple cameras at once (using Auto mode).
- From the list of registered cameras on the Cameras tab, click the name of the camera you want to use as a model.
- Then add or edit a camera stream that contains the settings you would like to copy to other cameras.
- Once your template profile is complete, click the Copy Stream to Cameras icon for the stream you want to copy.
A screen will appear that will allow you to edit and complete the profile transfer to selected cameras.
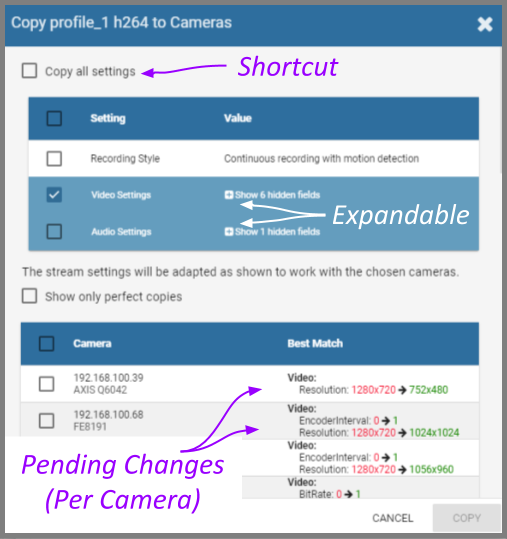
The screen lists all of the cameras that have been added to the system. It also provides comments to show which cameras are good candidates for the stream settings (which may help you decide if you want to copy all of the settings to all of the cameras.) For each camera that is not a perfect match, Orchid Core VMS will pick the stream setting that is the closest match and indicate how the stream settings will be modified for that camera.
There are several reasons why profile matches might not be perfect. For instance, maybe the model camera is configured to use a higher resolution than is supported by the target cameras. In this case, Orchid Core VMS will choose the closest available resolution on the target cameras.
The appearance of this screen will change as different settings are selected. Depending on how many cameras have been added and which settings are selected, you may need to scroll down to see all of the cameras and settings.
- Mark the Copy all settings checkbox to copy all of the stream settings. (These will be copied to all of the cameras selected in the lower half of the screen.)
- Leave the Copy all settings checkbox unmarked if you want the ability to choose which settings will be copied.
- Mark the Setting checkbox if you decide to copy all of the settings anyway.
- Mark the checkbox for any of the individual categories that you want to copy (including Recording Style, Video Settings, Audio Settings, and Decode all frames).
- You may expand the Video and Audio Settings categories to select individual settings within each, if needed. (Click on the _+Show hidden fields link to expand the list and the -Hide fields link to condense the list.)
- Mark the Show only perfect copies checkbox if you want the software to list only those cameras that can implement the new profile settings exactly. (This checkbox will not appear if there are no camera streams that are a perfect match.)
- Mark the Camera checkbox if you want to copy settings to all of the cameras in the list. Leave the Camera checkbox unmarked if you want the ability to choose which cameras will receive the stream settings.
- Mark the Overwrite primary stream checkbox if you want these stream settings to replace the existing primary stream settings on every camera selected. Leave the Overwrite primary stream checkbox unmarked if you simply want to add this as a new stream option for each of the selected cameras. (When left unmarked, Orchid Core VMS will not record from this new stream.)
- Once your selections are complete, click the Copy button to send the stream settings to the selected cameras. It may take a few minutes for the settings to change based on the number and type of cameras being updated.
- When the copy process is complete, click the Done button.
Cameras with Multiple Lenses
There are some camera models that have multiple lenses or offer multiple camera views (such as 180- or 360-degree cameras). To take advantage of this capability, you will need to do the following:
- Add this camera to the system one time for each available lens.
- Edit the properties for each of the cameras as follows:
- For ease of identification, provide similar but unique camera names. (For example: Tower1East, Tower1West, and Tower1North.)
- To ensure that you are able to view video from each of the available lenses, select a different primary stream for each of the cameras you added.
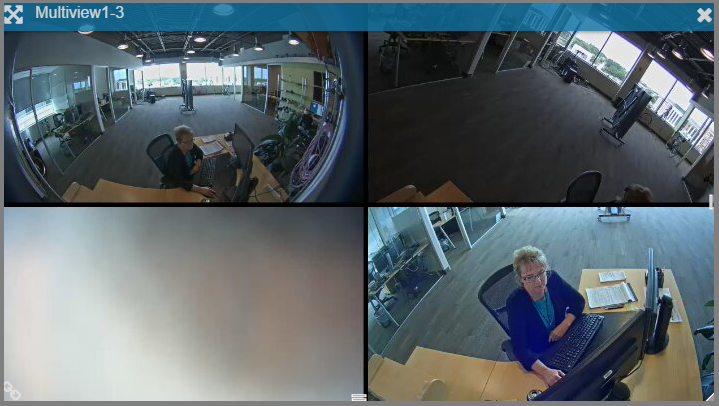
In the example below, a multi-lens camera is added to the system 3 times. Each has a similar (but different) camera name, and each has a different primary stream selected.
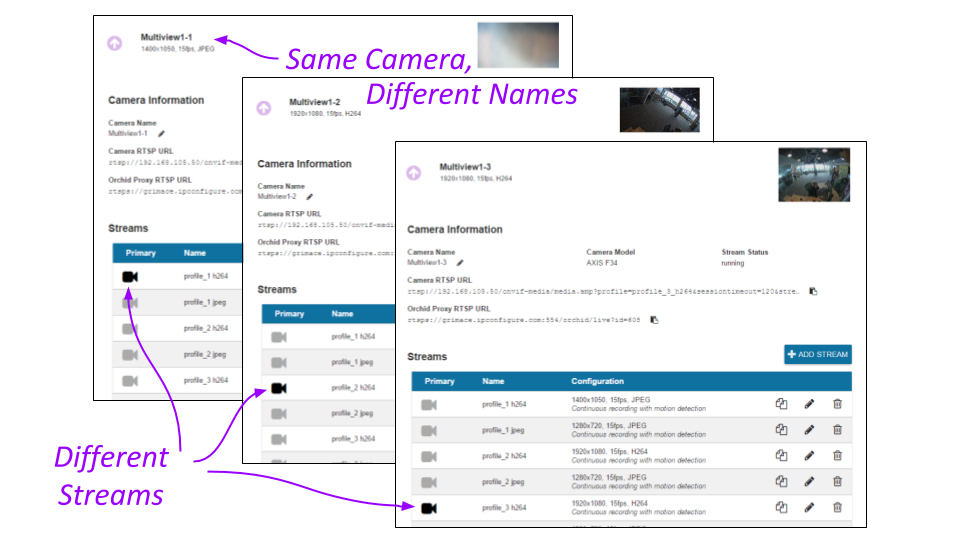
If you find a Camera Stream profile called “multiview” (or something similar) in the list of stream names, select that as the Primary stream if you want to view/record all of the views as one stream. When you add this Player to the Stage, it will display all available views as one Player.
Removing a Stream
| |
This is the Delete / Trash Can icon. |
- To remove a single camera stream, go to the Streams List for a given camera and identify the stream you want to delete.
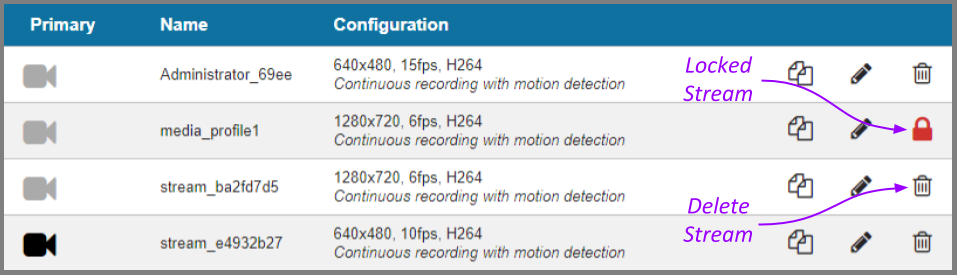
- Click the Trash Can icon to the right of the selected stream. The software will ask you to confirm that you want to delete the stream. Press Delete to confirm. This cannot be undone.
Recovering a Camera
If someone edits camera settings (including the IP address) directly at the camera, Orchid Core VMS may be unaware of the new settings and may lose its connection with the camera. For Orchid Core VMS versions 2.2.2 and above, Orchid Fusion VMS provides access to the Recover Camera feature.
- To recover a camera, click the name of the camera you want to recover from the list of registered cameras on the Camera Configuration screen.
- Press the Recover Camera button at the bottom of the expanded camera entry. The Connection Settings screen will appear.
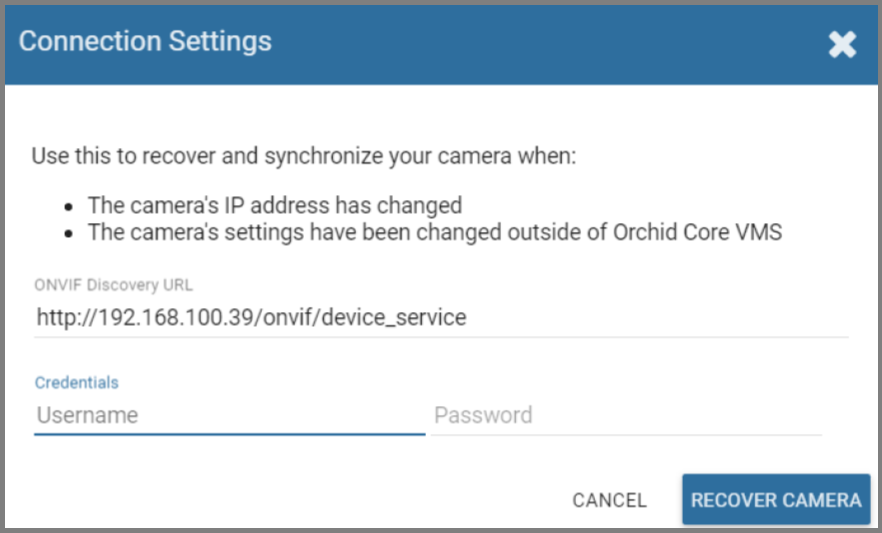
- To refresh the camera settings, simply enter the credentials for the camera, then press the Recover Camera button. (The software will pull the camera settings directly from the camera.)
- To reconnect with the camera, replace the camera’s IP address (with the new one) in the camera’s URL field. Then enter the credentials for the camera and press the Recover Camera button. (The software will reconnect with the camera at its new IP address, and will also pull the camera settings from the camera.)
Removing a Camera
- To remove a single camera, do either of the following:
- From the list of registered cameras on the server’s Cameras tab, position the cursor over the arrow to the left of the camera you want to delete; the arrow will change into a checkbox. Mark the checkbox, then press the Delete Selected button at the bottom of the list. The software will ask you to confirm that you want to delete the camera. Press Delete to confirm. Once a camera is removed, it is no longer available for viewing, playback, recording, export, etc. This cannot be undone.
- From the camera’s settings screen, click the Delete Camera button (located at the bottom of the screen). The software will ask you to confirm that you want to delete the camera. Press Delete to confirm. Removal may take a few moments.
Removing Multiple Cameras
Multiple cameras can be removed from Orchid Core VMS at the same time, if needed.
- From the list of registered cameras on the server’s Cameras tab, first select the cameras you want to delete. (For each camera you want to delete, position the cursor over the arrow to the left of the camera name; the arrow will change into a checkbox. Mark the checkbox.)

- Once your selections are complete, click on the Delete Selected button at the bottom of the list. The software will ask you to confirm that you want to delete the cameras. Press the Delete button to confirm. Once the cameras are removed, they are no longer available for viewing, playback, recording, export, etc. This cannot be undone.
- To delete ALL of the cameras in the list of registered cameras, mark the Delete Selected checkbox at the bottom of the list, then click on the Delete Selected button. The software will ask you to confirm that you want to delete the cameras. Press the Delete button to confirm. Once the cameras are removed, they are no longer available for viewing, playback, recording, export, etc. This cannot be undone.
Post your comment on this topic.