
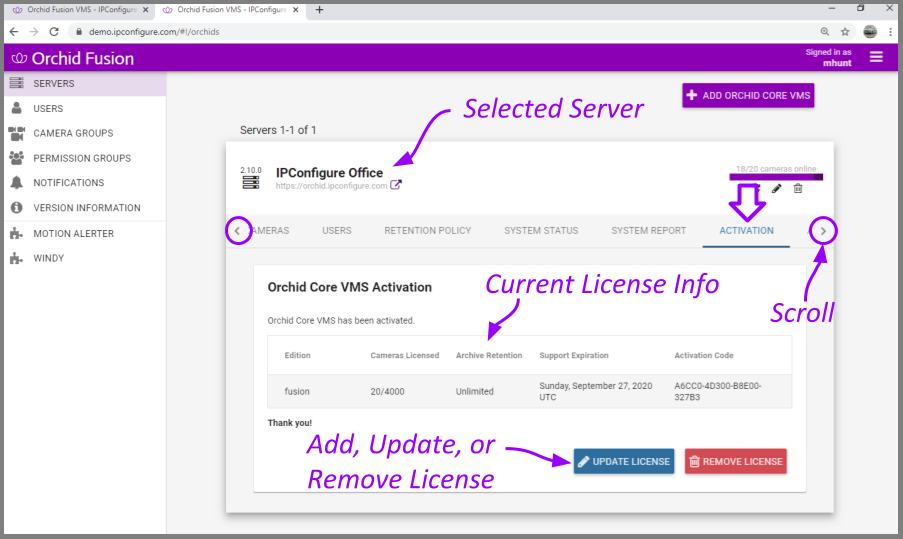
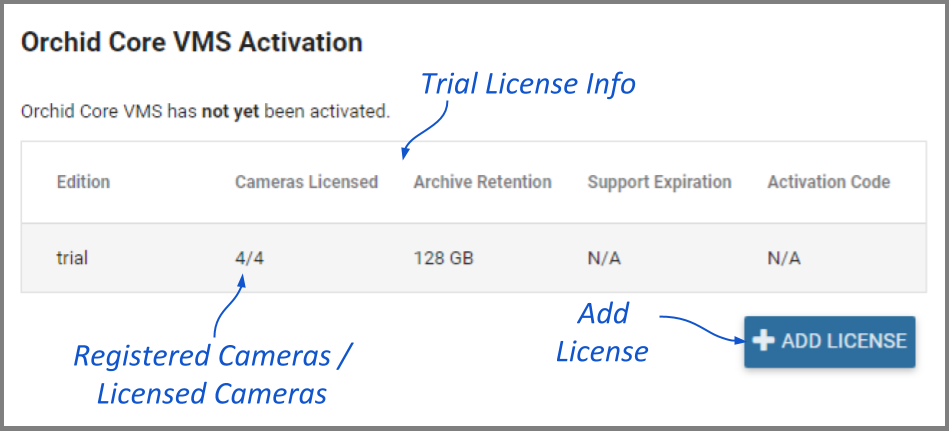
The Activation tab allows you to review current license information for the Orchid Core VMS server, and provides a means to add or update a license.
About Orchid Core VMS Licenses
There are three types of licenses available for the Orchid Core VMS software: Trial, Core, and Fusion. Each license type offers certain capabilities and restrictions.
- Trial License
- When installed on a Windows x86-64 server or a Linux x86-64 server, the Trial license will allow up to four cameras, and up to 128GB of video archives. The Trial version can also be linked to Orchid Fusion VMS.
- When installed on a Linux ARM embedded server, the Trial license will allow unlimited cameras and archives, but the Trial version cannot be linked to Orchid Fusion VMS.
- Core License
- The Core license offers unlimited archives, but will limit the number of cameras allowed and cannot be linked to Orchid Fusion VMS.
- Fusion License (for Orchid Core VMS)
- The Fusion license will limit the number of cameras allowed, but offers unlimited archives and can be linked to Orchid Fusion VMS.
Accessing the Activation Tab
- Once you access the Servers screen, select a server and click on the Activation tab.
Adding a Fusion License to Orchid Core VMS (Quick Method)
| |
This is the Add icon. |
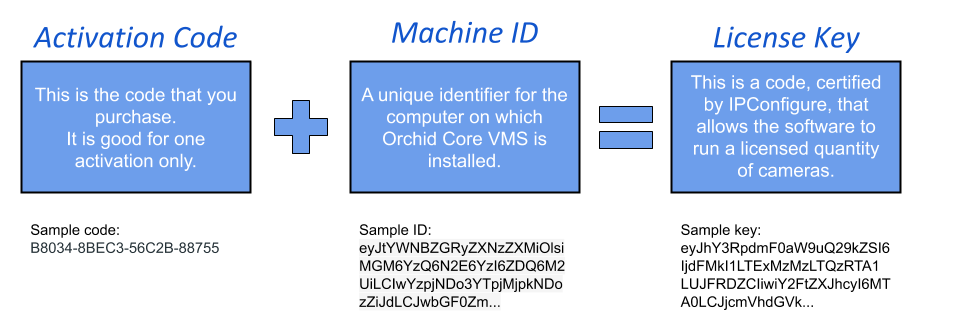
When you purchase a Fusion license for Orchid Core VMS, you will be given an activation code. As indicated in the diagram below, the activation code is just the starting point in the process of adding a license. This code, after being paired with your Machine ID, will generate a license key. With this quick method, most of the work is done behind the scenes.
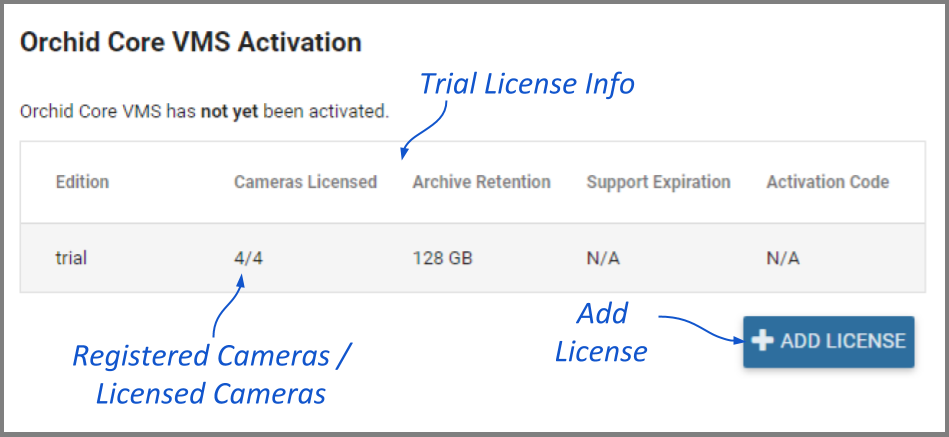
- At the Orchid Core VMS Activation screen (above), click the Add License button to activate a new license.

- On the Activation screen, enter your activation code in the Activation Code field. (Sample code shown above.)
- Then input a location description that specifies where your Orchid Core VMS server will be located. Common location descriptions are a shop name, number, or address.
- Click the Activate button to generate your new Orchid Core VMS license. If the license creation is successful, a screen will appear that indicates success.
Adding a Fusion License to Orchid Core VMS (Offline Method)
Use the Offline Activation method if the Orchid Core VMS server doesn’t have an internet connection. This activation method is very similar to the original activation method.
- At the Orchid Core VMS Activation screen (above), click the Add License button to activate a new license.
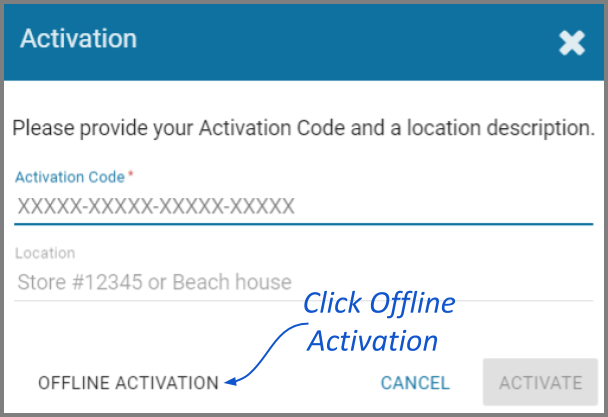
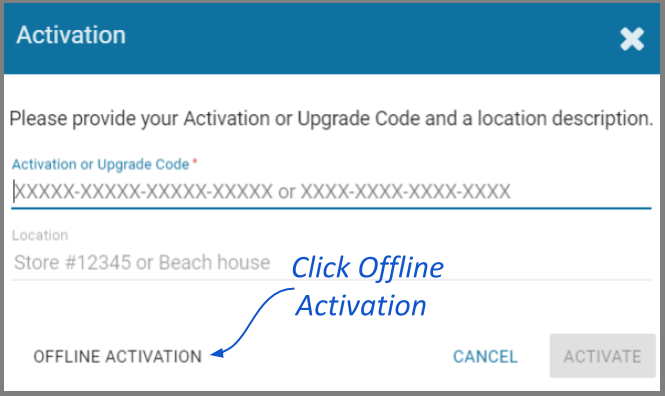
- At the Activation screen, click the Offline Activation button.

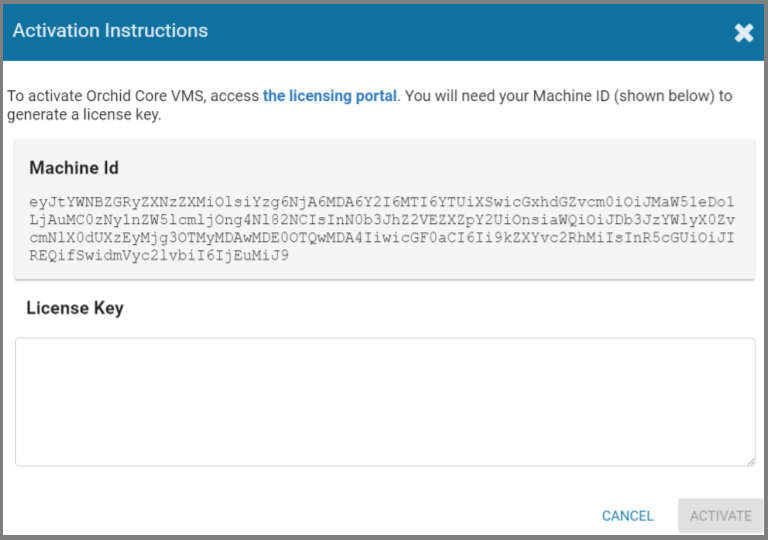
- At the Activation Instructions screen, copy your Machine ID. (Click and drag from the beginning to the end of the text string, then click CTRL+C to copy it.)
- Click CTRL_V to paste the ID into a text file on a USB drive that you can use on a computer with internet access.
- Using a computer with internet access, go to the following site: https://www.orchidsecurity.com/activation.
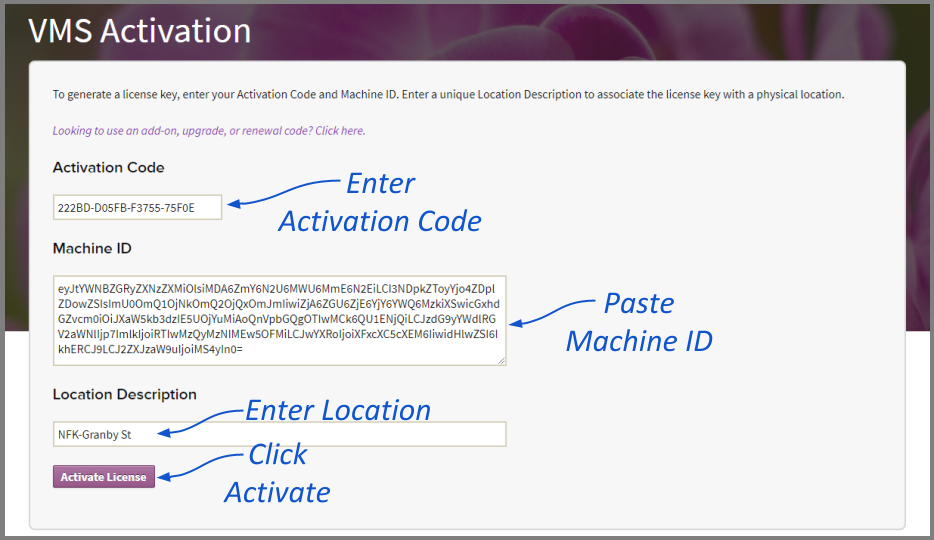
- Once the VMS Activation screen loads, enter the Activation Code into the Activation Code field. This code was provided to you when you purchased your Fusion license for Orchid Core VMS. (Sample code shown above.)
- Paste your Machine ID into the Machine ID field.
- Input a location description that specifies where your Orchid Core VMS server will be located. Common location descriptions are a shop name, number, or address.
- Click the Activate License button to generate your new Orchid Core VMS license. If the license creation is successful, a screen will appear that indicates success and includes a License Key. (The License Key looks like a paragraph of random text.)
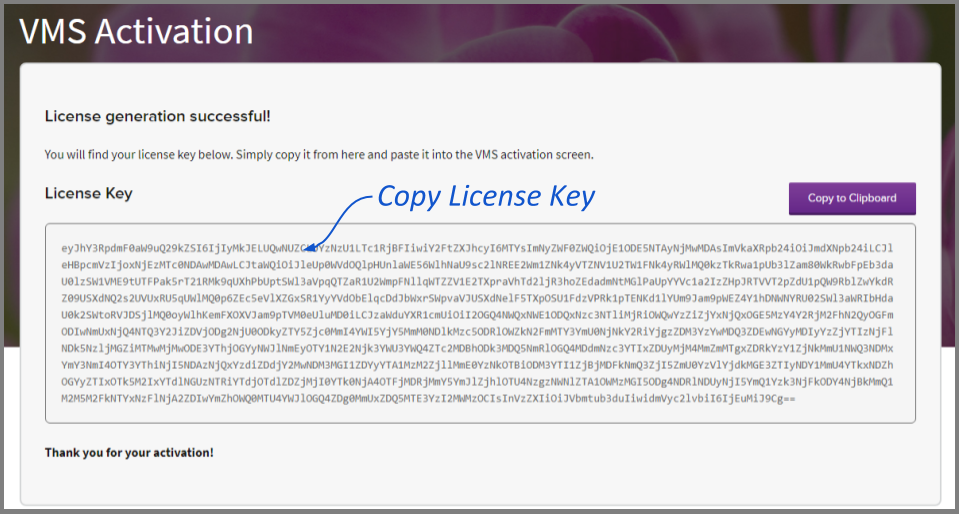
- Select the text in the License Key field, then click CTRL-C to copy the License Key to a text file on a USB drive.
- Close the VMS Activation screen and return to the Orchid Core VMS server.
- Click into the License Key field on the Activation Instructions screen. Click CTRL+V to paste the text into the field (as pictured below).
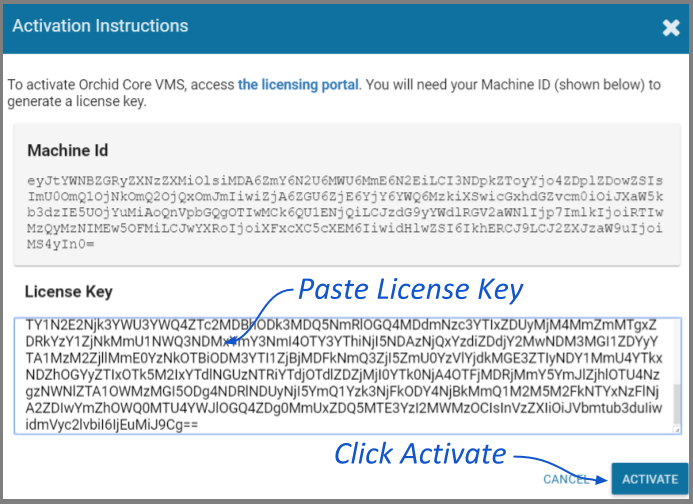
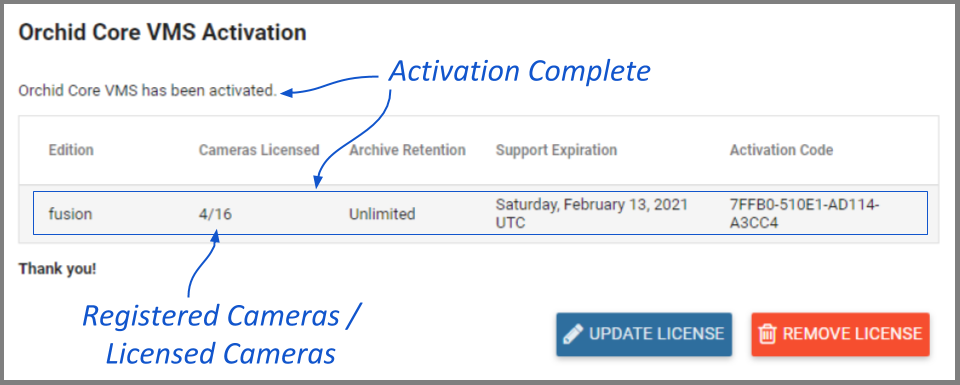
- Click the Activate button to activate your new license key. If the activation was successful, you will see a message at the top of your screen saying “Orchid Core VMS has been activated.”

The Edition, Cameras Licensed, Archive Retention, and Support Expiration fields will all be updated to match the license you purchased.
Modifying an Existing License (Quick Method)
| |
This is the Edit pencil icon. |
If you want to add more cameras to the system, or simply extend your support agreement, you will need to modify an existing Orchid Core VMS license.
- Once you access the Servers screen, select a server and click on the Activation tab.
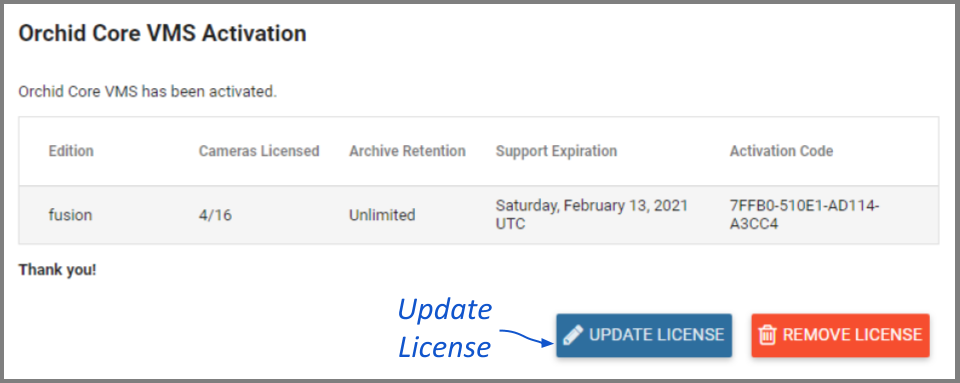
- When the Orchid Core VMS Activation screen appears (above), click the Update License button.
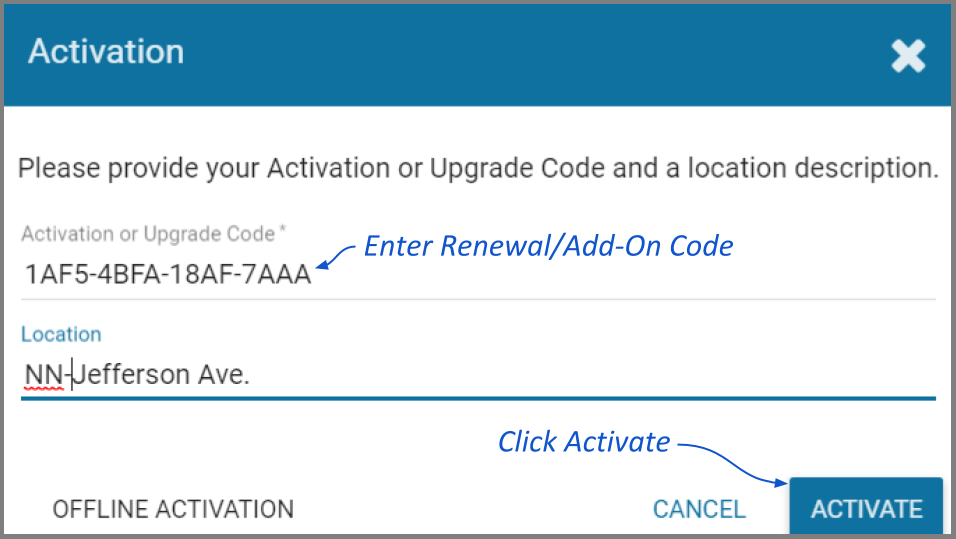
- When the Activation screen appears, enter your Renewal/Add-On code into the Activation or Upgrade Code field.
- In the Location field, enter a description that specifies where your Orchid Core VMS server will be located. Common location descriptions are a shop name, number, or address.
- Click the Activate button. The Orchid Core VMS Activation screen should appear and should display updated license information. (In this case, the number of licensed cameras has increased.)

Modifying an Existing License (Offline Method)
Use the Offline renewal/upgrade method if the Orchid Core VMS server doesn’t have an internet connection. This renewal method is very similar to the original activation method.
- Once you access the Servers screen, select a server and click on the Activation tab.
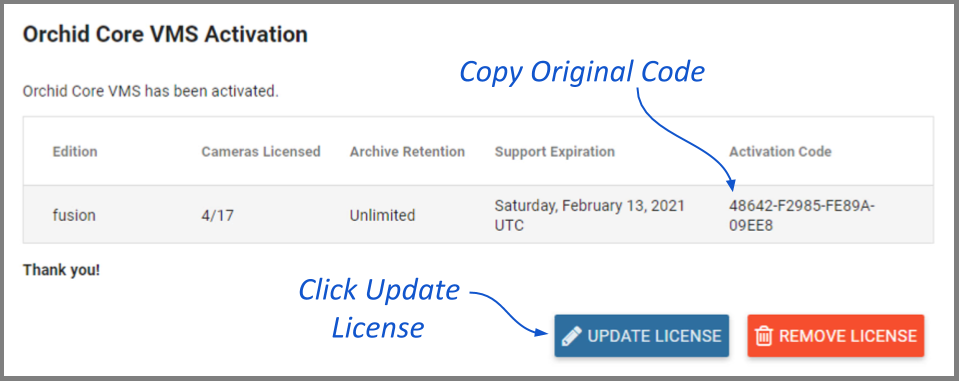
- When the Orchid Core VMS Activation screen appears (above), click and drag over your original activation code to select it, then click CTRL+C to copy the code. (You will need this code later.)
- Open a new text file and click CTRL_V to paste the original activation code into the text file.
- Save this text file on a USB drive that you can use on a computer with internet access.
- Click the Update License button to begin the upgrade/renewal process.
- On the Activation screen, press the Offline Activation button.
- When the Activation Instructions screen appears, this is your cue to take your USB drive and find a computer with internet access. Open a web browser and go to www.orchidsecurity.com/activation. The VMS Activation screen will appear.
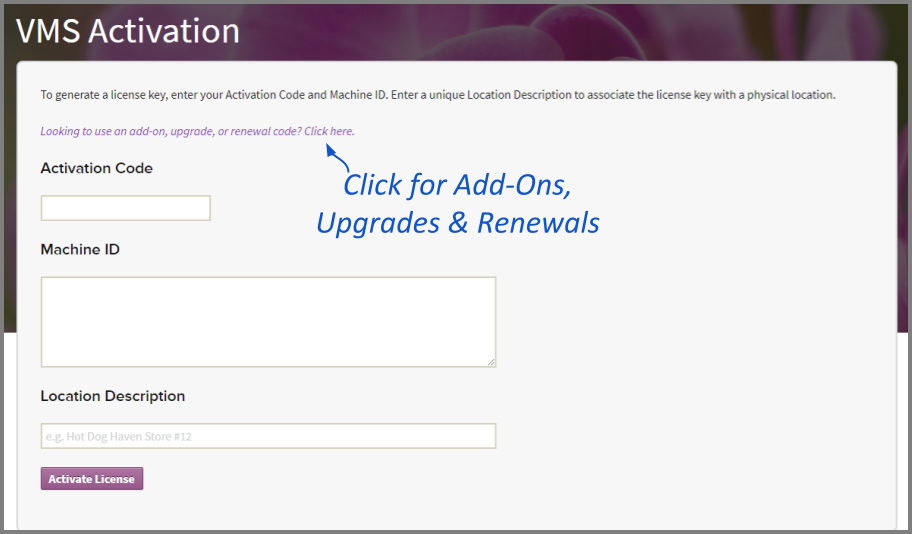
- Click on the link that says: “Looking to use an add-on, upgrade, or renewal code? Click here.” The Renewal/Add-On screen will appear.
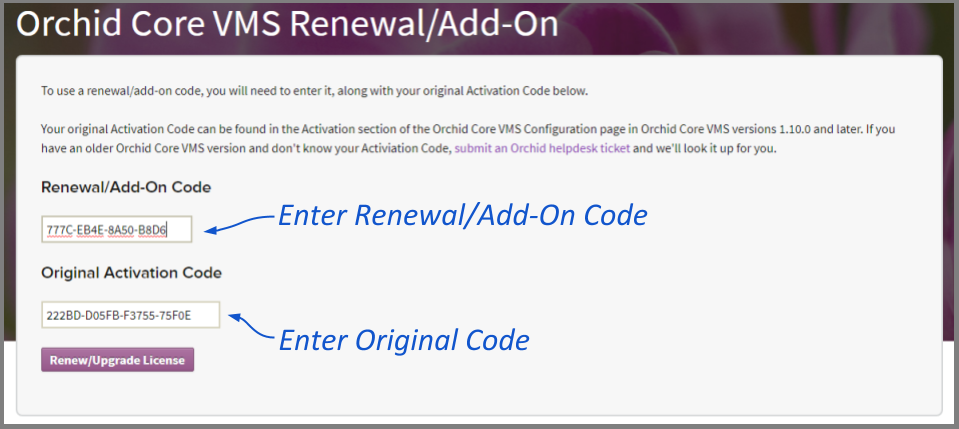
- Once you reach the Renewal/Add-On screen, go to the Original Activation Code field and copy the original code from the USB drive and paste it into this field.
- Then go to the Renewal/Add-On Code field and enter the code that you just purchased.
- Press the Renew/Upgrade License button. If successful, the system will generate a Renewed license key.
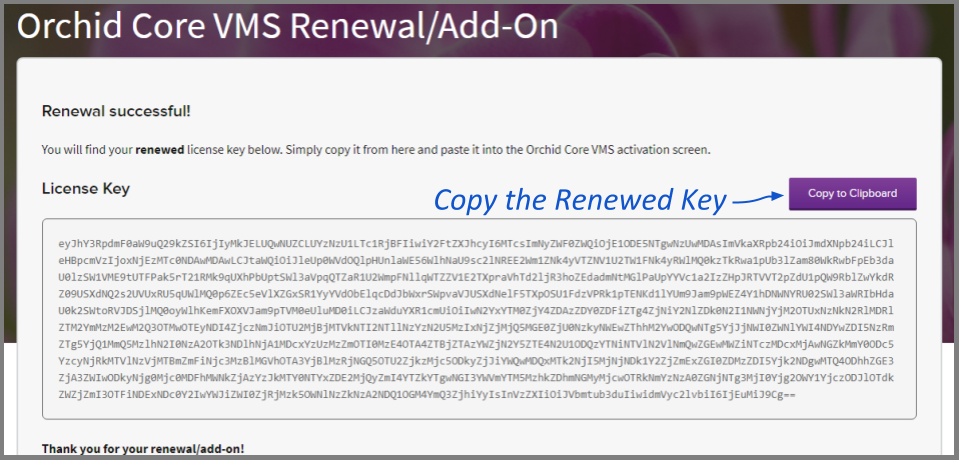
- Once the renewal is successful, select the text in the License Key field, and click CTRL-C to copy the License Key text. Use the CTRL+V command to paste it onto the USB drive.
- Close the Renewal/Add-On screen on the internet-connected computer.
- Take the USB drive back to the Orchid Core VMS server and return to the Activation Instructions screen.
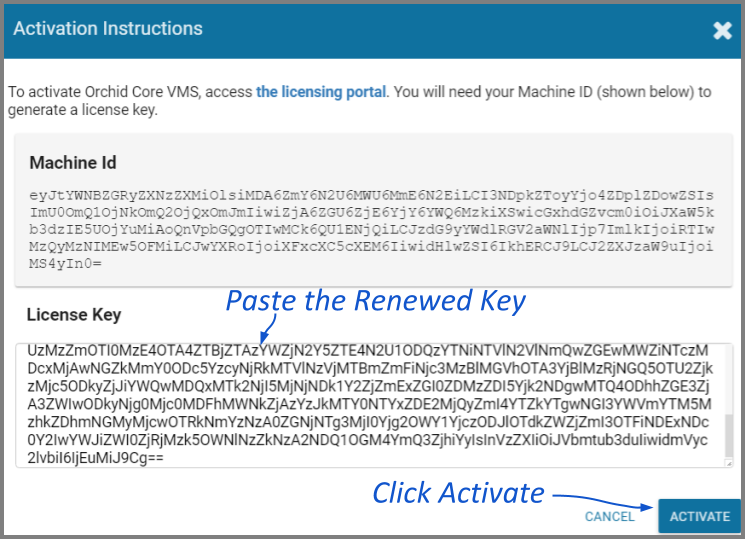
- Copy the Renewed license key text from the USB drive and paste it into the License Key field.
- Click the Activate button to activate your new license key. If the activation was successful, you will see a message at the top of your screen saying “Orchid Core VMS has been activated.”
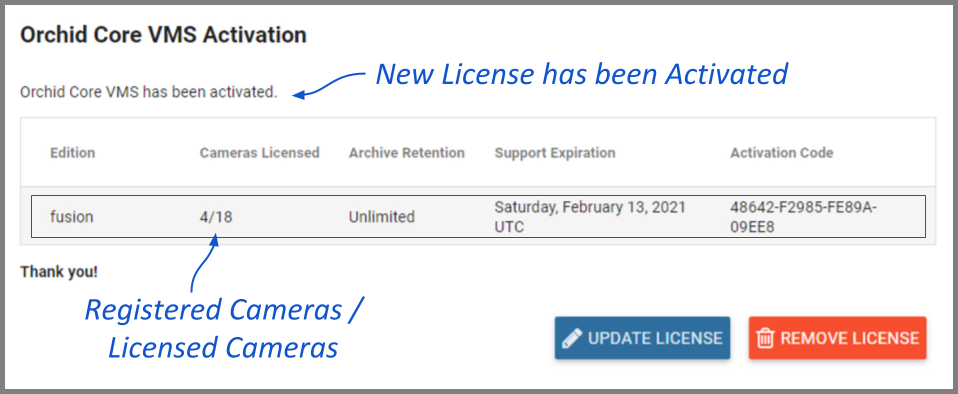
The Orchid Core VMS Activation screen should display updated information in the appropriate fields (to match the add-on, upgrade, or renewal you purchased).
Post your comment on this topic.