
The process of bringing an image into Imerge Pro, where it can be edited, is called importing. Once you have created a project, you will want to import some images to work with. There are many ways to do so, allowing you to use whichever method you are most comfortable with, or whichever option works best for your current needs.
Import images to new layer
All images you import will be stored in image layers. Each image layer can potentially contain multiple images.
To create a new image layer and import an image or images into it:
Option 1: The add image layer button. ![]()

- At the top of the layer stack, click the Add image layer button
![]() and select one of the options.
and select one of the options.
- Image from folder: Use this option to navigate to any folder on your system and select one or more images for direct import.
- Import folder: Use this option to select a folder on your system, and import everything inside.
- Chroma image: Use this image for importing green screen or blue screen photos. A chroma key effect will automatically be added to the layer, and set to remove the colored background.
- Raw image: Use this image for importing Raw images for processing. A variety of basic processing effects will be added to the layer automatically, making it simple to process the raw image to a finished state.
- Stock image: Use this image for importing stock images with a black or white background. The remove stock background and Matte cleaner effects will be added automatically, to facilitate clean removal of the background.
Option 2: The project menu
- In the project menu, select Import to project. Navigate to the image or images you want to import, and select them, then click Open.
Option 3: The insert menu
- Press CTRL+I to open the Insert menu, then select your preferred option.
- Image: Use this option to navigate to any folder on your system and select one or more images for direct import.
- Chroma image: Use this image for importing green screen or blue screen photos. A chroma key effect will automatically be added to the layer, and set to remove the colored background.
- Raw image: Use this image for importing Raw images for processing. A variety of basic processing effects will be added to the layer automatically, making it simple to process the raw image to a finished state.
- Stock image: Use this image for importing stock images with a black or white background. The remove stock background and Matte cleaner effects will be added automatically, to facilitate clean removal of the background.
Option 4: The keyboard
- On the keyboard, press CTRL+SHIFT+I in Windows or CMD+SHIFT+I on Mac. Navigate to the image or images you want to import, and select them, then click Open.
Option 5: Drag and drop
You can drag and drop images from the Windows File Explorer or Mac Finder directly into the Imerge interface.
- Drag an image onto the canvas and drop it, to import it into a new image layer.
- Drag an image onto the layer stack and drop it, to import it into a new image layer.
Import images into an existing layer
Images can be imported into any existing image layer as well. Each image layer can contain multiple content variations, but only one variation can be displayed at a time.
To import new content variations into an existing image layer:
Option 1: The add content item button ![]()
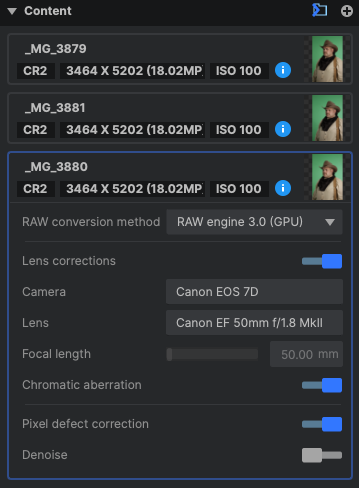
- Select the layer and navigate to its content list in the sidebar.
- Click the add content item button
![]() at the top right of the content list.
at the top right of the content list. - Choose the file or files you want to import, and click Open.
Option 2: Drag and drop
You can drag and drop images from the Windows File Explorer or Mac Finder directly into a layer’s content list.
- Drag an image onto the content list and drop it, to add the image to the layer as a new content variation.
Automated hot folder import
Imerge allows you to select a specific folder or directory on your system as a hot folder. When you set up a hot folder, all images currently in the folder are imported into Imerge Pro as content variations. The folder is then continuously monitored for changes, and any time images are added to or removed from the folder, the content list for the layer in Imerge is updated accordingly. The chief use for this is working with a tethered camera, which saves images to a specific folder on your computer as they are captured. Setting that folder as a hot folder in Imerge Pro means that every image you capture is immediately imported into Imerge, automatically.
To set up a Hot Folder in Imerge Pro:
Option 1: The add image layer button. ![]()
- At the top of the layer stack, click the Add image layer button
![]()
- Select Import folder. Navigate to the folder whose contents you wish to import, then click the Select Folder button.
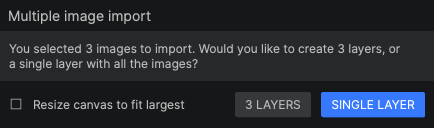
- If there are multiple images in the folder, you will see the Multiple Image dialog:
![]()
- X layers: This option imports each image in the folder into its own image layer. The number will vary based on how many images are in the folder.
- Resize canvas to fit largest: Enable this option to ensure that your images all fit within the canvas. The canvas dimensions will be resized to match the largest image in the selected folder. To leave the canvas at its current size, leave this option disabled.
- Single layer: Select this option to create a Hot Folder. All images in the selected folder will be imported into a single layer, as content variations.
- X layers: This option imports each image in the folder into its own image layer. The number will vary based on how many images are in the folder.
- If there are multiple images in the folder, you will see the Multiple Image dialog:
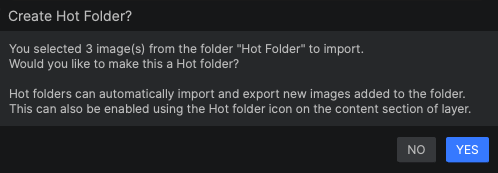
- In the Create hot folder? dialog, click Yes to enable the hot folder status for the image layer.
![]()
- When the layer is created, the hot folder icon
![]() will be enabled.
will be enabled.
![]()
Option 2: Convert an existing layer using the hot folder button ![]()
- In the layer stack, select the layer you want to convert to hot folder status.
- In the content list for the layer, click the set a hot folder
![]() button.
button.
![]()
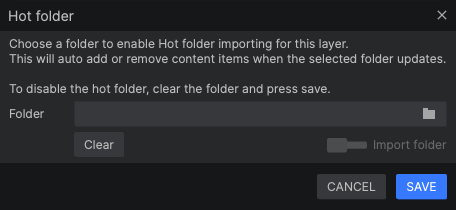
![]() Folder: Click the folder icon to navigate to the folder whose contents you want to import, or manually enter a file path.
Folder: Click the folder icon to navigate to the folder whose contents you want to import, or manually enter a file path.- Clear: Deletes the current file path from the folder property. If you wish to disable hot folder export, use this button to do so.
- Import folder: Enable this option to import all images currently in the selected folder. Leave it disabled to only import images added to the folder in the future.
- Cancel: Closes the dialog without implementing any changes to the layer status.
- Save: Stores the file path and enables the selected folder as a hot folder.
Need more help with this?
Don’t hesitate to contact us here.