
3D compositing adds depth to your scenes. In addition to the X and Y coordinates, you also have a Z coordinate.
Switching to 3D
To change a composite shot into 3D you need to add a camera. This can be done using the New Layer menu at the top of the composite shot timeline.
A default camera will be added and the scene will automatically switch into 3D. For more information on cameras see Virtual Cameras.
If you add a 3D layer to a timeline a camera will be automatically added.
Once you have a 3D camera, you will need some 3D content otherwise the camera will not have anything with which to interact. See Working with Layers for information on creating 3D layers.
Customizing the 3D Viewer
To aid navigation and placement in the 3D space you can change the Viewer to display multiple views from different angles.
You can display up to 4 views simultaneously from different angles. The View menu in the Viewer is used to add additional 3D views.
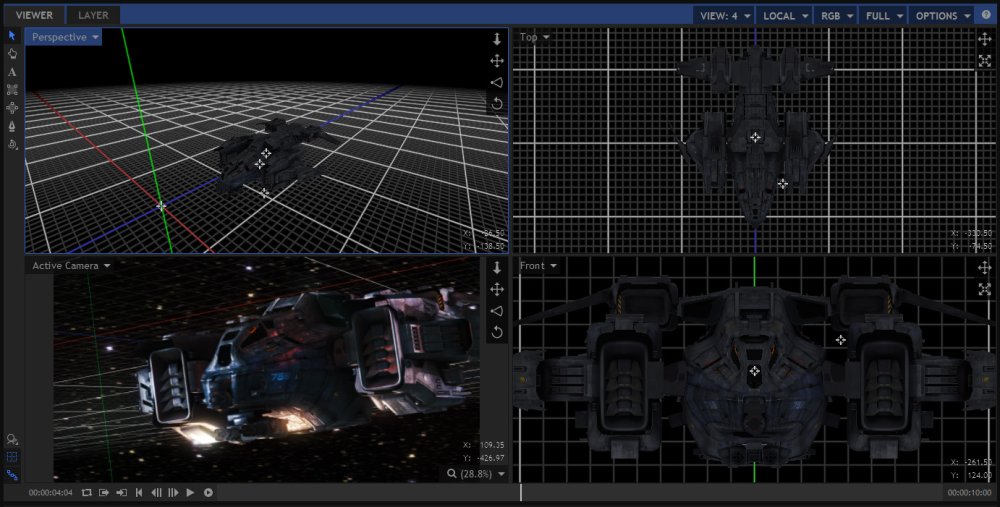
The c urrent view mode is displayed at the top left of each view. Clicking on this displays all the available modes:
Active Camera View
The active camera view shows what will be rendered when you export. This is what will appear in your rendered videos. If you have multiple camera layers on your timeline, the active camera is defined as being the top-most active camera layer on the current frame.
Changing the position and orientation when in active camera view will change your camera’s transform properties.
For more information on cameras see Virtual Cameras.
Perspective View
The perspective view is a free-roaming way to explore your scene without affecting the position of your camera.
Orthographic Views
The orthographic views provide flat, 2D views of your 3D scene. The orthographic views do not show perspective or depth.
You can choose from front, back, left, right, top and bottom views.
As they are presented in a 2D ‘blueprint’ form, the orthographic views are very useful for precise positioning of layers in the 3D space.
The orthographic views are controlled in a similar way to the Viewer when it is in 2D mode.
Zoom and pan controls in the corner of the Viewer can be clicked and dragged for quick movements.
Resetting the Views
You can reset a view using the Reset Current View option, in the View menu.
Navigating 3D Space
Navigating in a 3D composite shot is different than in a 2D composite shot as you also have to take the Z-axis (depth) into consideration.
Orbit Tool ![]()
The quickest and easiest way to move around the 3D space is using the orbit tool. This has two modes: Orbit Around Selected Layers and Orbit Around Clicked Point. You can switch between these two modes by clicking and holding on the Orbit tool button.
Orbit Around Selected Layers uses your current layer selection for orbiting. This can be a single layer or multiple layers. This way you can be certain of what you are going to orbit around, even in complex scenes.
Orbit Around Clicked Point tries to determine where you want to orbit around based on where you click in the Viewer.
- If you click on a layer the view will orbit around that specific point on the layer.
- If you click on an empty space it will orbit around that point on the 3D grid.
3D Move Controls ![]()
![]()
![]()


To the right of the 3D Viewer are the move controls. These will vary depending on your current view and are operated by clicking and dragging on them with the mouse.
- Dolly/Track Z: Moves the camera or view forwards and backwards along its own Z axis.
- Pan/Track XY: Moves the camera or view horizontally and vertically along its own X and Y axes.
- Zoom: adjusts the camera’s field of view, zooming in and out.
- Rotate/Tumble: Rotates the camera or view without moving its position.
Keyboard Shortcuts
Using keyboard shortcuts makes navigating in HitFilm’s 3D space much faster. The shortcuts are as follows:
- Orbit: ALT+Left mouse
- Dolly: ALT+Right mouse
- Zoom: CTRL/CMD+Right mouse
- Rotate: Middle mouse
- Pan: Right mouse (perspective & orthographic views only), *ALT*+Middle mouse or *CTRL*/*CMD*+Left mouse
- Canvas Pan: Right mouse (active camera view only)
- Select Object: Left mouse
Render Options
At the bottom-left of the 3D Viewer is a button for turning render options on and off.
Clicking the button will turn ALL render options on and off, which is a quick way to switch between a fast performing Viewer and a high quality render.
Holding the mouse button down on the button opens a menu where you can choose specific items to turn on and off:
- Lights: Turns rendering of lights on and off.
- Shadows: Turns rendering of shadows and ambient occlusion on and off.
- Reflections: Turns dynamic reflections on and off.
- Motion Blur: Turns motion blur on and off.
- Depth of Field: Turns depth of field on and off.
- Toggle All Render Options: turns everything on and off.
These settings only affect the Viewer. They do not affect your final export, which is always rendered with all elements activated.
You can also change these settings from the Viewer’s Options menu.