
Scopes allow you to precisely monitor the color of your project, to help with making color corrections and ensure that color ranges fall within specified standards. This is important to ensure that colors are accurately reproduced when the finished program is broadcast later. Scopes are important because they are always accurate, no matter what display you use. The actual colors in your video can vary based on the display they are viewed on, and how the color of that display is calibrated. But scopes will always give you accurate color info, to ensure that the colors fall within established standards regardless of the hardware used to make color adjustments.
There are four types of scopes available: a Histogram, an RGB Parade, a Vectorscope (which gives scopes its names), and a Waveform monitor.
Scopes can be accessed two different ways, through the Scopes panel, and through the Control panel of individual layers.
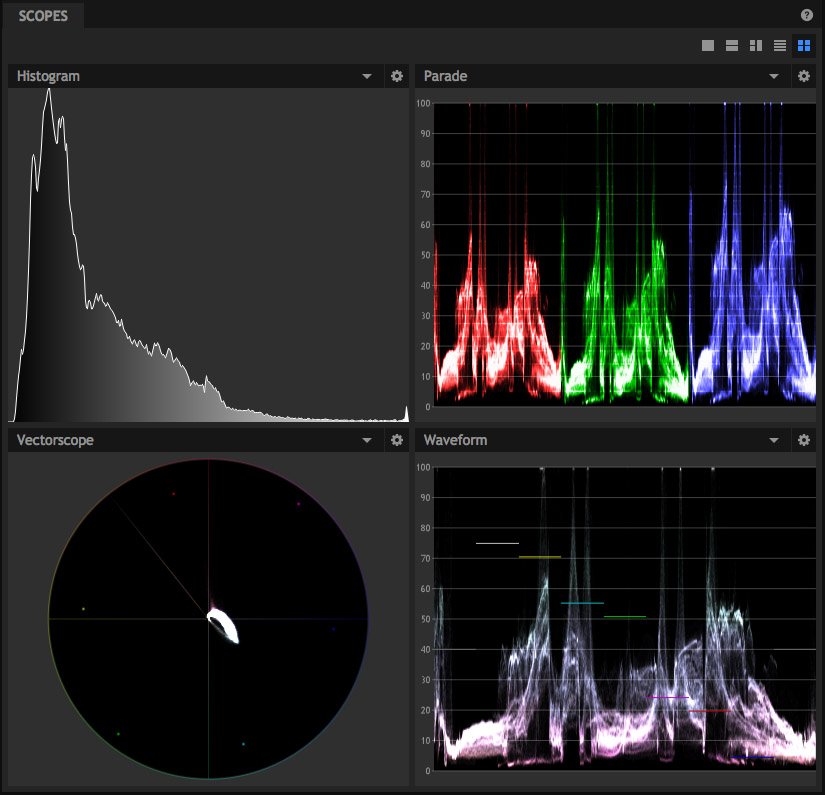
The Scopes Panel ![]()

The Scopes panel gives you color values for the output of your timeline. The readouts of the scopes panel are based on the combined color values of all layers on the timeline at the current playhead position.
The layout of the scopes can be changed using the buttons at the top right of the panel. You can focus on a single scope, or set up any combination of two, three or four scopes.
At the top of each scope in the panel, the current scope name is shown in a menu. You can open the menu to change which type of scope is shown.
Each scope also has properties that can be accessed through the cog icon, and which vary based on the type of scope being used.
Scopes Effects ![]()
Scopes can also be applied to individual video clips or layers, to monitor the color information for that specific layer. The Scopes folder, in the Effects panel, contains all four types of scopes, which can be applied in the same fashion as any other effect. When used as effects, the scopes readout is based on the color values of the specific layer or video clip they are applied to. This can be useful to evaluate the colors of each layer before they are combined into the final readout shown in the Scopes panel.
The Four Types of Scopes
There are four types of scopes available. Each gives a different readout of of your layer, so you can evaluate it from several directions. Each type of scope also has unique properties to control what information is displayed. The cog icon at the top right of each scope gives access to the properties for that scope.
Histogram
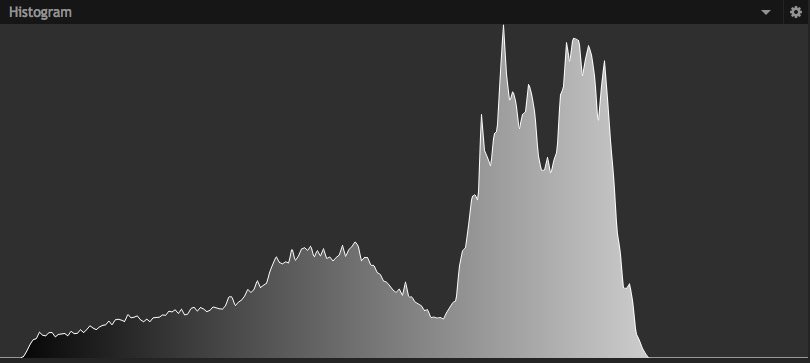
The histogram displays a readout of the tones in your image. The tones range from pure black on the left to pure white on the right. The height of the graph indicates the relative frequency of that specific tone in the image.
The Properties for the Histogram contain the following options.
- Mode: Select the color information that is displayed in the scope.
- Luminance: Displays the luminance levels of the overall image in a greyscale graph.
- RGB: Shows the red, green, and blue channels simultaneously, as colored overlays
- RGB Parade: Shows the red, green, and blue channels simultaneously, as individual readouts in a vertical stack
- Red: Shows only the red channel
- Green: Shows only the green channel
- Blue: Shows only the blue channel
- Alpha: Shows the levels of the alpha channel of the image
- CbCr: Shows the blue chroma difference and red chroma difference channels of the YCbCr color space. The Y value is Luminance, which can be selected separately
- CbCr Parade: Shows the blue chroma difference and red chroma difference channels of the YCbCr color space, as individual readouts in a vertical stack
- Cb: Shows only the blue chroma difference channel
- Cr: Shows only the red chroma difference channel
- Analysis Downsample: Adjusts the precision of the readout. Lower sample rates are faster, but less accurate.
- Color Space: Select between various color standards, so you can ensure your content meets the color specifications required
- Rec. 601: The color standard for standard definition (SD) footage
- Rec. 709: The color standard for high definition (HD) footage
- Rec 2020: The color standard for ultra high definition (UHD) footage
- Analyse Using: select whether the footage is analysed using the CPU or GPU
Parade
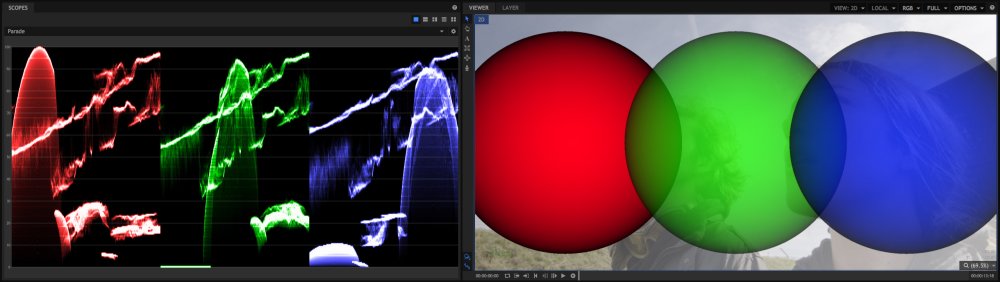
The Parade displays a readout of the contents of each color channel in your image. Each channel is shown individually, in sequence. Whenever “parade” is used in regard to a scope, it indicates that each channel will be shown individually, one after another.
In each channel of the parade scope, the left to right axis of the graph indicates the image from left to right. So the colors present on the left side of the image will be shown on the left side of the scope. The vertical axis of the graph indicates the intensity of that color channel in that area of the image.
In the image above, notice that the red circle is on the left side of the viewer. And when you look at the red channel of the scope, a spike of high red values appears on the left side of the graph. Compare that to the blue circle, which is on the right side of the viewer. And in the blue channel of the parade, high blue values are shown on the right side of the graph.
The Properties for the Parade contain the following options.
- Mode: Select the color information that is displayed in the scope.
- RGB: Shows the red, green, and blue channels simultaneously, as colored overlays
- YCbCr: Shows the luminance (Y), blue chroma difference (Cb) and red chroma difference(Cr) channels of the YCbCr color space.
- Direction: By default, the parade displays values across the image from left to right. The direction control allows you to change this, so that the scope is mapped across the image in a different direction. Setting the Direction to 90 degrees, for example, will map the top of the image to the left edge of the scope, and the bottom of the image to the right edge of the scope.
- Brightness: Manipulates the brightness of the parade readout. Increasing or decreasing the brightness of the parade may make it easier to read in some situations.
- Analysis Downsample: Adjusts the precision of the readout. Lower sample rates are faster, but less accurate.
- Color Space: Select between various color standards, so you can ensure your content meets the color specifications required
- Rec. 601: The color standard for standard definition (SD) footage
- Rec. 709: The color standard for high definition (HD) footage
- Rec 2020: The color standard for ultra high definition (UHD) footage
Vectorscope
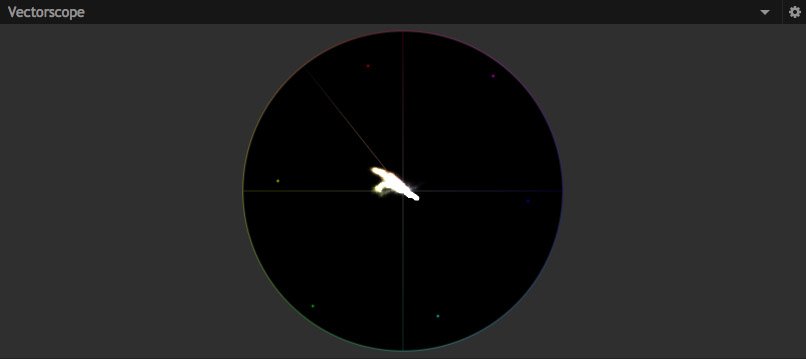
The Vectorscope provides hue and saturation data for your image. Hue is represented circularly, as a color wheel. Saturation is graphed along the radius. The more saturated a color is, the closer to the outside of the circle it will be graphed. The six color points around the perimeter of the circle represent the standard color bars used in vide, and can be used for reference. The diagonal line represents skin tones, to make it easier to color correct your footage for accurate color.
The Properties for the Vectorscope contain the following options.
- Brightness: Manipulates the brightness of the vectorscope readout. Increasing or decreasing the brightness of the parade may make it easier to read in some situations.
- Analysis Downsample: Adjusts the precision of the readout. Lower sample rates are faster, but less accurate
- Color Space: Select between various color standards, so you can ensure your content meets the color specifications required
- Rec. 601: The color standard for standard definition (SD) footage
- Rec. 709: The color standard for high definition (HD) footage
- Rec 2020: The color standard for ultra high definition (UHD) footage
- Skin Line: toggles the skin tone line on and off. By default the skin line is on, but you can hide it using this option, if you wish.
- Standard Color Bars: toggles the color bar indicators on and off. By default they are on, but you can hide them using this option, if you wish.
Waveform
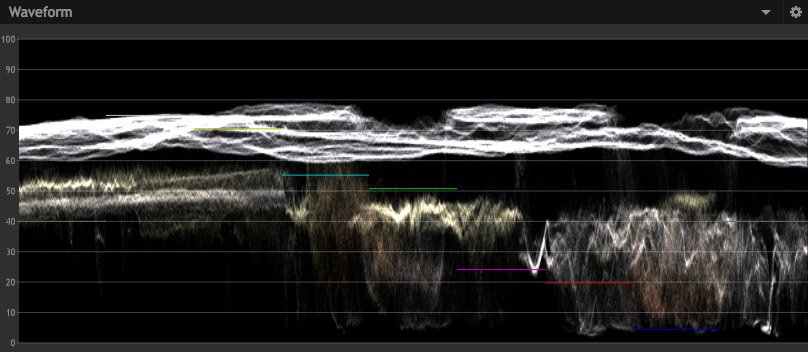
The Waveform displays a readout of the contents of the current frame. The left to right axis of the graph indicates the image from left to right, in a similar fashion to the Parade. So the colors present on the left side of the image will be shown on the left side of the scope. The vertical axis of the graph indicates the intensity of that color channel in that area of the image.
The Properties for the Waveform contain the following options.
- Mode: Select the color information that is displayed in the scope.
- RGB: shows the red, green, and blue channels simultaneously, as colored overlays
- YCbCr: shows the luminance (Y), blue chroma difference (Cb) and red chroma difference(Cr) channels of the YCbCr color space.
- Direction: By default, the waveform displays values across the image from left to right. The direction control allows you to change this, so that the scope is mapped across the image in a different direction. Setting the Direction to 90 degrees, for example, will map the top of the image to the left edge of the scope, and the bottom of the image to the right edge of the scope.
- Brightness: Manipulates the brightness of the waveform readout. Increasing or decreasing the brightness of the waveform may make it easier to read in some situations.
- Analysis Downsample: Adjusts the precision of the readout. Lower sample rates are faster, but less accurate
- Color Space: Select between various color standards, so you can ensure your content meets the color specifications required
- Rec. 601: The color standard for standard definition (SD) footage
- Rec. 709: The color standard for high definition (HD) footage
- Rec 2020: The color standard for ultra high definition (UHD) footage