
Masking is used to manually create a matte. A matte determines which parts of a layer are visible.
Practically, this means that masks are used to cut holes in your layers.
You can draw masks manually inside HitFilm or use mocha’s planar tracking to automatically track shapes for you. See Planar Tracking with mocha HitFilm for details.
Creating Masks ![]()
![]()
![]()
Masks can only be created in composite shots.
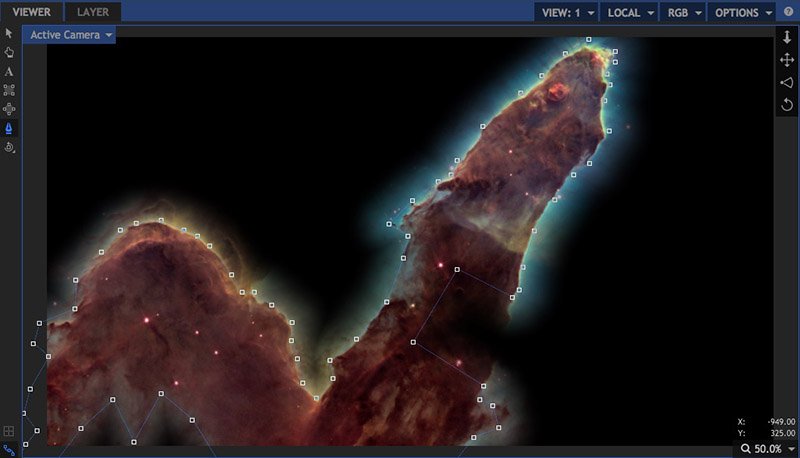
To create a mask you use the mask drawing tools, which are used to draw elliptical, rectangular and freehand shapes. First select a layer on the timeline, then use one of the mask tools to begin drawing. You may want to use the Layer Viewer to make it easier to see your layer.
Rectangle and Ellipse Shapes
![]() Elliptical Mask: draws a circular or elliptical mask.
Elliptical Mask: draws a circular or elliptical mask.![]() Rectangular Mask: draws a square or rectangular mask.
Rectangular Mask: draws a square or rectangular mask.
Click and drag on the Viewer to create the shape. This will create a new mask on the currently selected layer. Releasing the mouse will set the shape.
Holding SHIFT while drawing the shape will constrain it to a perfect square or circle. Holding ALT (OPTION on Mac) will set the center of the mask at the original point you pull from.
To deform the shapes see ‘Editing masks’, below.
Freehand Mask ![]()
For all mask shapes other than basic rectangles or ellipses, you will use the Freehand Mask tool. Freehand masks can be used for creating even very complex mask shapes.
With the Freehand Mask tool selected you can click on the Viewer to draw points. Clicking and dragging creates a curved line, while clicking and releasing creates a linear, straight line.
The shape of curved points can be further adjusted using the extension handles.
You can change the type of any point by right clicking on it and choosing the required type from the menu:
- Make Curved Locked: Both extension handles work in tandem. Adjusting one will adjust the other simultaneously. This is useful for maintaining smooth curves.
- Make Curved Unlocked: The extension handles can be adjusted separately. This is useful for creating sharp corners while retaining a curved line.
- Make Linear: The point forms an angled corner and the line either side is straight.
To activate a freehand mask you must close it. To do this simply click again on the first point you created, having created at least 3 points. The mask will close and activate.
Editing Masks ![]()
![]()
Once a mask has been created it can be edited and customized. There are two primary ways to edit a mask.
- Using the Freehand Shape tool, you can edit or animate the individual points of the mask, individually or in groups.
- Using the Selection tool, you can edit or animate the mask as a whole, using the Position, Scale, and Rotation properties.
Editing the Shape
If you want to make adjustments to the mask shape use the freehand shape tool. This will display all of the available mask shape points of the currently selected mask. Masks can be selected on the timeline or in the Controls panel.
Individual points can be clicked and dragged to change the shape. Curved points have additional bezier controls for changing the curvature. Clicking on a connecting line will add a new linear point. Clicking and dragging on a connecting line will add a new curved point.
To edit multiple points at once, you can drag a marquee around the points to select them. A bounding box will appear, enclosing the selected points.
- Dragging any corner will uniformly scale the selected points from the center of the bounding box.
- Holding SHIFT will override the aspect ratio lock, and allow freeform scaling from the center of the bounding box.
- Holding CTRL (CMND on Mac) will uniformly scale the selected points from the opposite corner of the bounding box.
- Holding SHIFT+ CTRL (SHIFT + CMND on Mac) will allow freeform scaling from the opposite corner of the bounding box.
- Holding ALT (OPT on Mac) and dragging any corner will rotate the selected points around the center of the bounding box.
Right-clicking on a selected point opens a menu with several additional options.
- Select All can be used to select all points in the mask.
- Invert Selection will select all unselected points, and deselect the currently selected points.
- Reset will restore the mask to its original shape.
Transforming the Shape
Using the Select tool in the Viewer you can transform the mask shape in the same way you would the layer itself. The currently selected mask on the timeline or in the Controls panel will also be selected in the Viewer, with a bounding box around the shape. This can be used to scale and position the shape without changing the shape.Click within the mask and drag to reposition it. Hold SHIFT and drag to reposition the anchor point from the center of the layer.
• Dragging any corner will uniformly scale the selected points from the anchor point of the mask.
- Holding SHIFT will override the aspect ratio lock, and allow freeform scaling from the anchor point of the mask.
- Dragging any edge point will scale the mask on that specific axis.
- Holding CTRL (CMND on Mac) will uniformly scale the selected points from the opposite corner of the bounding box.
- Holding SHIFT+ CTRL (SHIFT + CMND on Mac) will allow freeform scaling from the opposite corner of the bounding box.
- Holding ALT (OPT on Mac) and dragging on an edge point will rotate the shape.
Animating Masks
To animate the mask over time you must have the Path property’s keyframes enabled. See Animating with Keyframes for details.
The mask’s entire shape is stored in the Path property. You cannot keyframe individual mask points.
Mask Properties
A mask’s properties can be customized in the Controls panel or on the timeline.
- Inverted: Toggles whether the mask selection area is inside or outside of your specified shape.
- Blend: Multiple mask shapes can be blended together in various ways for different results.
- Shape
- Expansion: This can be used to contract or expand the mask without needing to change its shape or position.
- Feather: There are three types of feathering; working from Inside the mask shape, Outside, or Both. Which you use will depend on the specifics of your shot.
- Feather Strength: A stronger feather creates a softer edge to the mask.
- Roundness: This is a useful way to change a linear shape into a curved shape without needing to alter the points.
- Transform
- Path: If keyframing is turned on for this property the mask shape can then be animated over time.
p(banner tip). You cannot add or remove mask points using keyframing. A mask shape will have the same number of points for its entire duration. - Opacity: Adjusts the transparency of the mask.
- Anchor Point: Sets the location of the mask’s anchor point, with 0,0 being the center of the mask.
- Position: Moves the mask along the X and Y axes. This is useful for quickly moving the mask without changing its shape.
- Scale: Enlarges or shrinks the mask. The X and Y scales are linked by default so that your layer retains its original shape. You can unlink them using the chain icon.
- Rotation: Rotates the mask around its anchor point. Rotation is presented as number of turns and degrees, making it easy to keyframe multiple rotations.
- Extra Transform: Used by mocha HitFilm. See Planar Tracking with mocha HitFilm for details.
- Path: If keyframing is turned on for this property the mask shape can then be animated over time.