
The CT Jenkins plugin operates based on the local file system path of exported general projects. To manage general projects under version control, additional configuration is required.
Follow one of the two methods below to apply changes from general projects to Jenkins builds.
1) Integrating CT 2024.12 Projects Using Jenkins Git Plugin
- Install the Git plugin from [Manage Jenkins] > [Plugins].
- Create a separate Git repository to manage the CT 2024.12 project.
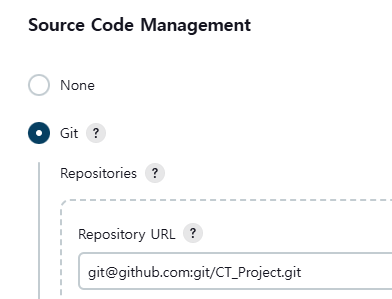
- Configure the Git settings in [Configure] > [Source Code Management] of the Jenkins project.
- Enter the repository URL where the CT 2024.12 project is uploaded in [Repository URL].
![]()
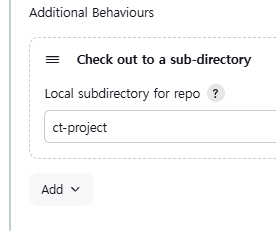
- After the connection settings, select [Additional Behaviors] > [Add] > [Check out to a sub-directory]. Enter
ct-projectfor [Local subdirectory for repo].
![]()
- Use [Local subdirectory for repo] for convenient project management. You may freely set the directory name, excluding
ct.
- Use [Local subdirectory for repo] for convenient project management. You may freely set the directory name, excluding
- Enter the repository URL where the CT 2024.12 project is uploaded in [Repository URL].
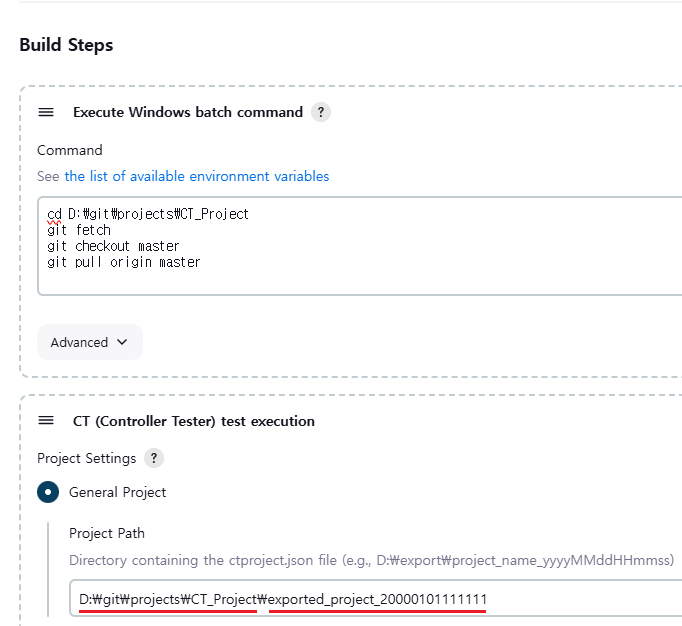
- Specify the general project path in [Configure] > [Build Steps] > [CT (Controller Tester) test execution] > [Project Settings] as follows.
- Windows:
{jenkins workspace path}\ct-project\{exported project folder path} - Linux:
{jenkins workspace path}/ct-project/{exported project folder path} - The example is as follows:
![]()
- Windows:

2) Integrating CT 2024.12 Projects Using Default Jenkins Build Steps
- Clone the repository managing the CT 2024.12 project to the Jenkins server.
- Add a build step to configure the cloned project above [CT (Controller Tester) test execution] in [Build Steps].
- Windows: Add [Execute Windows batch command].
- Linux: Add [Execute shell].
- Write a command in [Command] to always pull the latest version of the repository to the server. Specify the general project path as follows.
- Windows:
{cloned repository path}\{exported project folder path} - Linux:
{cloned repository path}/{exported project folder path} - The example is as follows:
![]()
- Windows:
Need more help with this?
Don’t hesitate to contact us here.
Copyright © 2025 Suresofttech
—
Powered by 