
Once a transport path has been created, target systems need to be assigned. Select the transport path in the configuration window – the targets that are currently assigned will appear in the transport path tree
Next, drag each required target to the tree and either
- Drop the target system onto an empty space to add the target system as a root node of the transport path, or
- Drop the target system onto another target system that already appears in the transport path tree to build a hierarchy of targets.
Please note that it can cause issues if the same target system is present on more than one transport path so this is now prevented in Transport Expresso. If this is required the SAP system should be defined against an additional target system to allow this to happen.
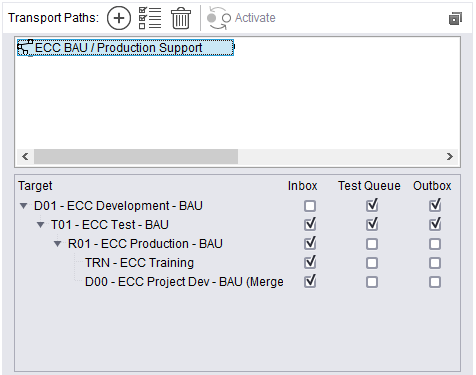
When a transport form is completed (or a transport request pending transport is approved), the transport request automatically flows to the transport path’s “root” targets. Once a transport request finishes processing within a particular target, it flows to the targets that follow on the transport path.
For example, if the Production target follows the Test target in the transport path tree, then a transport request that is assigned to the transport path will be imported into Production after it has been imported into the Test target – and potentially after the associated task has been tested and/or the changes approved out of the target (if these transport path options are enabled for the target).
The transport path also specifies whether transport requests need to be approved into, tested in and/or approved out of a target system (these are the Inbox, Test Queue and Outbox options respectively). Simply enable the desired options using the checkboxes that appear alongside each target system in the transport path tree.
Post your comment on this topic.