
Contact Manager is deployed with a self-signed SSL certificate, but optionally can be configured with a certificate from a private or public certificate authority.
Contact Manager supports SSL certificates generated using its own private key or using an external private key.
- Generate a Certificate Signing Request (CSR)
- Use the CSR to generate a certificate with a Certificate Authority
- Upload the certificate to Contact Manager and restart the server
Method 1 – Use Contact Manager’s private key
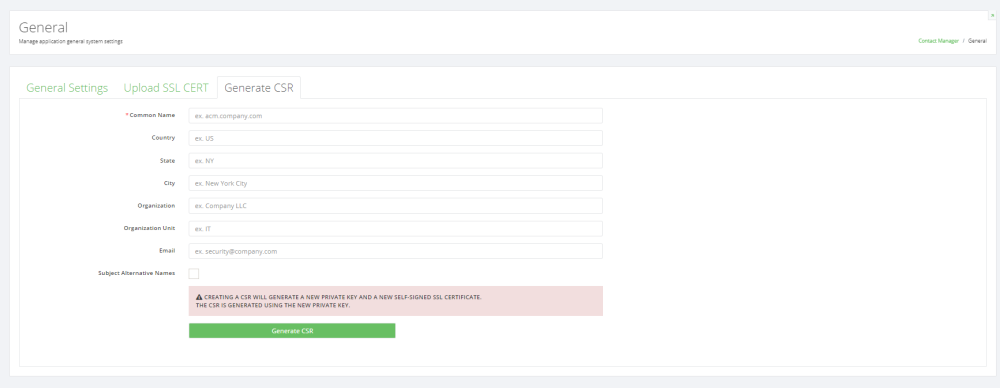
- Select Settings from the System menu
- Click the Generate CSR Tab
- Enter the information for the certificate request as demonstrated in the table below
- When complete, click Generate and choose a location to save the CSR file.
- Select the Upload SSL Cert tab
- Select Choose File and locate the server.crt file, and click Upload Certificate
- Restart Contact Manager server for the change to take affect

Method 2 – Use an external private key
- Select Select the Upload SSL Cert tab
- Select the Generate button
- Complete the Certificate Signing Request
With the CSR generated, the next step is to generate a certificate using your designated Certificate Authority. Contact Manager supports certificates from any valid public certificate authority such as DigiCert or Verisign as well as self-signed certificates authorities.
Using the CSR generated from Contact Manager, follow the instructions provided by your certificate authority to generate a certificate. Download the certificate bundle most appropriate for Apache Web Server, which is typically a ZIP file containing the individual certificate files. The Certificate should have a .crt extension and will need to be renamed to server.crt before being uploaded to Contact Manager.
Post your comment on this topic.