
Starting in Orchid Core VMS version 2.6, the Camera Configuration screen includes Motion Detection Settings which allow you to apply camera-specific motion detection settings. The Motion Detection Configuration screen provides two tools to reduce the number of “nuisance” motion captures: Motion Mask and Object Size.
Motion Mask
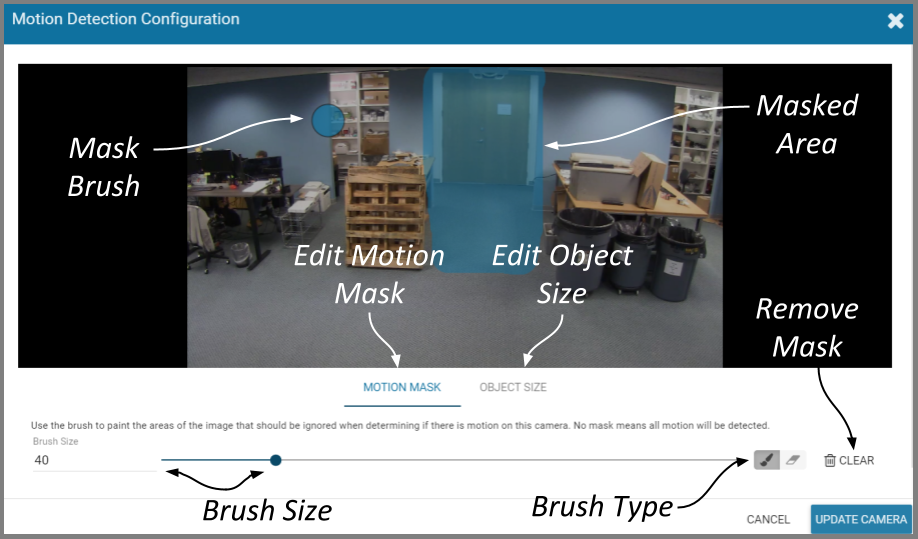
- At the Camera Configuration screen, click the camera you want to edit. Click the Motion Detection link to open the Motion Detection Configuration screen.
- Select the Motion Mask tab (just underneath the video image). Use this screen to change the way motion detection is applied to the selected camera.
By default, all cameras are set to detect motion. When motion is detected, a motion event is recorded and will appear on the Timeline Bar (which is intended to make video review easier). But sometimes, the camera captures too much motion. There may be objects in the video, like trees, banners, or balloons, that move constantly, increasing the number of motion events to such a degree that it actually makes video review more tedious.
The Motion Mask tool allows you to “paint” over one or more areas of the video image, making those areas invisible to motion detection. (You will still see all of the video, but the motion capture feature will ignore the masked area.)
- Select the Brush Type.
- The paint brush will add a masked area to the video image. This area will be ignored by the motion detection feature.
- The eraser will remove masked area from the video image. This area will now be evaluated during motion detection.
- Adjust the Brush Size using either of the following methods.
- Click in the Brush Size field and enter a new number or use the up and down arrows to increase or decrease the size of the brush.
- Click and drag the slider to increase or decrease the size of the brush.
- Position your cursor over the video image and you’ll see a blue circle (the mask paint brush) or a pink circle (the mask eraser). (Adjust the brush size if needed.)
- Click and drag the brush across the video image to change the masked area.
- If you selected the paint brush, you will add masking to the image.
- If you selected the eraser, you will remove masking from the image.
- To remove the entire mask, click the Clear button.
- To save the mask (or the cleared image), click the Update Camera button.
Object Size
The Object Size tool allows you to modify motion detection based on area. This tool instructs the software to ignore the movement of any objects with a smaller area than the selected object size (like small animals and robot vacuum cleaners). (You will still see all of the video, but the motion capture feature will ignore the small stuff.)
- Select the Object Size tab (just underneath the video image). Notice the blue square in the center of the video image. This represents the defined object area. Objects of equal or lesser area will be ignored by motion detection.
For example, if the selected object size (area) is 100, the software will ignore objects with an area of 100 or less. This includes objects that are 10 × 10, 20 × 5, 30 × 3, 45 × 2 and so on (each of which have an area of 100 or less).

- Adjust the Object Size using either of the following methods.
- Click in the Size field and enter a new number or use the up and down arrows to increase and decrease the area.
- Click and drag the slider to increase and decrease the area.
- To activate motion detection for objects of all sizes, set the Size to zero.
- To save the Object Size settings, click the Update Camera button.
Post your comment on this topic.