
VEGAS Effects integrates directly with VEGAS Pro 17, allowing you to move video clips directly from the VEGAS Pro timeline into VEGAS Effects. This is the primary workflow for creating a new VEGAS Effects timeline. Other options are also available for working in VEGAS Effects directly.
Starting A New Project
Each time you open VEGAS Effects, a new project is created automatically. The most common method for creating a new project is using the integration with VEGAS Pro 17.
- In VEGAS Pro, right-click the asset on the timeline.
- Select Edit in VEGAS Effects
- VEGAS Effects will launch, and a new timeline will be created containing the selected asset.
If VEGAS Effects is already open and you wish to create a new project, you can do so by opening the File menu, and selecting New…
Creating New Timelines
Your work within a project is performed on timelines. The Start Tab, which is always visible in the timeline panel, is the primary location from which new timelines are created. There are several ways to create a new timeline in VEGAS Effects, depending on your desired workflow.

New Timeline Using VEGAS Pro 17 Integration
While working in VEGAS Pro, you can send a media asset from the VEGAS Pro timeline into VEGAS Effects, for compositing.
- In VEGAS Pro, right-click the asset on the timeline.
- Select Edit in VEGAS Effects
- VEGAS Effects will launch, and a new timeline will be created containing the selected asset.
New Empty Composite Shot
VEGAS Effects can also be used as a standalone application, without VEGAS Pro.
- Launch VEGAS Effects.
- In the Start panel, click the large New Composite Shot button.
- In the Composite Shot Properties window that opens, enter the settings for your new composite shot.
- Name: New timelines are named sequentially by default, but you can enter a name that reflects the contents of the timeline to help keep your project organized.
- Template: Templates are provided for most common video formats up to 8k resolution. The Save icon to the right of the templates menu allows you to save your current settings as a new template, for future access.
- Duration: Set the specific duration of the timeline.
- Width/Height: Enter the resolution you wish the timeline to use.
- Frame Rate: Set the number of frame per second that the timeline will use.
- When the properties are set, click OK.
- A new blank timeline will open.
You can return and edit your Project settings at any time through the File menu, by clicking File > Project Settings.
New Composite Shots From Footage
- Launch VEGAS Effects.
- In the Start panel, click the large New Composite Shots From Footage button.
- In the File Explorer window that opens, select the media file or files that you wish to import.
- Click the Open button to import the media assets.
- A new composite shot timeline will be created for each file that was imported, using the properties of the source media asset.
New Composite Shot by Dragging
You can also create a new timeline by dragging content onto the Start tab of the timeline.
- Media Panel: With the Start tab of the timeline selected, drag a Media File or 3D Model from the Media panel onto the timeline area and drop it, to create a timeline from that asset.
- Effects Panel: With the Start tab of the timeline selected, drag a 3D Effect or 3D Effect Preset from the Effects panel onto the timeline area and drop it, to create a timeline from that effect.
New Composite Shot From The Media Panel
You can also create a new timeline from the Media panel.
- In the Media panel, click the New button, and select Composite Shot.
- Alternately, use the keyboard shortcut Ctrl+Shift+N to create a new blank composite shot.
Project Settings
The Project settings define the quality at which your project is rendered. In general, higher settings create higher quality results, at the expense of slower performance. You may want to adjust some of these settings periodically while working on a project, using lower settings while working to increase productivity, then switching to higher settings to evaluate quality, or for your final export. You can also set default values for these settings in the Render tab of the VEGAS Effects Options.
- To access the Project settings, open the File menu and select Project Settings…
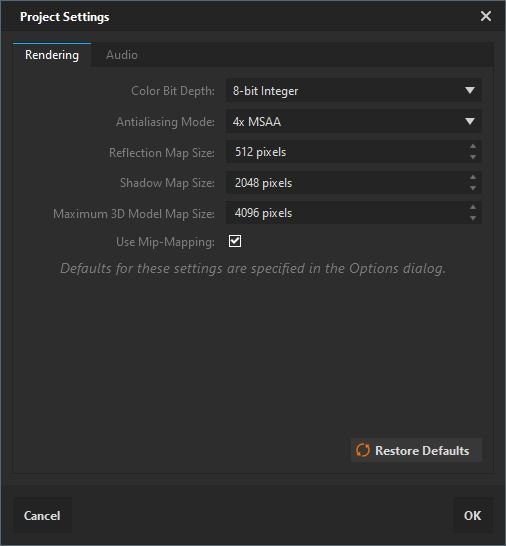
- Color Bit Depth: Higher bit depth creates higher fidelity images but will increase rendering times, especially on less powerful hardware.
- Antialiasing Mode: Antialiasing is used to create perceptibly higher quality edge detail. VEGAS Effects supports multiple antialiasing types depending on the capabilities of your hardware. Higher numbers can give higher quality results, and may increase processing times.
- Reflection Map Size: The quality of 3D model reflections can be controlled using the resolution of the reflection maps. Larger reflection maps will create higher quality reflections at the cost of performance. The default setting of 512 pixels looks good in most circumstances other than close-ups.
- Shadow Map Size: The quality of shadows can be controlled using the resolution of the shadow maps. Larger shadow maps will create smoother edges on shadows, at the cost of performance.
- Maximum 3D Model Map Size: The quality of 3D model textures is dependent on the resolution of the texture maps. Larger texture maps will create higher quality reflections, but will also impact performance. Some hardware may not be capable of handling very high resolution maps.
- Use Mip-Mapping: Mip-mapping pre-calculates multiple versions of an imported image, at different resolutions. Optimizing the images in this way increased performance speed and reduces aliasing artifacts.
Additional details about these render settings are available on the Render Options page of this manual.
Composite Shot Properties
The properties of any composite shot can be edited at the time of its creation, or at any time afterward.
You can open the settings for the current composite shot at any time, in two ways:
- From the Timeline: On the timeline, click the Properties Cog at the bottom left of the timeline.
- From the Media Panel: In the Media panel, click the Properties Cog to the right of the composite shot name.
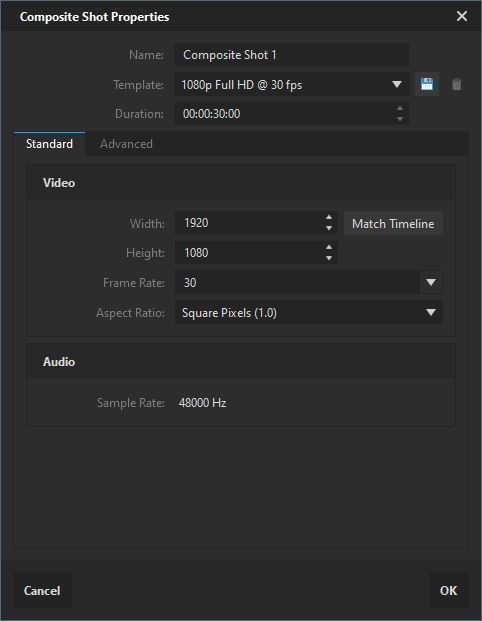
Video
It is advisable to be familiar with the formatting details of the footage you will be editing, before you begin your project. If you know the resolution, frame rate, and aspect ratio of your footage, enter that information here. If you don’t know these settings, then don’t worry. You can skip them for now, and VEGAS Effects can adjust the settings for you later, to match the video files you import.
- Width: The width in pixels you want your project to use. The maximum supported resolution will depend on the amount of video RAM on your GPU.
- 1GB of RAM up to 4GB will support resolutions up to 4096 × 4096.
- 4GB or more of video RAM will support resolutions up to 8192 × 8192.
- Height: The height in pixels you want your project to use. The maximum supported resolution will depend on the amount of video RAM on your GPU.
- 1GB of RAM up to 4GB will support resolutions up to 4096 × 4096.
- 4GB or more of video RAM will support resolutions up to 8192 × 8192.
- Frame Rate: The number of frames per second that you want your project to use. This should be the same frame rate that you wish to use when exporting your project. In most cases, it will also be the same frame rate as your imported video.
- Aspect Ratio: The pixel aspect ratio that you want your project to use. This should almost always be set to square. Some cameras create anamorphic video, which is compressed horizontally when recorded, and requires the pixels to be stretched horizontally when displayed. Even when you plan to import anamorphic video files, it is usually best to set up your project with a square pixel aspect ratio. Any anamorphic video you import will then be conformed to standard square pixels, so it can be viewed correctly, without distortion, in any context.
Audio
Select the sample rate that you wish to use for your project. In general, this should be the same sample rate used by your audio files. If you will be importing audio files with multiple sample rates, your project should use the Sample rate at which you wish to export.