The Transform controls for a layer allow you to manipulate the size and shape of the layer, and how it is combined with the other layers in your project. Each kind of layer has its own unique set of transform controls, though there is some overlap in the controls between layer kinds.
Transforming image layers
Image layers contain the largest number of transform controls.
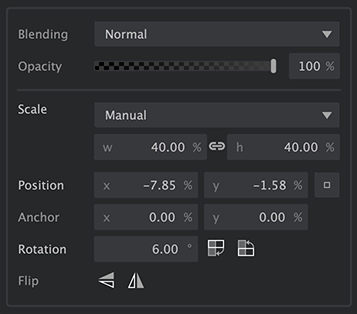
- Blending: The blending menu define how the colors in the selected layer are combined with the layers farther down in the layer stack. Full details of the blending mode options are available on the blending modes page of this manual.
- Opacity: Adjusts how opaque or transparent the layer is. 100% is fully opaque, and 0% is completely transparent.
- Scale: Scale controls adjust the size of the layer relative to the canvas, and are used to enlarge or reduce the size of the layer.
- Scale mode menu: There are three modes that determine how the layer is scaled.
- Manual: This is the default mode, and gives you full manual control over the size of the layer.
- Fill canvas: Auto adjusts the layer size so that it completely fills the canvas. If the layer and the canvas are different shapes, then some of the layer will be cropped.
- Fit to canvas: Auto adjusts the layer so the entire layer fits within the canvas. This gives you the largest possible layer size without any of the layer falling outside the canvas.
- Width and height: When manual mode is selected, the width and height of the layer are displayed in percentages. Decrease the value to make the layer smaller, or increase the value to make it larger.
- Linking/unlinking the scale ratio: By default the width and height are linked, so adjusting one automatically adjusts the other as well, and the image will not get distorted. Click the blue chain icon between the width and height to unlink them, if you need to edit them independently.
- Scale mode menu: There are three modes that determine how the layer is scaled.
- Position: Adjusts the location of the layer on the canvas. For basic adjustments, you can simply click and drag the layer directly on the canvas. But precise adjustments can also be made in the controls here.
- X and Y: Defines the X (horizontal) and Y (vertical) position of the selected origin point. You can edit the values to change the origin point’s position.
- Anchor matrix: You can select the origin point from which the layer’s position will be defined by clicking the point you wish to use. By default, the position is defined using the center point, but you can select any corner or and edge center if it works better for the alignment you need.
- Anchor point: Offsets the layer from the selected anchor point. The origin point will stay in place, while the image moves.
- Rotation: Spins the layer around the anchor point.
Rotate 90° clockwise: Use this button to quickly rotate the layer in a clockwise fashion, in precise 90° increments.
Rotate 90° counter-clockwise: Use this button to quickly rotate the layer in a counter-clockwise fashion, in precise 90° increments.
- Flip: These two buttons reverse the image in either direction.
Flip horizontal: Flips the image on a horizontal axis, so the bottom becomes the top and the top becomes the bottom.
Flip vertical: Flips the image on a vertical axis, so the left side becomes the right side and the right side becomes the left side.
Transforming text layers
Text layers have similar transform controls similar to image layers. There are no Scale controls for text layers, though, because the size of the text is controlled in the Font settings.
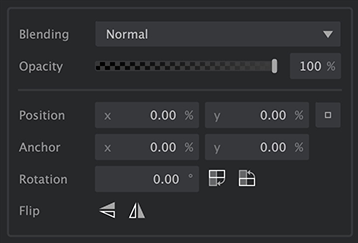
- Blending: The blending menu define how the colors in the selected layer are combined with the layers farther down in the layer stack. Full details of the blending mode options are available on the blending modes page of this manual.
- Opacity: Adjusts how opaque or transparent the layer is. 100% is fully opaque, and 0% is completely transparent.
- Position: Adjusts the location of the layer on the canvas. For basic adjustments, you can simply click and drag the layer directly on the canvas. But precise adjustments can also be made in the controls here.
- X and Y: Defines the X (horizontal) and Y (vertical) position of the selected origin point. You can edit the values to change the origin point’s position.
- Anchor matrix: You can select the origin point from which the layer’s position will be defined by clicking the point you wish to use. By default, the position is defined using the center point, but you can select any corner or and edge center if it works better for the alignment you need.
- Anchor point: Offsets the layer from the selected anchor point. The origin point will stay in place, while the image moves.
- Rotation: Spins the layer around the anchor point.
Rotate 90° clockwise: Use this button to quickly rotate the layer in a clockwise fashion, in precise 90° increments.
Rotate 90° counter-clockwise: Use this button to quickly rotate the layer in a counter-clockwise fashion, in precise 90° increments.
- Flip: These two buttons reverse the image in either direction.
Flip horizontal: Flips the image on a horizontal axis, so the bottom becomes the top and the top becomes the bottom.
Flip vertical: Flips the image on a vertical axis, so the left side becomes the right side and the right side becomes the left side.
Transforming solid layers
Solid layers simply fill the canvas area with a solid color, so the Transform controls focus on how that color is blended with the other layers in your project.
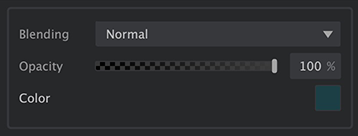
- Blending: The blending menu define how the colors in the selected layer are combined with the layers farther down in the layer stack. Full details of the blending mode options are available on the blending modes page of this manual.
- Opacity: Adjusts how opaque or transparent the layer is. 100% is fully opaque, and 0% is completely transparent.
- Color: Click the color swatch to open a color picker and choose the color for your text. The image here shows a dark teal as the selected color, but the color of the swatch will represent your currently selected color.
Transforming adjustment layers
Adjustment layers have no positioning controls, because the y have no actual rendered contents. They alter other layers in your project, so the transform controls only contain the controls that affect how the layer is blended with other layers.

- Blending: The blending menu define how the colors in the selected layer are combined with the layers farther down in the layer stack. Full details of the blending mode options are available on the blending modes page of this manual.
- Opacity: Adjusts how opaque or transparent the layer is. 100% is fully opaque, and 0% is completely transparent.
Transforming group layers
Group layers serve as folders which contain other layers, allowing you to use multiple layers as a single object. They can be used for organization, or to control the order in which processing is applied.
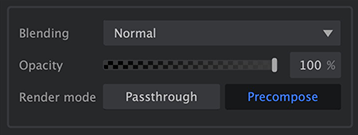
- Blending: The blending menu define how the colors in the selected layer are combined with the layers farther down in the layer stack. Full details of the blending mode options are available on the blending modes page of this manual.
- Opacity: Adjusts how opaque or transparent the layer is. 100% is fully opaque, and 0% is completely transparent.
- Passthrough: Passthrough blends the layers within the group in order, as if the group did not exist. This option allows the blend modes of individual layers within the group to interact with layers below the group.
- Precompose: Precompose processes all layers within the group first, and then layers the precomposed image created by the group over any layers below the group.This option means that only the bend mode of the group itself will be used to combine the layers within the group with any layers below the group.
Transforming HDR stack layers
HDR stack layers combine multiple images with different exposures to create a single image with expanded dynamic range. Most of their transform controls match those of a standard image layer.
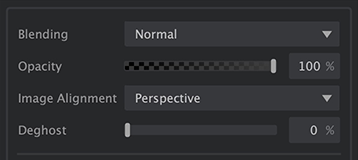
- Blending: The blending menu define how the colors in the selected layer are combined with the layers farther down in the layer stack. Full details of the blending mode options are available on the blending modes page of this manual.
- Opacity: Adjusts how opaque or transparent the layer is. 100% is fully opaque, and 0% is completely transparent.
- Image alignment: Specifies how the multiple images used to create the final exposure are aligned.
- None: All images are left in their original position. If all of your images were shot from a solid tripod, this option can speed up processing times.
- Translate & rotate: The images in the stack can be moved horizontally or vertically, or rotated, but no distortion will be applied during the alignment process.
- Perspective: In addition to translation and rotation adjustments, this option will also use perspective distortions when necessary, to improve the alignment results.
- Deghost: Ghosting refers to areas of the image where multiple edges are visible for a single object. After the images are aligned, there might be areas where not everything perfectly aligns Leaves moving in the wind, or the surface of a lake for example. Deghosting removes the unwanted duplicate edges, to improve image clarity.
The remaining transform controls (not pictured) exactly match those of a standard image layer, and function in the same way.
Transforming focus stack layers
Focus stack layers combine multiple images with different focal distances to create a single image with expanded depth of field. Most of their transform controls match those of a standard image layer.
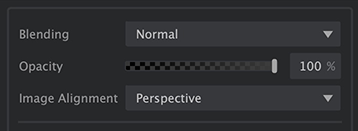
- Blending: The blending menu define how the colors in the selected layer are combined with the layers farther down in the layer stack. Full details of the blending mode options are available on the blending modes page of this manual.
- Opacity: Adjusts how opaque or transparent the layer is. 100% is fully opaque, and 0% is completely transparent.
- Image alignment: Specifies how the multiple images used to create the final exposure are aligned.
- None: All images are left in their original position. If all of your images were shot from a solid tripod, this option can speed up processing times.
- Translate & rotate: The images in the stack can be moved horizontally or vertically, or rotated, but no distortion will be applied during the alignment process.
- Perspective: In addition to translation and rotation adjustments, this option will also use perspective distortions when necessary, to improve the alignment results.
The remaining transform controls (not pictured) exactly match those of a standard image layer, and function in the same way.
Need more help with this?
Don’t hesitate to contact us here.

