
The Layer Sidebar is located to the right of the viewer. It is the primary area that you will interact with when editing projects, and how you build up composites and edit layers.
It can be broken down into the following parts.
Histogram
The histogram provides an objective, scientific way to evaluate the color data in your image. It graphs the color data in your image in a way that is simple to read. The horizontal axis of the graph represents the luminance range of the image, from pure black on the left to pure white on the right. The vertical axis of the graph represents the quantity of pixels, so the higher the graph line is at any point the more pixels of that luminance value the image contains.
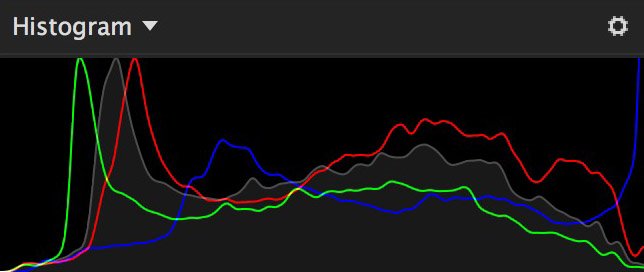
The default RGB option uses separate lines to graph the contents of each color channel in the image, but this can be adjusted through the settings.
Show/Hide Histogram
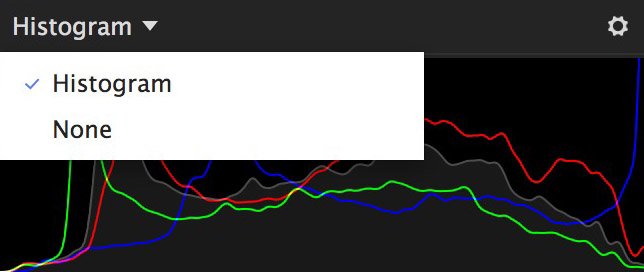
You can open the histogram title menu to show or hide the graph. Select Histogram to show the graph, or select None to hide it.
Channel Menu
Select the channel or channels that are displayed in the graph.
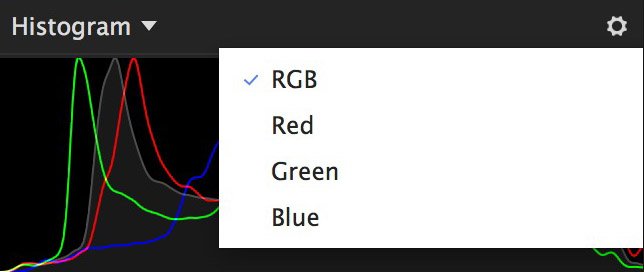
- RBG: Displays four histograms at once. The red, green, and blue histograms are colored to match the channel they represent. The gray histogram represents the Luminance channel.
- Red: Displays the tonal values of the Red channel of the image.
- Green: Displays the tonal values of the Green channel of the image.
- Blue: Displays the tonal values of the Blue channel of the image.
Layer List
All of the layers in your project are managed here. New layers can be created, and the stacking order of existing layers can be viewed and altered.

New Layers
There are five buttons to create different sorts of new layers.
![]() Image: Image layers are used to store any images you want to import into Imerge Pro. Each image layer is a container, and can store as many image variations as you require.
Image: Image layers are used to store any images you want to import into Imerge Pro. Each image layer is a container, and can store as many image variations as you require.![]() Text: Text layers are used to generate text. All features of the text remain fully editable, so you can change the contents, the font, the color, or other aspects of the text whenever you need to. Each text layer is a container, and can store as many text items as you require.
Text: Text layers are used to generate text. All features of the text remain fully editable, so you can change the contents, the font, the color, or other aspects of the text whenever you need to. Each text layer is a container, and can store as many text items as you require.![]() Solid: A solid layer is simple a rectangle filled with a single color. This can be further modified by applying effects or mask to adjust the color, pattern , or shape.
Solid: A solid layer is simple a rectangle filled with a single color. This can be further modified by applying effects or mask to adjust the color, pattern , or shape.![]() Adjustment: Adjustment layers apply effects to all layers below them. This makes it easy to apply effects to multiple layers in a project, without needing to apply the effect to each layer individually. You can also mask an adjustment layer to apply its effects to only specific areas of the layers below.
Adjustment: Adjustment layers apply effects to all layers below them. This makes it easy to apply effects to multiple layers in a project, without needing to apply the effect to each layer individually. You can also mask an adjustment layer to apply its effects to only specific areas of the layers below.![]() Group: This layer serves as a container for other layers, to group them together. This is useful for keeping your project organized when many layers are involved. It also allows you to apply masks or effects to multiple layers at once. When a mask or effect is applied to a layer group, all layers inside the group will be affected.
Group: This layer serves as a container for other layers, to group them together. This is useful for keeping your project organized when many layers are involved. It also allows you to apply masks or effects to multiple layers at once. When a mask or effect is applied to a layer group, all layers inside the group will be affected.![]() Stacked: Stacked layers are used to combine multiple images into a single result.
Stacked: Stacked layers are used to combine multiple images into a single result.
- HDR Merge: Combines multiple exposures of an image, each with different exposure compensation, to create an image with increased dynamic range.
- Focus Stack: Combines multiple exposures of a scene, each with a different focal distance, by using the in-focus area from each image, to create a final image with deep focus or infinite depth of field.
 Image: Image layers are used to store any images you want to import into Imerge Pro. Each image layer is a container, and can store as many image variations as you require.
 Text: Text layers are used to generate text. All features of the text remain fully editable, so you can change the contents, the font, the color, or other aspects of the text whenever you need to. Each text layer is a container, and can store as many text items as you require.
 Solid: A solid layer is simple a rectangle filled with a single color. This can be further modified by applying effects or mask to adjust the color, pattern , or shape.
 Adjustment: Adjustment layers apply effects to all layers below them. This makes it easy to apply effects to multiple layers in a project, without needing to apply the effect to each layer individually. You can also mask an adjustment layer to apply its effects to only specific areas of the layers below.
 Group: This layer serves as a container for other layers, to group them together. This is useful for keeping your project organized when many layers are involved. It also allows you to apply masks or effects to multiple layers at once. When a mask or effect is applied to a layer group, all layers inside the group will be affected.
Search Layers

Use this search box to quickly find a layer by name. For complex composites with large layer stacks this can be especially helpful. The results update dynamically as you type, so only layers that match the characters currently in the search box are displayed.
Layer List
The majority of the layer list area is used to show your actual layers. The layer order directly corresponds to how the layers are stacked in the composite, with layers at the top of the stack appearing in front of the layers below them.

Layer Inspector
To the right of the layer stack is the layer inspector, which shows details and controls for the currently selected layer.
Transform
Transform controls adjust fundamental properties of the layer as a whole, such as its size, position, and how it is blended with other layers in the project.
Blending Controls
- Blending Menu: Blending modes control how the colors in the selected layer are blended with the layers beneath it in the layer stack. See Blend modes for full details.
- Opacity: Adjusts the percentage at which the results of the selected blend mode are applied. 100% is full opacity. For the standard Normal blend mode, which is the default, reducing the Opacity makes the layer more transparent. When other blend modes are selected, the results can differ somewhat.
Position Controls
All controls for adjusting the position, rotation, and orientation of the layer are accessed here. Many of these properties can also be accessed on the canvas, using the canvas controls. See Transforming layers for full details.
Masks
The selected layer can be masked to control what parts of it are transparent or opaque. Click the Plus icon ![]() to add a new mask to the layer, then select the kind of mask you want. There are six kinds of masks available:
to add a new mask to the layer, then select the kind of mask you want. There are six kinds of masks available:
- Gradient Mask: Creates a mask with a large feather, based on a linear gradient. The direction and intensity of the gradient can be adjusted.
- Area Mask: A quick option for creating rectangular or elliptical masks.
- Vector Mask: Allows you to draw a specific mask shape, in any shape you desire.
- Image Color Mask: Creates a mask based on a selected color. A pipette is used to select a specific color from the layer, and you can then adjust the range of colors that are included in the mask.
- Image Alpha Mask: For images with a built-in alpha channel, this allows you to modify the existing alpha information.
- Image Luminance Mask: Creates a mask based on tonal value. Either the brightest areas or the darkest areas of the image can be removed.
Each mask can be enabled or disabled using the blue square toggle to the left of the mask name. Full details about each kind of mask can be found in the masking chapter of this manual.
Display mode menu
The display mode menu at the top of the masks section controls how the masks are displayed on the canvas.
- Apply: Shows the final results of the mask, after it is applied to the images’s current state
- Replace: Applies the mask before any other adjustments, so any existing transparency data is replaced by the mask shape.
- Show: Displays the actual mask itself, in grayscale, while hiding the layer contents. The full range of transparency is covered, with completely transparent areas being black, and completely opaque areas being white.
- Overlay: Renders the mask in transparent red over the top of the layer, so both the layer contents and the mask are visible.
- Disable All: Disables all masks so you can view the original image.
Full details on using masks can be found on the Masking page of this manual.
Effects
Effects can be added to the layer here. All controls for effects already added to the layer can also be accessed here. Click the Plus icon ![]() to add a new effect, then select the specific effect you need from the list. There are many effects available. For full details, see the chapter on Effects.
to add a new effect, then select the specific effect you need from the list. There are many effects available. For full details, see the chapter on Effects.
Each effect can be enabled or disabled using the blue square toggle to the left of the effect name.
Resetting Values
- Full Reset: Clicking the circular reset arrow to the right of any effect name will reset all properties in that effect to their default values.
- Individual Property Reset: Any individual property can be reset to its default value by double-clicking the name of the property.
Effects Masks
If you want to apply an effect to only specific parts of a layer, you can use an effects mask to do so. Click the effect mask icon ![]() at the far right of the effect title bar to add a new mask, then select the kind of mask you want. There are five kinds of masks available:
at the far right of the effect title bar to add a new mask, then select the kind of mask you want. There are five kinds of masks available:
- Gradient Mask: Creates a mask with a large feather, based on a linear gradient. The direction and intensity of the gradient can be adjusted.
- Vector Mask: Allows you to draw a specific mask shape, in any shape you desire.
- Area Mask: A quick option for creating rectangular or elliptical masks.
- Image Luminance Mask: Creates a mask based on tonal value. Either the brightest areas or the darkest areas of the image can be removed.
- Image Color Mask: Creates a mask based on a selected color. A pipette is used to select a specific color from the layer, and you can then adjust the range of colors that are included in the mask.
Display Mode Menu
Once an effect mask is added to an effect, the display mode menu will appear at the top of the effect masks section. This menu controls how the masks are displayed on the canvas.
- Apply: Shows the final results of the mask
- Show: Displays the actual mask itself, in grayscale, while hiding the layer contents. The full range of transparency is covered, with completely transparent areas being black, and completely opaque areas being white.
- Overlay: Renders the mask in transparent red over the top of the layer, so both the layer contents and the mask are visible.
- Disable All: Disables all masks so you can view the original image.
Font
The Font section is only available for text layers. It provides access to edit all formatting details of the text contained in the layer, including the font, size, style and alignment.
Content
Image and text layers serve as containers. The layer exists independently of its contents, and here is where you can change what the layer contains.
Image Layer Content
Image layers can contain one or more images. You can easily batch process multiple images using the same settings by importing them all into the same image layer. The Content section of the layer sidebar list all images contained in the layer.

Click the plus icon to open a file browser and select additional images to import.
Right-click the triangle next to the image name to open the image management menu.
- Remove: Deletes the image from the layer contents.
- Reveal in File Explorer: Opens a new Windows file explorer for the folder containing the source image. On a Mac, this option is called Reveal in Finder.
Each image listing will have some additional options, which will vary based on the image format.
- Apply Camera Profile: By default, Imerge displays your images based on the color profile embedded in the image by the camera that captured it. You can disable this option and use the color profile selected in the canvas settings by disabling this option.
- RAW Conversion Method: For Raw files, you can choose the conversion method used to convert the raw data into an image.
- Imerge 1.0 RAW Engine (GPU): The Raw engine built into Imerge Pro 1.0 uses the GPU to convert files using a Raw library with wide compatibility.
- Imerge 2.0 RAW Engine (CPU): The Raw engine in version 2 of Imerge is much faster, as it is GPU accelerated. It also provides a greater range of adjustment for recovering highlights. It supports all cameras that use a Bayer filter color array on the sensor. Any images from cameras that do not use a Bayer filter will be processed using the Imerge 1.0 Raw engine.
Text Layer Content
The content area of a text layer is where you can edit the actual text contained in the layer. The currently selected text can also be edited directly on the viewer.
A text layer can contain multiple text items, all of which will be listed in the Content area. Click the plus icon to add a new text item.
Need more help with this?
Don’t hesitate to contact us here.