
Layer content allows you to define multiple images or pieces of text which can be substituted in the layer. This is useful for managing variations or setting up batch processing workflows.
Only the following kinds of layers support multiple content items:
![]() Image layers
Image layers![]() Text layers
Text layers
 Image layers
 Text layers
Each item in the contents list is called a variation. Each layer will display only one variation at a time.
Working with layer contents
Adding contents
The list of contents for a layer is displayed at the bottom of the layer sidebar. To add a new variation, click the Plus icon next to the content title.
- Adding image variations: Click the plus icon to open a file browser window, where you can navigate to the image or images you wish to import, and select them.
![]()
- Adding text variations: Click the plus icon to immediately add a new text variation. Click the new text variation to select it, and enter the text you want it to contain. The appearance of the text can then be set up in the Font controls.
![]()

Removing contents
Any variation can be removed by clicking the triangle at the right side of its listing, and selecting Remove.
Setting a variation as active
Each layer will display only one variation at a time. The active variation is the one that is currently displayed. The active variation is highlighted in the list.
- Setting a variation as active: Click any variation in the contents list to set it as the active variation.
Relinking image contents
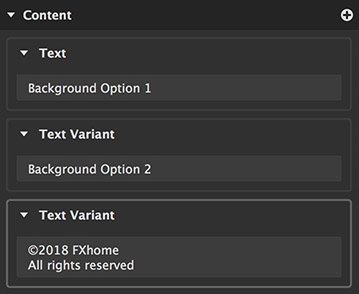
If any image in your project becomes offline, it will be labeled as such in the Viewer, and highlighted in red in the contents list. The thumbnail of the image will also not be displayed.

In the above image, the bottom two images are offline. Images can go offline for a variety of reasons:
- The image was moved to a new location on your computer.
- The name of the source image was changed.
- The name of the folder containing the image was changed.
- The drive containing the image was disconnected from your computer.
Regardless of the cause of the image going offline, the process for relinking the image is the same.
- Relink an image: To relink any image, click the triangle to the right of its name, and select Relink. Imerge will attempt to intelligently relink all images based on this selection, if the folder structure allows the software to find additional images where it expects them to be.

RAW Content
When images in any RAW format are imported, there will be additional controls included in the Content listing, for adjusting how the RAW image is displayed.
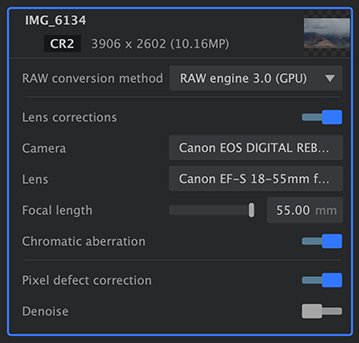
- RAW conversion method: Imerge offers several options for how the decoding of your RAW images is handled.
- None: The pixel data is decoded, but is displayed in the bayer pattern used by the sensor. Therefore each pixel will contain data for only one color; red, green, or blue.
- Raw engine 1.0 (CPU): This option runs on your CPU, and may therefore be slower than the other options. However, it does offer wider compatibility, and supports cameras which do not use a Bayer color array on the sensor.
- Raw engine 2.0 (GPU): This engine offers faster performance and a wider range of adjustments for many properties of the image, particularly highlight recovery.
- Raw engine 3.0 (GPU): This engine improves the color accuracy of highlight recovery, and handles dead pixels better.
- Raw engine XT (GPU): This option will only be used for certain Fujifilm cameras which use an X-Trans sensor rather than a Bayer sensor array. It will only be listed for images captured with an X-Trans sensor.
- Lens corrections: This toggle enables or disables automatic lens correction. The auto correction is calculated based on the optical properties of the selected camera and lens combination.
- Camera: The camera used to capture the image should be listed here. If the wrong camera is selected, click the camera name to open a menu and select the correct hardware.
- Lens: The lens used to capture the image should be listed here. If the wrong lens is displayed, click the lens name to open a menu and select the correct lens.
- Focal length: The focal length at which the image was captured will be displayed here. If a zoom lens is selected, there will be a slider which can be used to select the relevant focal length for the image.
- Chromatic aberration: This toggle enables or disables automatic removal of chromatic aberration.
Need more help with this?
Don’t hesitate to contact us here.