
Canvas settings can be accessed using the button at the bottom of the layer list.

Clicking the button opens the Canvas Settings dialog, where you can edit the fundamental aspects of the settings used by the canvas in your current project.

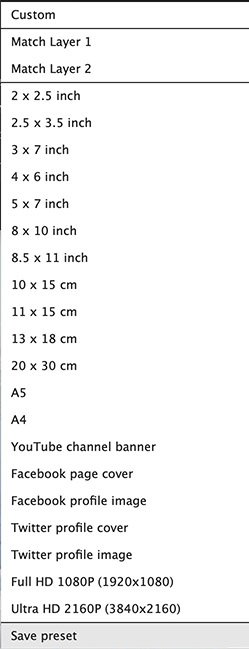
Dimensions

Use the Dimensions menu to select a specific size preset. If you want to dial in a custom size, select the Custom option and then enter the width and height, in pixels, that you require. The listed presets cover the majority of common and popular image sizes, and the Custom option will work for any sizes not available as presets.
Creating presets
If you have a specific canvas size that you use frequently, you can create your own preset for those canvas dimensions. Your personal canvas presets will be listed at the bottom of the canvas preset menu.
To create a preset:
- Open the Dimensions menu and select Save Preset.
- Enter a name for the new preset and click SAVE.
Background color

The canvas can be filled with a solid color. Click the swatch to select the color used, and to adjust its opacity.
Maintain positions

Controls whether the layers in your project are repositioned when the canvas dimensions are changed, or if the layers maintain their relative positions. When this option is toggled on, you will want to select an anchor point that will be used to define the relative positions of existing layers.
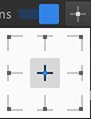
Click the anchor point button to open the matrix shown above. Then, click on the anchor point you wish to use. When the canvas dimensions are changed, the position of each layer in the project relative to the selected anchor point will be retained.
When Maintain Positions is disabled and the canvas dimensions are changed, Imerge will redistribute existing layers into the new canvas size, to maintain the general layout of the canvas as a whole.
Color management
When compositing images, it is not uncommon for a project to contain multiple images that use different color profiles. Color management defines how the colors contained in your images will be handled.

- Workspace profile: sets the color profile to which all imported images will be converted.
- sRGB (linear)
- ROMM RGB (linear)

- Rendering intent: if the source color space exceeds that of the destination, this setting determines how the adjustment is handled.
- Perceptual – good for highly saturated images intended for printing. The entire tonal range of the source image is compressed to fit into the available gamut of the destination profile, which retains the relative difference between different colors in the image. If your images contain many out-of-gamut colors, perceptual often gives the best result.
- Absolute – aims to retain the original colors as accurately as possible, regardless of whether they fit the gamut of the destination color space. Exactly maintains the values of all source colors that fall within the destination color space. Out of gamut colors are clipped. If the destination color space uses a different white point than the source, absolute color uses the white point of the source, and does not convert it to the destination.
Need more help with this?
Don’t hesitate to contact us here.