
The Generate effects are used to create new visual elements. These can be applied to layers like any other effect.
3D Extrusion
 3D Extrusion is available in the VFX: Starter Kit Pack.
Extruding creates the appearance of 3D depth in a flat 2D layer. This is often used to enhance titles but can be used on any layer.

3D extrusion can use the 3D lights in your scene. The material behavior of the extrusion can be adjusted in the Illumination property group. Another layer can be used as an environment map for extruded text. This is effective for creating reflective text or for inheriting some of the lighting in a background plate.

Position
Extrusion is a 32D effect, and can be positioned directly within 2D space. By selecting a 3D layer in the Transform From control, however, you can simulate the appearance of a 3D extrusion, and position the layer as if it were 3D.
- Transform From: Use this menu to select another layer on the timeline and use its position to control the extrusion’s position. When a 3D layer is selected, all three axes of the parent layer’s position are factored into positioning the extrusion.
- Position: Sets the position of the effect, if there is no layer selected above. When a Layer is selected in the Transform From property, Position reflects the offset of the extrusion from the parent layer’s location.
- Z Shift: Simulates shifting the effect away from or toward the virtual camera.
Rotation
- Rotation X: Rotates the extrusion around an axis running left to right.
- Rotation Y: Rotates the extrusion around an axis running top to bottom.
- Rotation Z: Rotates the extrusion around an axis running from front to back.
- Depth: Defines the depth of the extrusion. Higher values create a wider extruded edge on the layer.
- Quality: Set the quality used to render the extrusion.
- Normal: This option renders the fastest, at the expense of some finer detail. It is useful for keeping performance fast while setting things up
- Multisampled: This option provides a balance between normal and supersampled.
- Supersampled: This option gives the highest quality, but may take slightly longer to render. It is the best option for final rendering.
Depth of Field
- Enable: Turns on depth of field rendering, so you can control the distance from the camera at which the extrusion will be in focus
- DoF Settings: Choose what camera data will be used to calculate the depth of field.
- Active Camera: uses the active camera in your composite shot, so the depth of field applied to the extrusion matches the depth of field of all other layers in the scene. If you already have a camera on your timeline, this is often the best option to choose.
- Custom: Allows you to define the specific camera values used to render the depth of field on the extrusion effect. This option is especially useful if you don’t have a 3D camera on your timeline. Choosing custom opens the following three properties.
- Aperture: Defines the size of the virtual camera’s aperture. Higher values reduce the depth of field.
- Focus Distance: Sets the exact distance, in pixels, from the camera position to perfect focus.
- Blur: Controls the amount of blur applied to the areas outside the field of focus.
Illumination
- Type: Select the lighting option that will be used to illuminate the extrusion.
- Comp Lights: Uses all Light layers present in the composite shot timeline.
- Selected Lights: Allows you to specify which lights will illuminate the extrusion. When this option is selected, four menus will appear that allow you to select up to four specific light layers from the timeline.
Material
- Ambient: Determines how much the surface of the extrusion is illuminated by ambient lights.
- Diffuse: Determines how much the surface of the extrusion is illuminated by point, directional and spot lights.
- Specular: Adjusts the strength of specular highlights when illuminated by point, directional and spot lights. A low specular value will create a more matte surface.
- Shininess: Adjusts the size of the specular highlight. A low shininess creates a large, diffuse highlight while a high value creates a smaller, defined highlight.
Environment Map
- Layer: Choose any layer from the timeline to be used as the source of the environment map. The surface of the extrusion will be illuminated and display reflections as if it was surrounded by the selected layer.
- Pre-blur: Set the amount of blur applied to the layer before the reflections are calculated. Softening the reflections with blur tends to give more realistic results in many cases.
- Amount: Controls the overall strength of the environment map on the surface of the extrusion.
- Angle Dependency: Modifies the angle at which the environment map is reflected. Lower values use more fo the color from the environment map, while higher values tend to brighten the reflection using lighter colors.
- Texture Scale: Adjusts the size of the reflected image on the extruded surface.
- Texture Ratio: Controls the X ratio of the reflection. Values lower than 1 compress the reflected image from left to right. Values higher than 1 stretch the image from left to right.
Transform
- X Rotation: Rotates the reflected environment map image around the X axis, without affecting the rotation of the actual extrusion.
- Y Rotation: Rotates the reflected environment map image around the Y axis, without affecting the rotation of the actual extrusion.
- Z Rotation: Rotates the reflected environment map image around the Z axis, without affecting the rotation of the actual extrusion.
Animated Lasers
Animated Lasers is available in the VFX: Starter Kit Pack.
Animated Lasers allow you to quickly generate laser bolts and other ray-based effects. See Animated Lasers for full details.
Audio Spectrum
Audio Spectrum is available in the Motion: Audio Visual Pack.
Th audio spectrum effect generates spectrum patterns based on a chosen audio layer. The effect is akin to the readout on a graphic equalizer. Extensive controls allow you to fully customize the appearance of the spectrum.

Full details on the Audio Spectrum effect are available on the Audio-Visual Effects page.
Audio Waveform
Audio Waveform is available in the Motion: Audio Visual Pack.
Generate waveform patterns based on an audio layer. The waveform scrolls along a line, whose position is determined using end points, and its color and appearance is fully customizable.
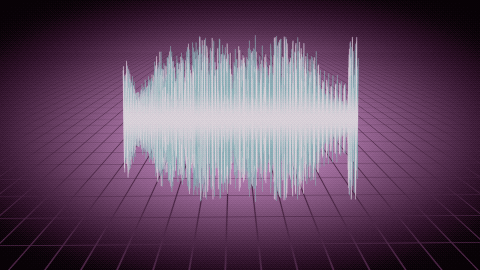
Full details on the Audio Waveform effect are available on the Audio-Visual Effects page.
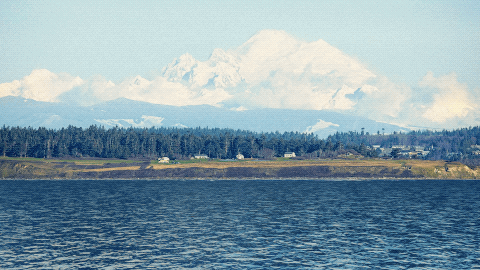
Auto Volumetrics
Auto Volumetrics is available in the VFX: Lighting Pack.
Generates volumetric lighting effects which can be positioned in 3D. The volumetric rays are based on a source layer.

Here is the original frame:

Often the most effective way to apply auto volumetrics is to a simple plane layer. You can then specify a separate source layer in the Light source properties. Applying the effect to a separate plane provides greater flexibility when moving a 3D camera, as the rays can emanate away from the layer boundaries of the source itself.
The light position determines the angle of the rays. You can also link the light position to another layer, such as a light or point layer.
Light Shafts
- Light Position: Use these controls to specify the central point from which the volumetric rays will emanate.
- Use Layer: Select another layer on the timeline to use that layer’s position to control the auto volumetrics.
- XY Position: Change the center position on the X (horizontal) and Y (vertical) axes.
- Z Position: Adjusts the depth of the origin point, on the axis running toward and away from the virtual camera lens.
- Light Falloff: Adjusts the radius of the glow applied to bright areas of the image, which will serve as the source of the rays.
- Distance Scalar: Adjusts the length of the rays themselves.
Light Source
- Use Layer: Select the layer whose contents will be used to generate the volumetric rays. By default, the contents of the layer to which the effect is applied will be used, unless a different layer is selected here.
- Use Layer As: Choose how the selected layer is used. It can be used as the Source, as a Mask, or as a Multiplier for the light rays.
- Threshold: Defines the level of brightness below which no volumetric rays will be generated. Only the brightest parts of the image, above the assigned threshold value, will be used to calculate the effect.
- Exposure: Adjusts the exposure of the source layer before applying the threshold value. This will not alter the selected layer itself, but only how the contents of that layer are processed to calculate where the volumetrics will be applied.
Render
- Exposure: Adjusts the exposure of the rendered volumetric rays themselves.
- Saturation: Adjusts the color intensity of the rendered volumetric rays themselves.
- Colorize: Allows you to introduce a specific color to the rays, independently of what colors appear in the source layer.
- Amount: How much of the selected color will be blended with the default color of the rays.
- Color: Choose a color. You can use the eyedropper to choose a color from the layer, or click the swatch to open a color picker and choose any color you prefer. You can also manually enter the color values for the red, green, and blue channels.
- Blend: Controls how the effect is combined with the contents of the layer it is applied to.
Caustics
Simulates the distortion created when looking through a volume of water. In this example, the water’s surface is entirely generated using Caustics.
This effect can also be used to simulate the natural movement of a liquid surface. The Bottom Texture allows you to select another layer whose contents will be used as the floor beneath the water. The Height Map controls the shape and movement of the waves on the water’s surface. The Environment Map handles the reflections on the water’s surface.
- Depth: Sets the depth of the water simulation. Greater depth values increase the distortion created by the effect.
- Refractive Index: Controls how light is refracted through the volume of he water simulation. 1.33 is the refractive index for water. If you wish to simulate other materials, you can change the refractive index used.
Bottom Texture
- Layer: Choose a layer that will be used as the image of the floor below the water volume. This can be an image, a video, or a composite shot.
Height Map
The height map is used to create the water’s surface. Luminance values are translated into a height map, with black areas being highest, and white areas being lowest.
- Layer: Choose any layer on the timeline to use its contents as the height map.
- Wave Height: Sets the range between the highest and lowest points.
- Invert Map: Inverts the values, so white areas are highest, and black areas are lowest.
Surface Texture
- Layer: Chose any layer on the timeline to be used as the surface of the caustics effect.
Illumination
- Type: Select what lights will be used to illuminate the caustics effect.
- Comp Lights: The caustics will be illuminated by entire lighting setup that is present on the timeline.
- Selected Lights: allows you to choose specific lights which will be applied to the caustics, while unselected lights will have no effect.
- Material: Control how the caustics will respond to lights.
- Ambient: Sets the intensity to which any Ambient light layers will affect the caustics.
- Diffuse: Sets the intensity to which any Point, Directional, or Spot light layers will affect the caustics.
- Specular: Adjusts the strength of specular highlights when illuminated by point, directional and spot lights. A low specular value will create a more matte surface.
- Shininess: Adjusts the size of the specular highlight. A low shininess creates a large, diffuse highlight while a high value creates a smaller, defined highlight.
Environment Map
Setting up an environment map to control the reflections on the water’s surface is a key part of the caustics effect. The selected layer will be mapped onto a spherical surface which surrounds the caustics effect, and reflections will be created based on that. The sphere itself is not visible, it is only used internally to generate the reflections.
- Layer: Choose the layer whose contents will be reflected onto the caustics surface.
- Pre-blur: Blurs the detail of the selected layer within the created reflections. It is often useful to turn off the pre-blur while setting the position of the reflection, then adjust the amount of pre-blur after the position is correct.
- Amount: Sets the overall intensity of the environment map reflections.
- Angle Dependency: Controls the balance of the reflection colors and the illumination color in specular areas of the caustic surface.
- Texture Scale: Adjusts the scale of the reflected image.
- Texture Ratio: Adjusts the height of the reflected image without affecting its width, to control the aspect ratio of the reflections.
- Transform: Sets the position of the reflected image within the frame.
- X Rotation: Rotates the spherical map on the X axis.
- Y Rotation: Rotates the spherical map on the Y axis.
- Z Rotation: Rotates the spherical map on the Z axis.
Clone
Clone is available in the Composite: Toolkit Pack.
Quickly create duplicates of your layer and arrange them in grid patterns.

- Number of Clones: Sets the number of copies of the layer which will be created.
- Position Offset: Define the X and Y distance from the center of the original to the center of the first clone. The same distance will be used to offset any additional clones. The default value is the width of the source layer, so by default there is no space between the clones.
- Rotation: Rotates the original and all clones by a selected number of degrees.
- Rotation Offset: Does not affect the original, but increases the rotation of each clone over the one preceding it by the selected value. So at a value of 15º, for example, the original will be rotated 0º, the first clone would be rotated 15º, and the second clone would be rotated 30º, the third clone 45º, etc.
- Scale Offset: Does not affect the original, but adjusts the scale of each clone to the selected percentage, based on the size of the preceding clone.
- Scale Position Offset: Enabling this option reduces the offset of each clone by a percentage corresponding to the Scale Offset.
- Time Offset: For layers containing movement, the playback of each clone is offset by the number of frames selected here.
- Clone Mode: Select how the clones are positioned in relation to the original.
- Normal: A single copy of clones is created, traveling in the direction defined by the Position Offset values.
- Dual: Clones are created in two opposite directions, in the direction defined by the Position Offset values, and by the inverted offset values.
- Mirror: Uses the same positioning as Dual, but the clones positioned using inverted values are also mirrored from the original.
- Frame Loop: Controls playback of the source layer in each clone.
- No: Each instance of the source is played through once, then ends.
- Repeat: Each clone plays repeatedly through the selected loop range, for the duration of the layer the effect is applied to. After reaching the final frame, playback begins again from the first frame.
- Oscillate: Each clone plays repeatedly through the selected loop range, for the duration of the layer the effect is applied to. The frames play back first forward, then in reverse order, then forward, etc.
- Loop Range: When The Frame Loop option is set to Repeat or Oscillate, Frame Loop controls will be displayed.
- Start Time: Select the frame of the source layer at which playback will start.
- End Time: Select the frame of the source material at which play back will stop.
- Blend Mode: Controls how the effect is combined with the contents of the layer it is applied to.
Clouds
A simplified fractal generator which creates a moving, randomly generated cloud texture using a fractal pattern. For more complex fractals requiring a finer degree of control, the Fractal Noise effect should be used.
- Preset: Chose from a variety of built-in presets, each of which gives you a predefined set of values for the effect controls. These can be used as-is, or as a starting point for further adjustments.
Center
- Position: Sets the overall position of the effect, using X (horizontal) and Y (vertical) values.
- Use Layer: Select another layer from the timeline using this menu, to use the selected layer’s position to control the position of the clouds. When a layer is selected, the Position property above functions as an offset from the parent layer’s position.
Shape
- Frequency: Sets the frequency of the fractal waveform on which the effect is based, thus adjusting the scale of the clouds. Higher values reduce the size of the individual cloud components.
- Frequency Relative X: Adjusts the frequency only on the X axis, thereby altering the aspect ratio of the cloud pattern.
- Iterations: Controls the amount of detail in the cloud effect, by adjusting how many iterations of fractal noise are used to generate the pattern.
- Seed: Each value randomizes the fractal pattern.
Speed
- X: Sets the speed, in pixels per second, at which the pattern will move on its horizontal axis. Positive values create movement to the right, negative values create movement to the left.
- Y: Sets the speed, in pixels per second, at which the pattern will move on its vertical axis. Positive values create upward movement, negative values create downward movement.
Appearance
- Blend: Sets the blend mode used to apply the cloud effect onto the underlying layer.
- Cloud Brightness: Adjusts the brightness of the cloud effect.
- Offset: Shifts the entire range of brightness up or down. Positive values will clip the whites, and negative values will clip the blacks.
- Cloud Color: Choose a color for the cloud pattern. You can use the eyedropper to choose a color from the layer, or click the swatch to open a color picker and choose any color you prefer. You can also manually enter the color values for the red, green, and blue channels.
- Background Color: Choose a background color, over which the cloud pattern will be created. You can use the eyedropper to choose a color from the layer, or click the swatch to open a color picker and choose any color you prefer. You can also manually enter the color values for the red, green, and blue channels.
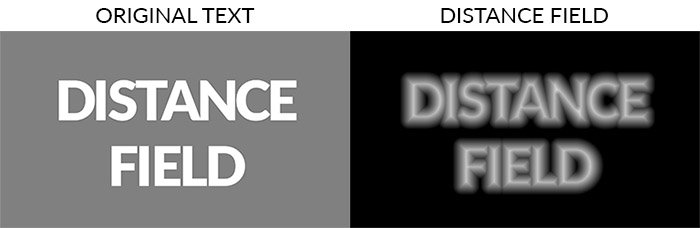
Distance Field
Creates a grayscale gradient, coloring each pixel based on its distance from the edge of the layer. Distance fields are primarily useful as an intermediary step to creating various other effects, rather than being used on their own as an end result.
- Mode: Select the mode that will be used to generate the gradient
- Inner Distance: The edge of the layer is black, and the gradient extends into the layer, to the width of the radius.
- Outer Distance: The edge of the layer is black, and the gradient extends outward from the layer, to the width of the radius.
- Edge Distance: The edge of the layer is black, and the gradient extends in both directions, to the width of the radius.
- Signed Distance: The edge of the layer is mid-gray, and the gradient extends to white inside the layer, and to black outside the layer.
- Radius: Defines the width of the gradient in pixels. Everything farther from the edge than the selected radius will be pure white (or pure black, if the effect is inverted)
- Invert: Swaps the black and white ends of the gradient, to invert the grayscale map.
Drop Shadow
Adds a drop shadow to the layer. You can change the scale, distance and appearance of the shadow, or choose to render the shadow without the layer.

- Preset: Choose from one of the built-in shadow configurations.
- Angle: Sets the angle at which the shadow will be offset from the layer’s center
- Distance: Choose the distance, in pixels, of the shadow’s offset from the layer position.
- Shadow Color: Choose a color for the shadow. You can use the eyedropper to choose a color from the viewer, or click the swatch to open a color picker and choose any color you prefer. You can also manually enter the color values for the red, green, and blue channels.
- Opacity: Adjust how transparent the shadow is. 0.00 is completely transparent, and 1.00 is completely opaque.
- Scale: Adjusts the size of the shadow, as a percentage of the source layer’s size. Values below 1.00 will be smaller than the source layer, values above 1.00 will be larger than the source layer.
- Scale Pivot: Offsets the origin point from which the shadow is scaled.
- Penumbra: Adjusts the width, in pixels, of the feathered edge of the shadow.
- Shadow Only: Enabling this option hides the layer, and renders only the shadow.
End Credits Crawl
Creates scrolling end credits with automatic formatting and animation, designed to mimic classic feature film credits.
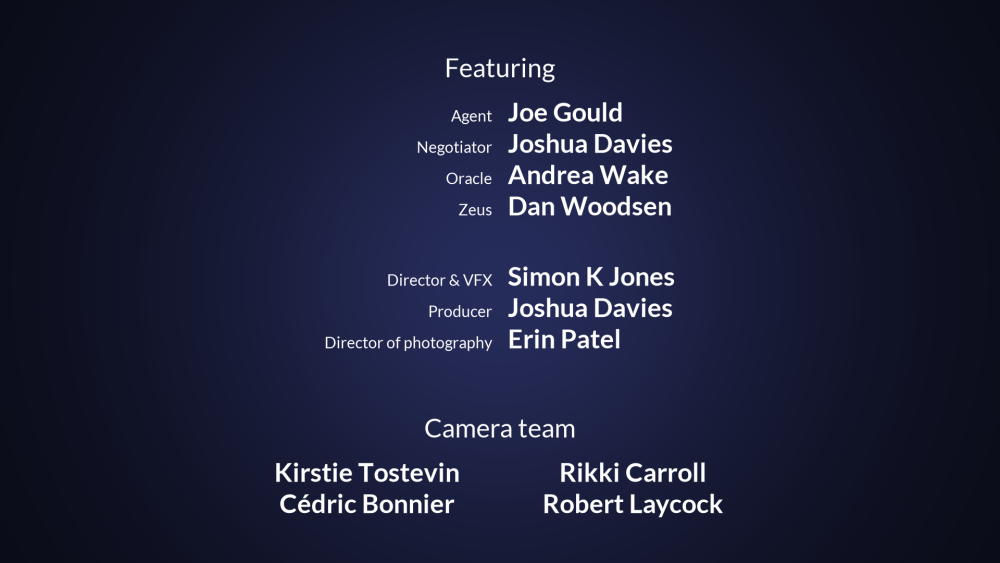
The effect is split into multiple design elements and automatically reflows text and adjusts the layout depending on the copy you provide. Formatting and layout for element titles, role descriptions and names can be adjusted independently, giving you a lot of flexibility within the core framework.
If you omit either titles or roles, the layout will be automatically updated to still make sense. For example, removing roles will reflow the names into a multi-column layout by default, which is useful for crediting a large stunt or VFX team who all share the same role.
Text Format
This section contains the text controls for adjusting the appearance of each of the components of the effect.
- Color: Choose a color for the end credits. The entire end credits effect will use a single color. You can use the eyedropper to choose a color from the viewer, or click the swatch to open a color picker and choose any color you prefer. You can also manually enter the color values for the red, green, and blue channels.
- Title: Edits the appearance of the Title component of each element.
- Font: Choose from any of the fonts installed on your system.
- Style: Select the style of the selected font to be used. Regular, Bold, Italic and Bold Italic are available.
- Font Size: Set the size of the text.
- Force Uppercase: Enabling this option overrides the case sensitivity of the text, and uses uppercase letters exclusively.
- Roles: Edits the appearance of the Roles component of each element.
- Font: Choose from any of the fonts installed on your system.
- Style: Select the style of the selected font to be used. Regular, Bold, Italic and Bold Italic are available.
- Font Size: Set the size of the text.
- Force Uppercase: Enabling this option overrides the case sensitivity of the text, and uses uppercase letters exclusively.
- Names: Edits the appearance of the Names component of each element.
- Font: Choose from any of the fonts installed on your system.
- Style: Select the style of the selected font to be used. Regular, Bold, Italic and Bold Italic are available.
- Font Size: Set the size of the text.
- Force Uppercase: Enabling this option overrides the case sensitivity of the text, and uses uppercase letters exclusively.
Layout
Adjust the layout and positioning of the End Credits effect.
- Width: Sets the maximum overall width of the end credits.
- Horizontal Positioning: Adjusts the position of the end credits, from left to right.
- Vertical Spacing: Adjusts the gaps between the components of the effect.
- Element: Changes the gap between one element and the next.
- Sub-element: Changes the spacing between the individual components within an element.
- Line: Changes the spacing between the lines in any component of an element that contains multiple lines.
- Horizontal Spacing: Adjusts the horizontal spacing between components of the effect.
- Column Gap: Adjusts the gap between the Roles column and the Names column.
- Columned Names Width: For components containing multiple names divided into columns, this adjusts the gap between the columns.
- Speed: Determines the speed at which the credits will crawl.
- Number of Elements: Set the number of separate elements contained in the complete end credits crawl.
Numbered Element Controls
A separate set of numbered Element controls (Element 1, Element 2, etc.) will be displayed for each element.
- Title: Enter the title of the element, e.g. Cast, Director, Visual Effects Supervisor, etc.
- Roles: For cast elements, enter the character names here.
- Names: Enter the names of the cast or crew members here.
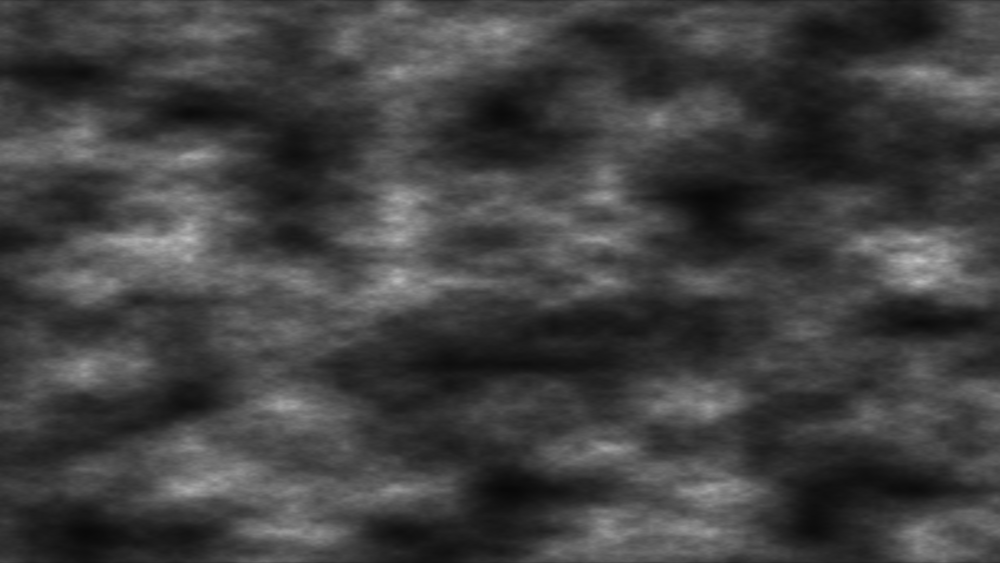
Fractal Noise
Procedurally generates a variety of patterns based on multiple iterations of fractal geometry.
Each fractal method includes a range of properties for customizing the appearance of the effect.
- Preset: Choose from a variety of built-in presets.
- Seed: Randomizes the pattern within the style created by the other settings. The seed value can also be keyframed to create movement within the pattern.
- Type: Each type uses a different fractal, to give a different appearance to the pattern.
- Blob: Creates a pattern of solid blobs with defined edges.
- Clouds: Creates a pattern of gradual transitions with dithered edges, reminiscent of clouds.
- Colored Clouds: Similar to clouds, but using the entire spectrum of colors.
- Emboss: Uses a pattern similar to clouds, but then applies a height map, creating a stone-like texture.
- Marble: A pattern of randomized fluid lines, giving the appearance of marble.
- Swirl: A variation of clouds where each tone has a linear aspect, so the colors swirl softly together.
- Whisp: Stringy, high contrast pattern.
- Wood: A strong linear pattern reminiscent of wood grain.
- *Energy: * A pattern of thin, energetic strings.
- Fluid: Replicates a pattern similar to the caustics created by looking through a volume of water.
- Smoke: Soft, billowing shapes like the texture of smoke.
- Interpolation: Choose the method used to build the texture from the fractal geometry.
- Block: Creates a square, pixelated appearance.
- Linear: Applies more gradual transitions from one block to the next.
- Cubic: More dramatic gradients completely obscure the block pattern to create organic shapes.
Transform
- Position: Moves the origin point of the fractal pattern, thereby shifting the entire pattern by the value selected.
- Use Layer: Allows you to select another timeline layer, to parent the fractal noise to its position data. When a layer is selected, the Position values above function as an offset from the parent layer.
- Rotation: Rotates the pattern around the origin point.
- Scale: Adjusts the size of the fractal pattern.
- Axis Scale: Allows you to scale the pattern on a single axis.
- X: Scales the width of the pattern without affecting the height.
- Y: Scales the height of the pattern, without affecting the width.
Sub Settings
The sub settings affect the additional iterations of the fractal which are used to break up the primary fractal and create the finer details.
- Sub Levels: Sets the number of sub levels which will be applied.
- Influence: Adjusts the balance of the original fractal and the sub levels. Values below 50% favor the original, and values above 50% favor the sub levels.
- Scale: Adjusts the size of the sub levels, without altering the original.
- Rotation: Rotates the sub levels, without rotating the original.
- Offset: Adjusts the position of the sub levels without altering the original.
- Center Subscale: Enabling this option precisely aligns the noise used for each sub scale with the primary fractal. Disabling it randomly positions each subscale noise, for more random results.
Appearance
- Color 1: Controls for the first color used to generate the fractal pattern.
- Color: You can use the eyedropper to choose a color from the viewer, or click the swatch to open a color picker and choose any color you prefer. You can also manually enter the color values for the red, green, and blue channels.
- Opacity: Adjusts the transparency of areas of the fractal pattern filled with the first color.
- Color 2: Controls for the second color used to generate the fractal pattern.
- Color: You can use the eyedropper to choose a color from the viewer, or click the swatch to open a color picker and choose any color you prefer. You can also manually enter the color values for the red, green, and blue channels.
- Opacity: Adjusts the transparency of areas of the fractal pattern filled with the second color.
- Exposure: Adjusts the exposure of the fractal effect. The intensity of the results correspond directly to the to the brightness of the original colors, so bright areas are affected more strongly than dark areas. Positive values brighten the effect, and negative values darken it.
- Offset: Shifts the entire range of tonal values up or down. Values shifted beyond pure black or pure white will be clipped.
- Blend: Controls how the effect is combined with the contents of the layer it is applied to.
Grid
Creates a grid pattern. The size of each square of the grid is determined by the position of two points, which mark opposite corners of the central square. You can adjust the spacing and size of the grid lines.

- Preset: Choose from one of the built-in grid presets.
- Point 1: The top left corner of the square.
- Position: Sets the location on the canvas of the top left corner of the central grid square
- Use Layer: Select another layer from the timeline using this menu, to use the selected layer’s position to control the position of point 1. When a layer is selected, the Position property above functions as an offset from the parent layer’s position.
- Point 2: The top left corner of the square.
- Position: Sets the location on the canvas of the top left corner of the central grid square
- Use Layer: Select another layer from the timeline using this menu, to use the selected layer’s position to control the position of point 2. When a layer is selected, the Position property above functions as an offset from the parent layer’s position.
- Border Radius: Sets the thickness, in pixels, of the grid lines.
- Feather: Adjust the softness of the edges of the grid lines.
- Feather X: Applies a blur on the X axis (left to right), which adjusts the edge softness of the vertical lines.
- Feather Y: Applies a blur on the y axis (top to bottom), which adjusts the edge softness of the horizontal lines.
- Color: Choose a color for the grid lines. You can use the eyedropper to choose a color from the viewer, or click the swatch to open a color picker and choose any color you prefer. You can also manually enter the color values for the red, green, and blue channels.
- Invert: Enabling this option inverts the effect, creating a grid of visible squares with transparent lines between them.
- Blend: Controls how the effect is combined with the contents of the layer it is applied to.
Hyperdrive
Hyperdrive is available in the VFX: Retro Pack.
Quickly create the star-streaked look of a ship jumping to hyperdrive. For full details, see the Hyperdrive page.
Letterbox
The fastest and easiest way to add letterboxing to your movie. Presets enable you to quickly pick from standard film aspect ratios.

- Preset: Choose from a selection of common aspect ratios.
- Color: Choose a color for the letterbox areas. You can use the eyedropper to choose a color from the viewer, or click the swatch to open a color picker and choose any color you prefer. You can also manually enter the color values for the red, green, and blue channels.
- Aspect Ratio: Choose an aspect ratio to use. The Custom options allow you to specify any aspect you wish. Custom (ratio) is used to define the ratio of the width as a percentage of the height (example, 2.35:1). Custom (w:h) allows you to specify the ratio as multiple of a smaller value (example, 16:9).
Lightswords
See Lightswords.
Neon Path [Layer Only]
Neon Path is available in the VFX: Neon Lights Pack.
A useful tool for creating animated Neon Path effects. You can use a Text Layer or a Mask to define the shape of the effect, and then control the position and movement of the Neon line on the selected path.
- Preset: Use this menu to choose from one of the built-in presets.
- Path From: Neon path effects take their shape from another layer. Choose the kind of source to be used.
- Mask: Allows you to sue the Masks from a different layer on the timeline.
- Text: Allows you to use the shape of a text layer as the path source.
- Layer: Choose another layer from the timeline, to be used as the path source.
Path
- Start Width: Set the width of the path, in pixels, at its starting point.
- End Width: Set the width of the path, in pixels, at its ending point.
- Start Alpha: Sets the opacity of the path at its start point.
- End Alpha: Sets the opacity of the path at its end point.
- Falloff: Shifts the transition between the Start Width and End Width. Positive values increase the influence of the Start Width. Negative Values increase the influence of the End Width.
- Evolution: Shifts the position of the effect along the source path.
- Extension: Adjusts the length of the neon path effect, as a percentage of the total length of the source path.
Core
The core is the central part of the effect, which is typically the brightest.
- Width: The Width of the core can be adjusted, as a percentage of the width values set in the Path controls above.
- Color: The core Color should generally be set sightly off white, in the direction of the color that will be used for the glow. You can use the eyedropper to choose a color from the viewer, or click the swatch to open a color picker and choose any color you prefer. You can also manually enter the color values for the red, green, and blue channels.
- Feather: The edges of the core can be softened with the Feather control.
- Mask Mode: Enable, Disable, or Invert Mask mode using this menu.
- Stability: Lowering the Stability causes the core shape to fluctuate in size.
Distortion
The Core Distortion controls allow you to procedurally alter the shape of the core to create a variety of animated results.
- Distortion: Controls the strength of distortion that is applied to the core.
- Type: There are four types of distortion available, each of which gives a different result.
- *Energy: * A pattern of thin, energetic strings.
- Fluid: Replicates a pattern similar to the caustics created by looking through a volume of water.
- Heat: Replicates the haze and diffusion created by heat waves.
- Smoke: Soft, billowing distortion, like the texture of smoke.
- Noise: The noise that defines the shape of the distortion can be modified using these properties. They correspond to the controls in the standalone Distortion effects.
- Animation: The movement of the noise that defines the shape of the distortion can be modified using these properties. They correspond to the controls in the standalone Distortion effects.
- Blend on Top: Enabling this option will apply the glow above the core, potentially altering the core’s color.
- Use in Glow: Enabling this option will adaptively shift the shape of the glow of the effect to match the distortion of the core shape.
Flicker
The Flicker controls will affect the movement of the overall effect.
- Amount: Controls the amount of flicker applied to the effect.
- Probability: Adjusts how regular the flicker is. Higher probability settings will make a more regular flicker.
- Frequency: Adjusts the timing between the flickering, Higher values will increase the speed of the flicker.
- Mode: Choose how the flicker will be generated.
- Per Path: The entire effect flickers as a whole.
- Per Character: Each character flickers independently.
- Seed: Changing the seed will randomize the pattern of the flicker.
Inner Glow
Two glows are built-in to the effect. This makes it possible to create an intense inner glow, with a low width so that it is close to the core, and a wider, diffuse, less bright outer glow.
- Width: The width of the inner glow can be adjusted, in pixels.
- Color: The inner glow color should generally be set to a bright, vibrant color.
- Alpha: Adjusts the transparency of the inner glow layer.
- Stability: Lowering the stability causes the glow shape to fluctuate in size.
- Flicker: Sets the intensity of brightness flicker applied to the glow. This does not alter the shape of the glow.
- Falloff: Alters the range over which the glow edges are feathered. Lower numbers will create a harder edge to the glow.
- Mask: Controls whether masks applied to the layer affect the glow.
- Disable will allow the glow to naturally wrap around the mask edges, for a softer result.
- Enable will cut the glow off exactly at the edge of the mask.
- Invert will reveal the glow outside the mask, while removing it inside.
Distortion
The Inner Glow Distortion controls allow you to procedurally alter the shape of the inner glow to create a variety of animated results.
- Distortion: Controls the strength of distortion that is applied to the inner glow.
- Type: There are four types of distortion available, each of which gives a different result.
- *Energy: * A pattern of thin, energetic strings.
- Fluid: Replicates a pattern similar to the caustics created by looking through a volume of water.
- Heat: Replicates the haze and diffusion created by heat waves.
- Smoke: Soft, billowing distortion, like the texture of smoke.
- Noise: The noise that defines the shape of the distortion can be modified using these properties. They correspond to the controls in the standalone Distortion effects.
- Animation: The movement of the noise that defines the shape of the distortion can be modified using these properties. They correspond to the controls in the standalone Distortion effects.
Outer Glow
Two glows are built-in to the effect. This makes it possible to create an intense inner glow, with a low width so that it is close to the core, and a wider, diffuse, less bright outer glow.
- Width: The width of the outer glow can be adjusted, in pixels.
- Color: The outer glow color can be set to a similar color to the inner glow color, for a traditional look, or to an entirely different color to create a gradient in the glow.
- Alpha: Adjusts the transparency of the inner glow layer.
- Stability: Lowering the stability causes the core shape to fluctuate in size.
- Flicker: Sets the intensity of brightness flicker applied to the glow. This does not alter the shape of the glow.
- Falloff: Alters the range over which the glow edges are feathered. Lower numbers will create a harder edge to the glow.
- Mask: Controls whether masks applied to the layer affect the glow.
- Disable will allow the glow to naturally wrap around the mask edges, for a softer result.
- Enable will cut the glow off exactly at the edge of the mask.
- Invert will reveal the glow outside the mask, while removing it inside.
Distortion
The Outer Glow Distortion controls allow you to procedurally alter the shape of the outer glow to create a variety of animated results.
- Distortion: Controls the strength of distortion that is applied to the outer glow.
- Type: There are four types of distortion available, each of which gives a different result.
- *Energy: * A pattern of thin, energetic strings.
- Fluid: Replicates a pattern similar to the caustics created by looking through a volume of water.
- Heat: Replicates the haze and diffusion created by heat waves.
- Smoke: Soft, billowing distortion, like the texture of smoke.
- Noise: The noise that defines the shape of the distortion can be modified using these properties. They correspond to the controls in the standalone Distortion effects.
- Animation: The movement of the noise that defines the shape of the distortion can be modified using these properties. They correspond to the controls in the standalone Distortion effects.
Mask
- From:
- Use Source:
- Use Text Alpha:
Background Distortion
The Background Distortion controls allow you to procedurally distort the image behind the Neon Path, to improve the realism of the effect’s integration into the scene.
- Distortion: Controls the strength of distortion that is applied to the background.
- Type: There are four types of distortion available, each of which gives a different result.
- *Energy: * A pattern of thin, energetic strings.
- Fluid: Replicates a pattern similar to the caustics created by looking through a volume of water.
- Heat: Replicates the haze and diffusion created by heat waves.
- Smoke: Soft, billowing distortion, like the texture of smoke.
- Noise: The noise that defines the shape of the distortion can be modified using these properties. They correspond to the controls in the standalone Distortion effects.
- Animation: The movement of the noise that defines the shape of the distortion can be modified using these properties. They correspond to the controls in the standalone Distortion effects.
- Blend: Choose how the effect is combined with the layer it is applied to.
PiP
PiP is available in the Edit: Starter Pack.
Quickly create a picture-in-picture effect using any layer in your timeline, and adjust the size and position of the PiP effect.
- Position: Choose the location within the frame where the Picture-in-Picture image is placed.
- Scale: Sets the size of the image, as a percentage of the frame width.
- Margin: Sets the width, in pixels, of the space between the picture-in picture and the edge of the frame.
Pond Ripple
Creates randomly placed ripples which expand and distort the layer, simulating the effect of rainfall on a pond. The size and behavior of the ripples can be adjusted.

- Seed: Changing the seed randomizes the placement of the individual ripples.
- Droplets Per Second: Sets the number of new ripples that will begin per second.
Droplet Shape
- Size: Sets the width of the rings of the droplets. Higher values softens the ring detail.
- Number of Ripples: The total number of rings per droplet.
- Viscosity: Adjusting the viscosity alters the speed of the ripple movement, and the degree to which they alter the liquid surface.
- Displacement: Adjusts the amount of displacement applied to the image below the ripples.
Droplet Animation
- Speed: Sets the speed at which the ripples will move away from the center point where they originate.
- Lifetime: Sets the total duration of each ripple before it disappears entirely.
Pulp Sci-fi Title Crawl
Pulp Sci-fi title Crawl is available in the VFX: Retro Pack.
An instant way to get perfect Star Wars and Flash Gordon-style openings, complete with separate sections for the teaser, main title and the crawl itself.
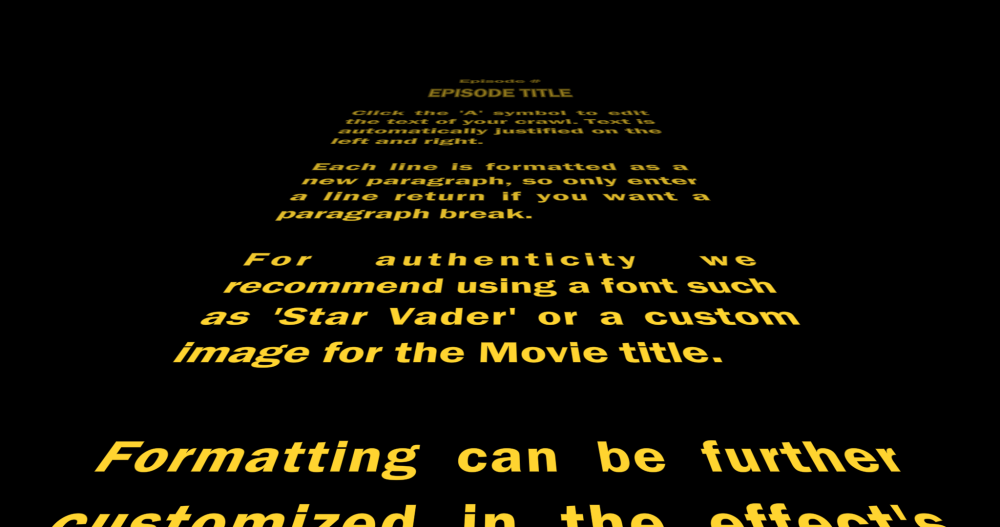
The text is entered into the Teaser, Movie Title, Episode Number, Episode Title and Text Crawl properties. Clicking the font ‘A’ symbol opens a new window for editing the Movie Title and Text Crawl text.
The formatting and animation of the teaser, movie title and text crawl can be adjusted in separate property groups, with the text reflowing automatically to suit the classic pulp look.
The Movie Title can also be switched to use an image instead of text. This can be useful for creating a more authentic appearance when recreating movie logos.
Radio Waves
Creates geometric shapes that can be warped and animated. Shapes can be heavily customized.

Reflection
A quick and easy way to create a reflection of the layer.

Sphere
Creates a sphere that reflects its surroundings.

The sphere can be heavily customized with separate layers for the optional surface texture and environment map.
The refractive index property can be used to accurately simulate refraction from real world materials. A list of common refractive indices can be found on Wikipedia.
Split Screen Masking
Split Screen Masking is available in the Edit: Starter Pack.
Provides a quick way to set up various split screen layouts. Numerous screen layout presets are included which can then be further customized.
Cuts determine how many slots are available for input.
Input layers/frames is used to link different layers into the effect.
Border changes the separation between cuts.
Text
Text is available in the Edit: Starter Pack.
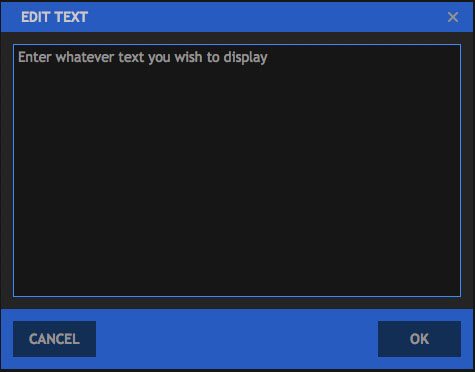
The Text effect lets you quickly generate text on any timeline, including the Editor. To add Text, drag the Text effect from the Effects panel onto a Plane, an image, or a video clip, to add text to that object. Open the controls for the effect in the Controls panel, and then click the A icon displayed to the right of the Text property. This will open the Edit Text dialog, where you can enter the text you wish to add to the layer. Once you are finished editing the text, click the OK button to close the Edit Text dialog and apply the changes. You can then edit the text and further customize the effect in the Controls panel, or directly on the timeline when working in a composite shot.
- Text: This is where you edit the contents of the Text effect. Click the “A” icon to open the Edit Text window. You can then enter whatever text you wish the effect to display.
![]()
- Cancel: discards any changes you have entered and closes the Edit Text window.
- OK: Confirms the text you have entered and closes the Edit Text window. Once the window closes, the text will be updated on the viewer.
Transform
You can control the alignment and positioning of the Text effect through these controls.
- Offset From: Select the position from which the layer movement will be measured. By default the text is Centered, but you can also place it in the Bottom Left, Bottom, Bottom Right, Left, Right, Top Left, Top, or Top Right.
- Position Offset: Sets the distance, in pixels, which the layer is moved from the default position selected in the Offset From menu.
- Rotation: Sets the rotation of the layer, in degrees.
Format
The Format controls allow you to set the details of the text style for the effect.
- Font: Select the font to be used, from a list of all fonts installed on your computer.
- Style: If your selected font includes different styles (Bold, Light, Italic, etc.), you can select your desired style here.
- Alignment: The text alignment can be adjusted here. You can align the text to Left, Center, or Right, or Justify the text to keep both sides aligned
- Color: Allows you to select a font color.
- Opacity: Sets the transparency of the Text, from completely invisible at 0.00 to completely opaque at 1.00.
- Font Size: Sets the size of your text. In general, if you want to enlarge your text, it is better to increase the font size rather than increase the layer Scale above 100%.
- Line Spacing: Defines the vertical spacing between each line of text.
- Enable Word Wrap: Toggles word wrap on and off. Enabling word wrap means that as soon as the text gets too long to fit in a single line, a line break will be created automatically, and a new line is started automatically.
- Word Wrap Width: Defines the width at which word wrap will be implemented. You can create margins in your text layer by setting the Word Wrap Width to a smaller value than the width of the layer the text effect is applied to. For example, if your text is applied to a Full HD layer that is 1920 pixels wide, and you set the Word Wrap Width to 1800, the 120 pixels that remain will be split to create a 60 pixel wide margin on each side of the layer.
- Blend: Determines how the Text is blended with the layer it is applied to. None will prevent the layer from being displayed at all, so only the text is visible. Normal displays the text over the top of the layer, so both are visible. Details on all the other Blend Mode options can be found on the page about Compositing With Blend Modes.
- Motion Blur: Sets the amount of motion blur applied to the layer when its position is animated.
Tile
A quick and easy way to tile the layer without needing to create duplicates.
Timecode
Generates a counter showing the current position in time of the layer or timeline.
Vertical Video
Vertical Video is available in the Edit: Starter Pack.
Quickly integrate vertical video into a standard video frame, by auto-filling the area surrounding the vertical video. Using a blurred version of the vertical video ensure the frame matches the video, and maintains a level of interest to the audience without being distracting.
Wireframe
Wireframe is available in the 3D: Model Render Pack.
Renders a line-based representation of a layer. This is particularly effective when applied to 3D models, to create wireframe views that can be highly customized.
Type
There are two main types of wireframe:
- Mesh: renders the lines around the triangles that make up the 3D model.
- Grid: renders a 3D grid of lines, on the surface of the 3D model. The grid can be further customized to adjust the pattern.
Render Mode
- All Triangles: renders the lines for all triangles within the model.
- Front Facing: renders lines only for surfaces that are facing towards the camera.
- Nearest Triangles: renders lines only for the parts of the model that are visible to camera.
Material
- Solid Color: creates solid lines of the chosen color.
- Model Material: uses the color from the model’s material.
- Model Material: * Color multiplies the color of the model’s material by the chosen color.
Illumination
Wireframe can use 3D lights for illumination. You can choose to use all lights in the composite shot or specific lights.