
Download and install EcoDomus Mobile from Apple’s App Store. Log in using your web username and password.
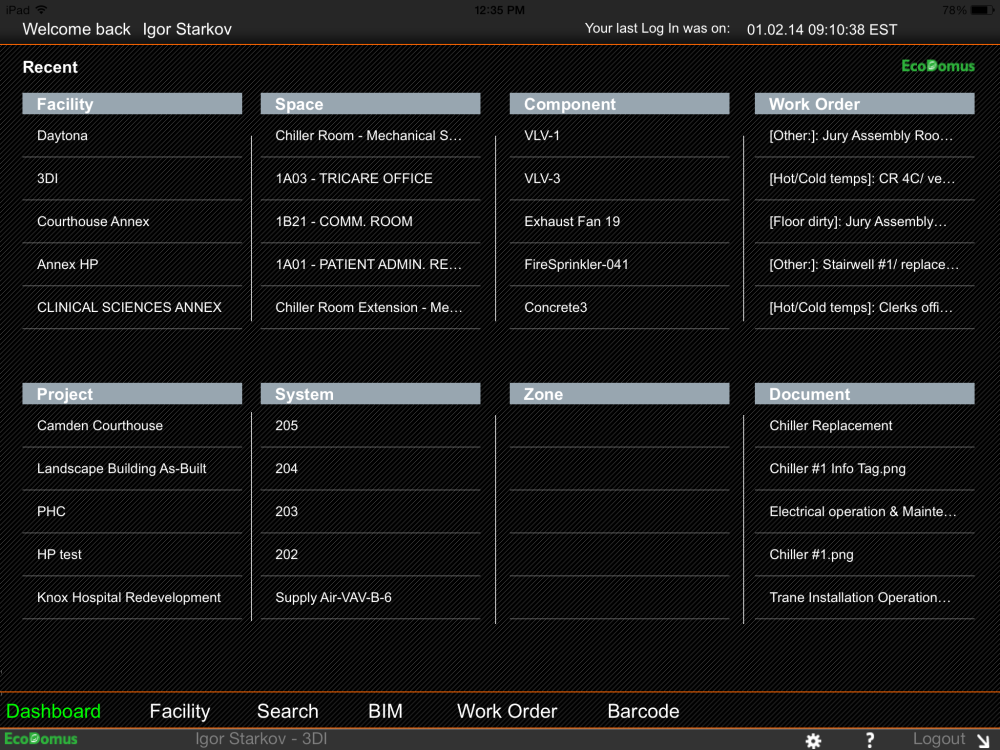
The first page you will see is Dashboard. The page shows the recent pages you visited and items that you worked with.
Click the Facility button in the menu at the bottom of the page, or select a facility in the Facility column on the Dashboard page. You will see a list of facilities on the left, the name of the facility at the top in the middle column, facility’s projects, documents and attributes (properties) in the middle column, and the list of BIM files for the selected facility on the right.

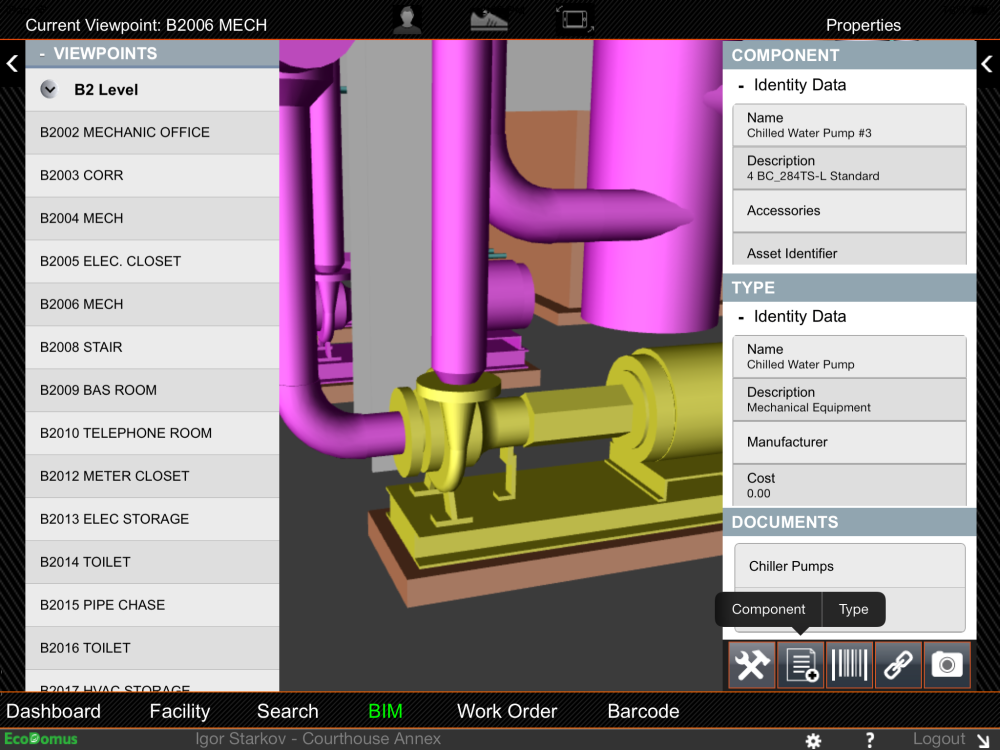
Select a file in the Building Information Models column – its name will highlight in the Selected Model field – and click the Go button. The software will take you to the BIM page, and it will start downloading the model to your iPad and you will see it in a few seconds (depending on your internet speed) on the BIM page (the bottom menu).
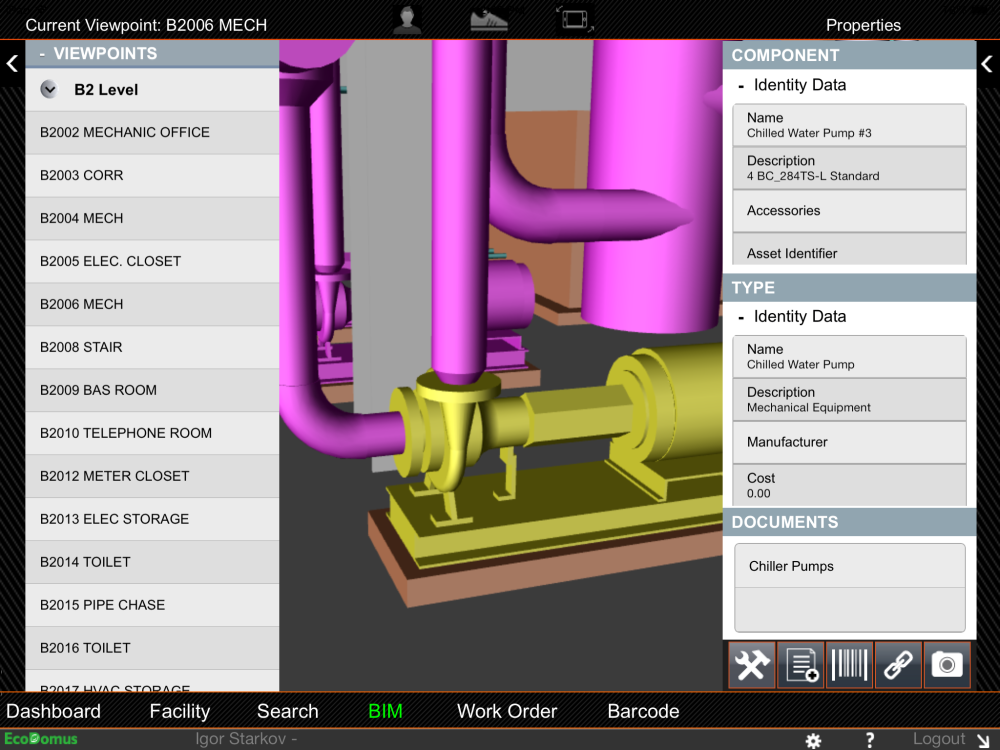
Use two fingers to zoom in (pinch) or zoom out (move fingers in the opposite direction). Use one finger to rotate (orbital) the model. There are three icons at the top of the page: the first one, a human head, when selected allows you to look around. The second, a shoe, allows you walk in the model (drag your finger across the screen). The third one, a rotated tablet, enables the accelerometer and you can rotate the tablet itself and see how the model is navigated (ensure that both “shoe” and “accelerometer” are enabled). Some iPads have issues with the borderline images so click the icons in the lower part of the icon image.
The left and right panels on the BIM page are collapsible: click the arrow close to the top of the page to open the Viewpoints or the Properties sections. The Viewpoints panel lets you navigate through the model quickly. The viewpoints can be stored hierarchically: if you see an arrow pointing down it means you can click on it to see the viewpoints from that folder. Double-click on an asset to see its properties. The Properties panel shows Component and Type properties for the selected component and the assigned Documents. Click on a property to see a popup that will allow you to edit that property’s value. The properties can be grouped, so you can collapse and un-collapse the groups by clicking the icon on the left from the group’s name.
Click on a document to view it.
There are five buttons below the Documents section in the right panel.
The first button on the left is Add Work Order. When you click on it you will see a popup.

Enter the work order title and click Next. Then specify the type of the work order, assign the asset (component), and the location. Click Save on the last page. You will see a message “Work Order Added Successfully”. You will see the newly created work order on the Work Order page.
The second button from the left is Add Attribute. When you click on it you will see a small popup offering to select either Component or Type.
If you select Component the new attribute will be a component attribute, similarly you can select Type to add a type attribute. Then you will see another popup with a “wizard”.

Fill out the Name and Description form in the popup and click Next. Then specify the value and select Unit of Measure from the dropdown (if applicable), and click Next. Select a group you want this attribute to be assigned to. Generic attributes can be assigned to the Identity Data group. The next page in the popup is for the lifecycle stage (i.e. when the item is installed select As Built in the dropdown). Click Save on the last page of the popup.

The third button from the left is for Barcoding. When you click on it the application will invoke the barcoding plug-in that uses the built-in iPad camera.

Click on the Scan button and position your iPad’s camera over the barcode. The software will automatically recognize the barcode and you will see the barcode’s translation (i.e. 9780870434) in the popup. Click the Update button in the popup to update the component’s Barcode field with the scanned value.
The fourth button from the left is called Link to Asset (or Link to Data). It is used to assign data to the visual object. Click on the button and you will see a popup that lists the facility assets (components). The columns Asset, Space, System, TagNo are self-explanatory. The column Status shows if the database record is already linked to some visual object. If it’s linked then the value is “Y” (Yes), if it’s not then the value is “N” (No). Select some asset and click Save to assign that asset record to the element currently selected in the model.

The first button from the right (fifth from the left) is the Camera button. Click on the button and you will see a popup.

Click on the Camera and the software will activate the built-in iPad camera. Take a photo. If you don’t like the result click the Retake button in the lower left part of the screen. If you want to use it click the Use Photo button. You will see the thumbnail image of the photo inside the popup. You can name the photo by typing in the Name field on top. Click Save Photo. You will see this photo in the Documents section in the right panel.
The Search page, accessible from the main menu at the bottom of the screen, can be used to find assets. You can browse through the facility systems, spaces, asset types, or search for an asset (component) using the text fields at the top of the page. Double-click the asset to locate it in the model – the BIM page will open and will automatically locate the found asset highlighting it while making the rest of the model semi-transparent.

The Work Order page will show the list of work orders for the currently selected facility.

You can add a work order by clicking the Add Work Order button below the grid, or adding a work order from within the model (see above). Click on the work order to see its profile, or double-click to edit it.

You can assign a location, an asset (component), and other properties to the work order. You can have a signature taken on an iPad (click the Sign Off button) assigned to the work order.
EcoDomus is not a CMMS application so this functionality exists primarily to receive/send work orders to the professional CMMS applications integrated with EcoDomus software.
Post your comment on this topic.