- Select Assessments from the Main menu.
- Click on New.
A new form should appear where you should be able to locate your property on which you would like to create an assessment.
If you know the property’s UPRN number, then simply enter it in the uprn field and press enter.
- If you do not know the property’s UPRN then click the magnifying glass where you can browse through all of the properties within the system.
- You can also perform a quick property search by typing in any attribute you remember of the property you would like to assess in this field.
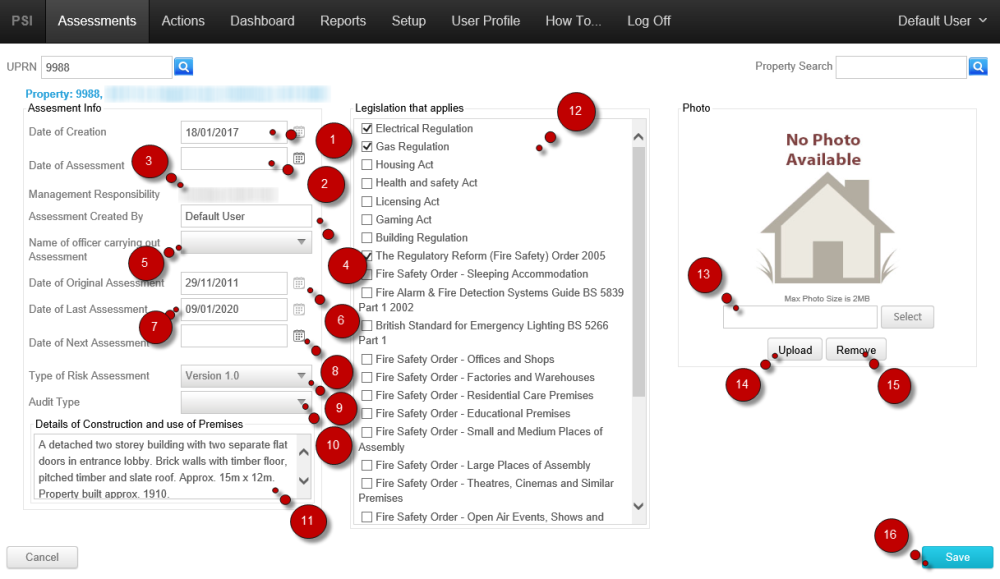
Assessment Information
- Date of Creation – This field is populated by the system upon creation of the assessment.
- Date of Assessment – This has to be entered by the user.
- Management Responsibility – This field is is populated by the system, it determines which division is responsible for this property.
- Assessment Created By – This field contains the name of the user who is creating the assessment.
- Name of officer carrying out Assessment – This field displays all the fire safety officers within the system.
- Date of Original Assessment – This field is populated by the system, it shows the date of the first assessment for selected property,
- Date of Last Assessment – This field is populated by the system, it shows the date of the last assessment for selected property,
- Date of Next Assessment – This field shows the date assigned to this property for when it will be assessed again.
- Type of Risk Assessment – This field contains an available library of risk assessments, selection of these, determines the default sections and assessment questions for the assessment.
- Audit Type – This field you can choose an audit type for assessment.
- Details of Construction and use of Premises – This is a free text box, you can insert any other neccesary details of the assessment there,
- Legislation that applies – This section you can choose which legislations apply for the property you would like to assess.
- Photo Upload – This allows you to select a photo for the selected property
- Upload – Uploads and sets the selected photo for the selected property
- Remove – Removes a property photo
- After you have inserted all the necessary information, press the save button to create the assessment.
Your assessment should now appear in the assessments list.


Post your comment on this topic.