
There are several properties related to SAML authentication that will need to be added to the Orchid Fusion VMS configuration file. So as a first step, get the configuration file ready for these new settings. You won’t be able to fully configure the last three properties until you have configured your Identity Provider (IdP) (which will be explained later).
- Open the fusion.properties file.
- Add the following properties to the Orchid Fusion VMS configuration file:
- fusion.public.url=https://your-url
- This is the public URL used to access your Orchid Fusion VMS.
- saml.common.setting.domain=yourdomain.com
- This is your domain name which will be used later to configure permissions.
- saml.provider.samlclient1.common.name=IdP Vendor
- This is the provider name that will be displayed on the Orchid Fusion login page (such as Okta, Ping, etc.).
- saml.provider.samlclient1.idp.metadata.filename=ap-idp-metadata.xml
- This is the name of the XML file you will download from your IdP. (We’ll cover this in the next section.)
- If you’re working in Linux, this XML file must be placed in the following directory: /etc/opt/fusion/
- If you’re working in Windows, this XML file must be placed in the following directory: C:\Program Files\IPConfigure\Fusion\conf
- This is the name of the XML file you will download from your IdP. (We’ll cover this in the next section.)
- saml.provider.samlclient1.attr.key.name=name
- saml.provider.samlclient1.attr.key.group=group
- These are the keys that the IdP uses to represent user names and user groups. (We’ll cover this in the next section.)
- Save changes to the properties file. (Don’t restart the Fusion service yet. We need to fill in more information first.)
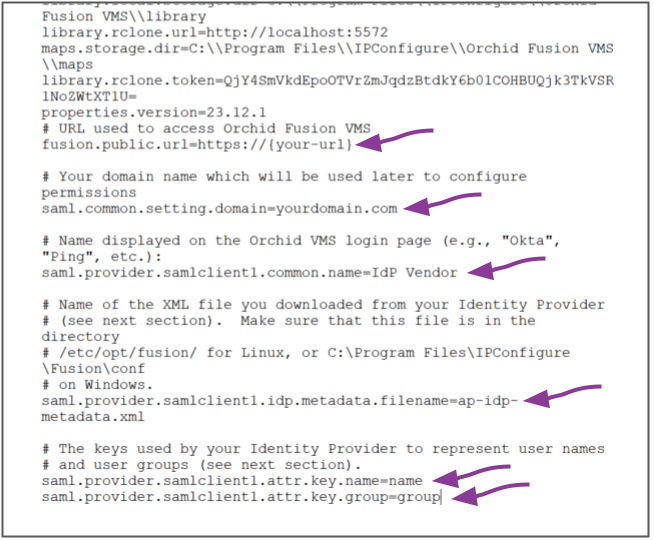
Here’s what your Fusion configuration file might look like at this point:
Post your comment on this topic.