
Orchid Fusion VMS now supports Single Sign-On with SAML. One of the Identity Providers (IdPs) supported by SAML is Microsoft Entra ID (formerly known as Azure AD). By performing some configuration work on the front end, your Orchid Fusion VMS users will be able to sign in with their Microsoft Entra credentials.
Configuring a SAML App in Microsoft Entra ID
The steps below should help you create and configure a SAML application in Microsoft Entra ID.
- First, review the Microsoft article linked here: Enable single sign-on for an enterprise application. This will provide you with the most detailed instructions to follow.
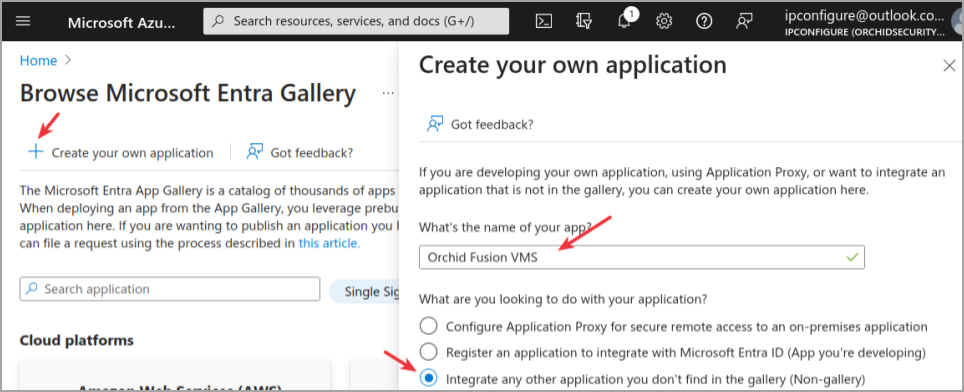
- Since Orchid Fusion VMS is a “non-gallery” application, you will need to select Create your own application as shown below.
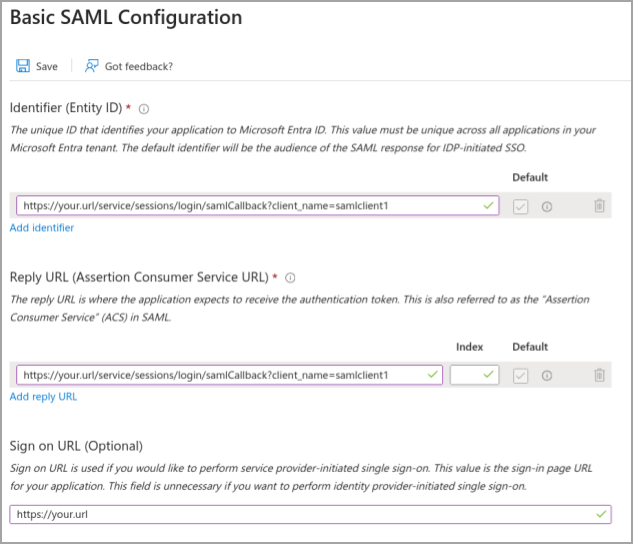
- In the SAML-based Sign-On/Basic SAML Configuration section, you will need to set the following:
- Identifier (Entity ID)
- Reply URL (ACS URL)
- Sign on URL (This is the Fusion public URL.)
We discussed these earlier in the Configuring an Identity Provider overview topic. These settings are pictured below.
- Next, you’ll need to configure the Attributes & Claims section so that Microsoft Entra ID values correctly map to Orchid Fusion VMS users and groups.
- First, map the Required “Name ID” claim to use user.objectid as its value.
- Ensure there is a claim for the value user.userprincipalname with the name name (which may already exist).
- Add a group claim for the value user.groups[ApplicationGroup] with the name groups. (This mapping will be created automatically when you create the Group Claim.)
- Configure this Group Claim to work only with “Groups assigned to the application”.
- As the Source attribute, select “Cloud-only group display names”.

- Based on the settings described above, the attribute key name and attribute key group properties would look like this when you add them to the fusion.properties file:
saml.provider.samlclient1.attr.key.name=name
saml.provider.samlclient1.attr.key.group=groups
- In the SAML-based Sign-On/SAML Certificates section, you will need to select Federation Metadata XML → Download to get the SAML configuration file needed by Orchid Fusion.
- Once downloaded, you will need to copy this file into the Orchid Fusion VMS configuration directory, and add the filename to the fusion.properties file (as detailed in Modify the Fusion Config File).
Complete the Configuration
- After all of the configuration steps have been completed, you’ll need to do the following:
- Restart the Orchid Fusion VMS service. For extra help, please refer back to the How to Manage the Orchid Fusion VMS Services section that corresponds to the operating system in which you are working.
- Go to Fusion and associate your Permission Groups with your IdP (Microsoft Entra ID) groups. Please refer to the last SAML section for details.
Post your comment on this topic.