
Orchid Fusion VMS now supports Single Sign-On with SAML. One of the Identity Providers (IdPs) supported by SAML is Auth0. By performing some configuration work on the front end, your Orchid Fusion VMS users will be able to sign in with their Auth0 credentials.
Configuring a SAML App in Auth0
The steps below should help you create and configure a SAML application in Auth0.
- First, review the Auth0 article linked here: Configure Auth0 as SAML Identity Provider. This will provide you with the most detailed instructions to follow.
- After you create an Orchid Fusion VMS web application with type Regular Web Application, to to the Settings tab.
- Under Application URIs, set the Allowed Callback URLs to the “ACS” value described earlier in the Configuring an Identity Provider overview section.

- Next, scroll down to Advanced Settings and create a Metadata mapping group called mappings.group.
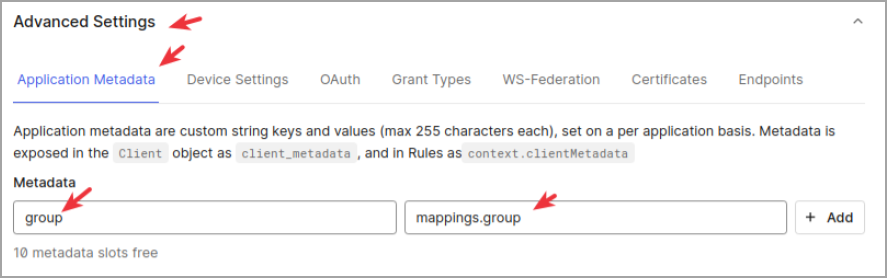
- Save your changes.
- Now, find the Addons tab and enable SAML2W WEB APP.
- Under Settings, the Application Callback URL should be configured with the “ACS” value you set in step 2a.
- Scroll down and click Enable, then click Save.
Based on the settings above, the attribute key name and attribute key group properties would look like this when you add them to the fusion.properties file:
saml.provider.samlclient1.attr.key.name=name
saml.provider.samlclient1.attr.key.group=group
- Next, in the SAML2W WEB APP section, go to the Usage tab.
- Find Identity Provider Metadata and click Download.
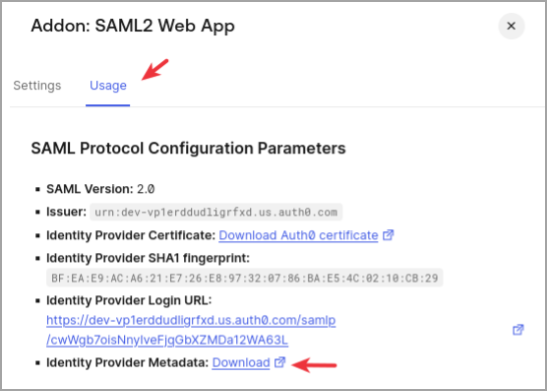
- Once downloaded, you will need to copy this file into the Orchid Fusion VMS configuration directory, and add the filename to the fusion.properties file (as detailed in Modify the Fusion Config File).
Now you need to associate Auth0 users with Groups whose permissions can be configured in Orchid Fusion VMS. To do this, you need to install the Auth0 Authorization extension.
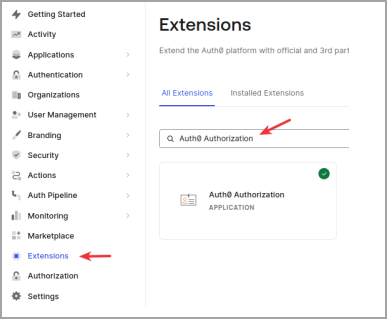
- In the Auth0 web interface, go to Extensions.
- Click on the All Extensions tab.
- Click Auth0 Authorization to create one or more Groups containing members who will be granted access to Orchid Fusion VMS.
Complete the Configuration
- After all of the configuration steps have been completed, you’ll need to do the following:
- Restart the Orchid Fusion VMS service. For extra help, please refer back to the How to Manage the Orchid Fusion VMS Services section that corresponds to the operating system in which you are working.
- Go to Fusion and associate your Permission Groups with the IdP (Auth0) groups. Please refer to the last SAML section for details.
Post your comment on this topic.