
The menu can be accessed by pressing the left button < Menu > on the Startup Screen. The menu list is displayed in Figure 10. The left key is used to scroll through the options.
To select, bring the desired option to the top line by using the left key and pressing the right button < Select >. A test can be started by returning to the startup screen by pressing the center button < Return >.
To return to menu after selecting an item, press the center button < Return >. Each option is described below, and is available on both TX and RX, unless noted otherwise:
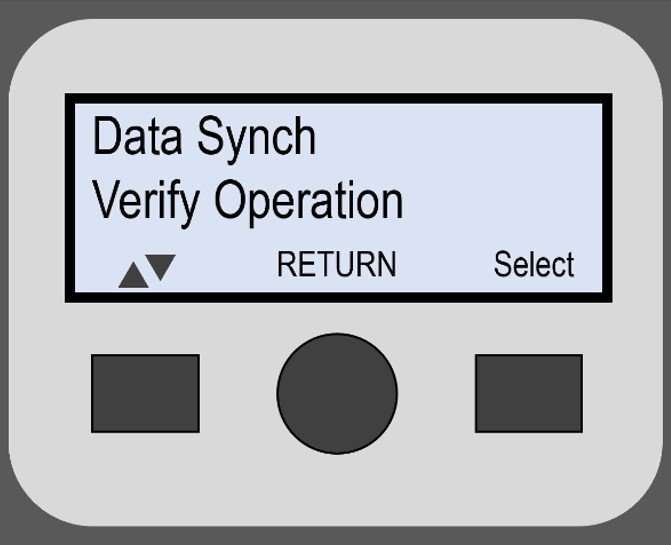
Figure 10. The Menu can be accessed by pressing the left button, < Menu >, on the Startup screen of both TX and RX units.
Data Synch: (RX only) Initiates data synchronization between the TX and RX, if they are in communication range of each other (less than 50 feet and free of obstructions between) and should remain close while the transfer takes place. Once the transfer is completed, both displays will automatically return to the Startup screen. The time required for data synchronization depends on the number of measurements conducted since the last synchronization. We recommend Data Synch to be conducted at least once every 10 measurements. Synchronization allows measurements to be validated. Table 2 lists the possible outcomes for the measurement validation process and the measurement condition which causes the outcome.
Table 2. Data Synch Status and Descriptions
| Measurement Status | Condition |
|---|---|
| Valid | No anomalies in the measurement conditions were detected. |
| Early | The SL-RAT transmitter unit (TX) was stopped prior to the SL-RAT receiver unit (RX) completed its processing. The Pipe assessment may be corrupted. |
| Late | The SL-RAT transmitter unit (TX) was started after the SL-RAT receiver unit (RX). The Pipe Assessment may be corrupted. |
| No TX | The SL-RAT transmitter unit (TX) was not turned on during SL-RAT receiver unit (RX) measurement. The Pipe assessment is corrupted. |
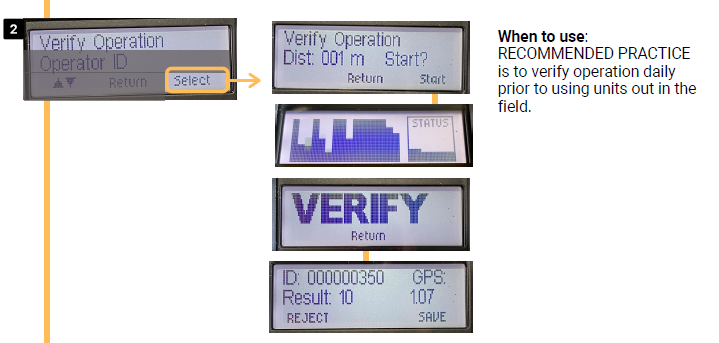
Verify Operation: Provides a method for verifying the TX and RX functional operation. The test is conducted with the TX tone sequence at a lower sound pressure level (-16 dB from normal test). To conduct a Verify Operation Test – the TX and RX should be located within one foot of each other. To start the test, select Verify Operation, first on the TX and then the RX.
Operator ID: Allows the operator to select/change the Operator ID recorded for each measurement. Operator ID values range from 1 to 30. The button on the left and right provide up and down scroll directions to change the Operator ID value. Center button returns to the Main Menu and selects the current value displayed as the Operator ID.
Review Results: Previous measurements can be reviewed. The RX and TX components can store up to 500 measurements. Once 500 measurements are reached, the RX will require measurements to be uploaded to a computer. The button on the left and right provide up and down scroll directions, respectfully.
- RX Display: Battery Level, RX Operator ID, Number Measurement Conducted on the RX, RX component serial number (Corresponds to the Face Plate SN), TX component serial number, Number of test requiring synchronization between the RX and TX, RX Firmware Version Number, RX Hardware Version Number, RX Build Date.
- TX Display: Battery Level, TX Operator ID, Number Measurement Conducted on the TX, TX component serial number (Corresponds to the Face Plate SN), TX Firmware Version Number, TX Hardware Version Number, TX Build Date.
System Info: The buttons on the left and right provide up and down scroll directions, respectfully.
- RX Display: Battery Level, RX Operator ID, Number Measurement Conducted on the RX, RX component serial number (Corresponds to the Face Plate SN), TX component serial number, Number of tests requiring synchronization between the RX and TX, RX Firmware Version Number, RX Hardware Version Number, RX Build Date.
- TX Display: Battery Level, TX Operator ID, Number Measurement Conducted on the TX, TX component serial number (Corresponds to the Face Plate SN), TX Firmware Version Number, TX Hardware Version Number, TX Build Date.
Options:
- XBEE Disable Option: The XBEE refers to the wireless protocol between devices. To disable the XBEE, scroll down to the “XBEE Disable” option and change to yes < Y >. To disable or enable the XBEEs, both TX and RX need to have their XBEE modules disabled. Disabling the XBEE will impact numerous operations. For more information on XBEE, reference page 18, Startup Menu (2/2) – XBEE Status and GPS.
Power Save: Allows the operator to place units in power save mode when selected. In addition, the RX and TX components will automatically enter power save mode if left idle for 2 minutes. When in power save mode, the screen will periodically remind operator the RX and/or TX component is still turned on. To exit power save mode, press the center key. Operator should turn off the SL-RAT if it is not in use for an extended period of time (more than one hour).
Contrast & Brightness: The contrast and brightness on the user display can be adjusted to improve visibility. Every time the device is turned off and on, the display returns to the default settings (132). Changing the contrast value too far from the default can cause the screen to blank or saturate. Increasing brightness can improve visibility in reduced light setting (e.g. indoors or at night). If the SL-RAT is being used outdoors during the day, reducing the brightness can typically improve battery performance. The button on the left is used to cycle between fields within the contrast and brightness. The button on the right is used to change the selected field.
Date & Time: Current date and time are provided based on GPS.
GPS Monitor: Provides the current GPS location data for the component. The GPS location is updated at 15 second intervals.
- RX Display: RX Latitude and Longitude specified in degrees, minutes, estimated distance to TX; RX and TX GPS status indicating both the type of GPS tracking and the number of satellites.
- TX Display: TX Latitude and Longitude specified in degrees, minutes, TX GPS status indicating type of GPS tracking and the number of satellites.
Post your comment on this topic.