
Operations is where passenger counts from Bookings impact Price/Inventory costs from Vendor, thereby creating Accounts Payable. Operations is where you can also produce travel documents for passengers, escorts and drivers – as well as generate inventory/utilization reports.
For every Price/Inventory record used to build an itinerary in one or more Packages, there will be a corresponding Operations record. This record will reflect the price and inventory data as loaded back in Vendor; as well as the number of passengers using that service once there is activity in Bookings. Operations is more or less the “end of the story”, since it’s here that you will come to record payments to your vendors, as well as run a variety of reports and documents when it comes time to finalize your tour.
As you finish creating and publishing your Package, you will be asked if you want to create Operations records. If you chose not to do it at that point, you can create them at any time by going to the List View layout in Package and clicking on the “Load Ops” button.
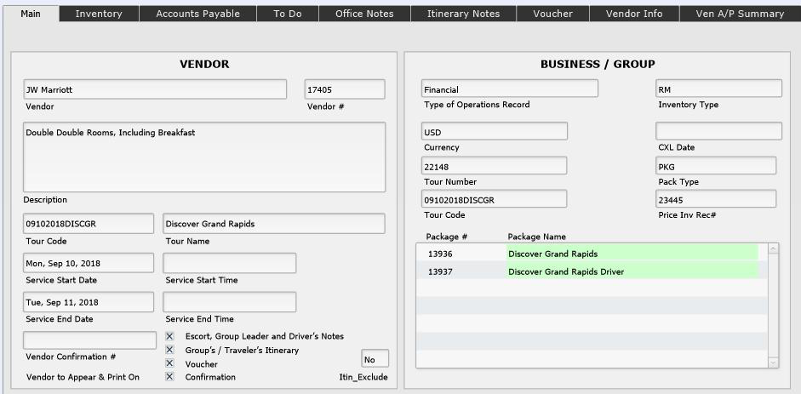
The fields contained on the Main entry tab are pretty straightforward. Note that the “Type of Operations Record” will be “Financial” if the Price/Inventory record represented has a cost loaded. If not, the Operations record will be classed as “Op Info”. If you entered a beginning and end time for the service in Price/Inventory, it will be displayed. If not, you may want to load it here (doing so will not cause the P/I record to be updated).
In the “print control check box” area(labeled Vendor to Appear & Print On), you will designate where you want this item to appear—whether on the Escort’s, Driver’s and Group Leader’s Notes; on the Group’s/Traveler’s Itinerary, and/or on a voucher. You can select or de-select by clicking on the check boxes.
In the portal at the bottom right of the screen, all Packages that share the Price/Inventory record and that are linked to the same tour will list. If the listing is colored green, that is an indication that the Package is published. You may see additional listings colored red; those Packages are related to the same tour but are unpublished.
Inventory Tab
Note: On the Accounts Payable tab, there is a button labeled “Update A/P”, which you will want to get in the habit of clicking immediately upon entering Ops. The script being called sweeps current booking numbers to the record, thereby also updating the current balance due.
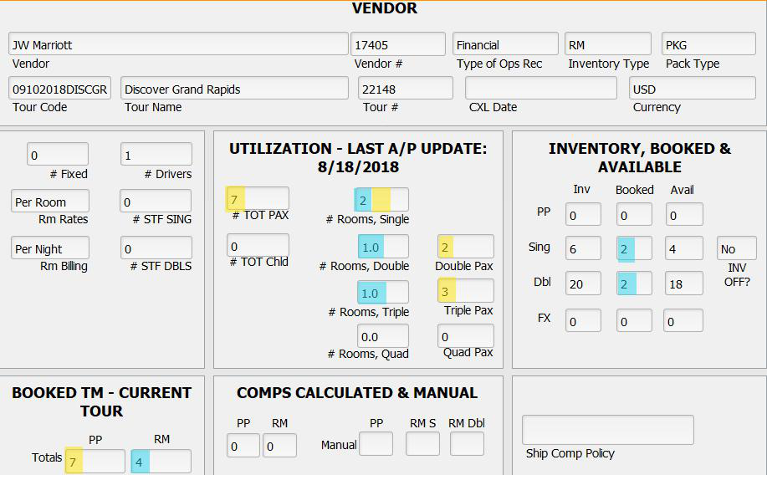
Moving from the left to the right, the panels you see on the Inventory screen show inventory and utilization. This is information for your reference; you will not make any changes here.
If the record represents a fixed-cost service, a motorcoach by example, the # Fixed field will reflect the number booked.
The fields Rm Rates and Rm Billing reflect the billing structure as established in the Price/Inventory record.
Numbers will display in the # Drivers/STF SING/STF DBLS fields if reservations identified as those types have been made back in Bookings.
In the middle panel, you will see an indication of how many adults (# TOT PAX) and how many bookings designated “Child”(# TOT Child) are using this particular service and, if there is a room component to the service, how many single, double, triple, and quad rooms have been booked. Directly adjacent, you see an indication of how many passengers will occupy those rooms.
If everything is in order, these numbers will “balance”, as in our example where we’ve highlighted passenger numbers in yellow (notice that singles are not broken out; the number you see in the # Rooms Single field represents both the room as well as passenger count); and room counts in blue. As a reminder, triple and quad rooms are impacting the Dbl inventory loaded back in the Price/Inventory record. Be on the watch for imbalances—by example you see two doubles but only three travelers. That should prompt an investigation of whether, back in Bookings, a single passenger is perhaps confirmed as a Double (Package)and should instead be a single.
To the far right, you see a reflection of whether inventory control was left off or turned on (INV OFF?) and loaded back in Vendor, the number being utilized in Bookings, and how many are still available. If inventory control was not turned on, nothing will show in this panel.
At the bottom left, you will see simple totals of people and rooms. Under “Comps Calculated & Manual”, you see the number of comps being backed out, based on the ratio loaded in the Price/Inventory record and present booking activity. If you don’t achieve the ratio but the vendor still allows a comp, load a 1 in the appropriate Manual Adj field: PP, RM S(ingle) or RM Dbl fields. The same fields appear on the Accounts Payable layout, meaning adjustments for comps can be made on that screen as well.
Accounts Payable Tab
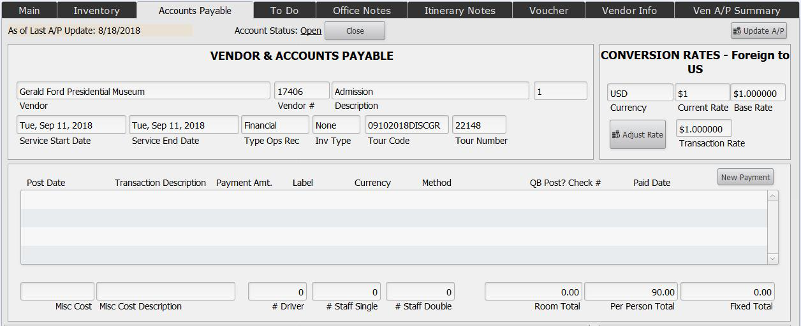
The Accounts Payable screen reflects what you owe the Vendor, based on current booking activity. Again, the first thing you want to do when coming to Ops is click on the “Update A/P” button to refresh the room and passenger totals, and thereby the balance due, based on up-to-the-minute counts. Glance to the top left to see the last time the record was updated and also whether the account is Open or Closed. To change the status, click on the green button to the left of the status indicator. Records should be closed once all payment activity is finalized; probably at the point the tour has operated, and financial records have all been tied out.
Posting Payments
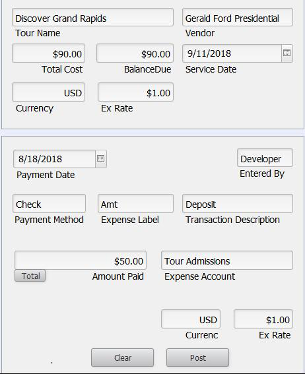 Begin by clicking on the button labeled “New Payment”, which will open up this window. Today’s date will drop into the Payment Date field and your name or initials will load to the Entered By field.
Pick a Payment Method from the value list that presents; Check, CC (credit card)or Transfer. Check and CC are obvious; Transfer denotes an electronic payment.
The values available to pick from in the “Expense Label” are Amt, Adj and Credit, respectively.
“Amt” will be used most often; it identifies an ordinary payment.
“Adj” might be used if a payment check sent previously was voided. Do not enter the Amount Paid as a negative as TourTools™ recognizes it for what it is when you select Adj as the label and Adjustment in the “Transaction Description” field.
“Credit” will be used when posting a refund or a credit memo. In the Transaction Description field choose Refund Rec’d or Credit Rec’d, respectively. The amount goes in as a positive number.
The Transaction Description field also displays a value list, the values being Deposit, Final Payment, Credit Rec’d, Refund Rec’d, Adjustment and CC Passthru. CC Passthru will be used to identify a payment made using a traveler’s credit card, the best example being…you made a deposit to Viking Cruises on behalf of passengers Smith using their card. When such a transaction occurs, there should always be a corresponding payment entry in the related booking record, in this case, giving the Smiths credit for the amount of the deposit made to Viking.
In the Amount Paid field, enter the amount of the payment being made. Clicking on the “Total” button will auto-load the total balance due.
The Expense Account field contains a value list identifying the expense account to which the payment should be credited (for systems interfaced to QuickBooks).
When all entries are complete, click on the “Post” button.
If your system is not interfaced to QuickBooks, deselect the “QB Post?” checkbox and manually make entries in the Check # and the Paid Date fields.
More about Manual Adjustments
Manual Adjustments might include forcing a comp (briefly addressed earlier), or perhaps adding an extra guest for dinner. If the vendor has agreed to a comp policy that is more lenient than what was first agreed upon and which is reflected in the Price/Inventory record, use the Manual Adj fields on the Rooms Expense tab or the Adjust field on the Per Person Expenses tab to adjust as appropriate.
The field labeled Misc Cost, which can accommodate positive or negative amounts, is generally used to make adjustments which are “random”. As an example, the aunt of one of your travelers is going to join the group for dinner. In the Ops record representative of the restaurant meal, enter $25 in the cost field and in the Misc Cost Description type “Smith Dinner Guest”.
Clicking on the “$ Update Tots” button will adjust the A/P amount being calculated, to include these kinds of miscellaneous adjustments.
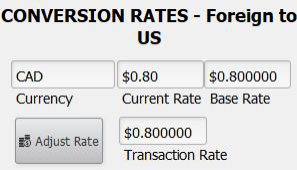 A Note About Foreign Currencies: If the vendor will be paid in a currency other than US Dollars, the exchange rate in effect when the Ops record was created will be reflected in the Current Rate, the Base Rate and the Transaction Rate fields. In this example, the rate was set at $1 USD = .80 CAD.
At the point you are ready to make a payment, you want to consider whether the rate is still accurate or if it needs to be adjusted; this in order that the record will capture the true cost of the payment to the Vendor, which—of course—is critical if expenses are to be properly reflected on the P/L that you will eventually run.
If the rate needs to be updated, enter it into the “Current Rate” field, then click on the “Adjust Rate” button. Doing so will reset the “Transaction Rate”. The “Base Rate” will reflect what was in place originally.
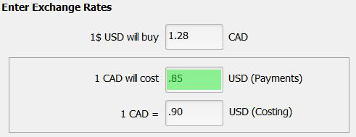 Note: The content of the “Current Rate” field, is directly linked to the field labeled “USD (Payments)” back in the Currency Support File. In other words, updating one will update the other. So, if we were to change the .80value in the previous record to .85, that is what you’d see back in the Currency Support File. What is important to note, however, is that the “Transaction Rate”—the one that really matters when it comes to payments calculating properly here in Ops— will not update unless you make that happen. Rest assured, that exchange rates in effect when Price/Inventory records became part of the itinerary back in Package are not affected by anything done here. Those rates are pulled from the “USD (Costing)” field andremain in effect until you update them (as described in Chapter 5).
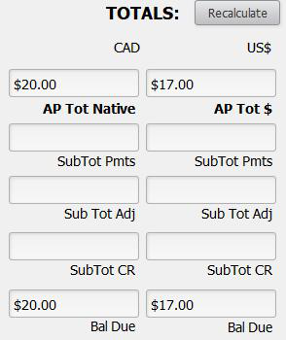 Glancing to the bottom right, click on the “Recalculate” button to update the A/P total in “real time”; taking into account the current exchange rate as well as the current number of whatever services represented in the record have been sold. On the left, the field labeled “AP Tot Native” will reflect the current amount owing in the local currency. On the right, the AP total in USD will be reflected in the “AP Total $”.
As payments are made, those will likewise be reflected in local currency as well as US Dollars in the fields labeled Pmts.
In the TOTALS pane, the value of any manual adjustments made (explained earlier) will be reflected in the Adj fields; and any payments identified as “CR (credits)” when posted will populate the CR fields.
Vendor A/P Summary Tab
It might be advisable to get an overview of what is owed to a particular vendor for all services before issuing a check for the one item you are looking at. The Vendor A/P Summary layout will display other services booked with the same vendor for the same tour; and corresponding balance due amounts.
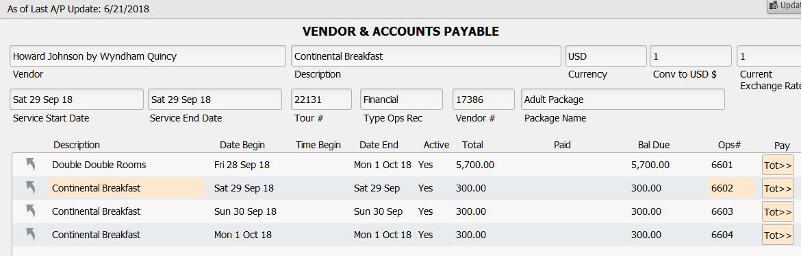
In this example, there are four separate services booked with the Howard Johnson by Wyndham Quincy Hotel. Two things happen if you click on the buttons labeled “Tot” at the end of each portal row. First, the total (reflected in the column labeled “Bal Due” will be swept to the Summary portal below. Secondly, that balance will be loaded as a pending payment on the Accounts Payable tab. If you want to proceed with actually processing that payment, you will want to—as usual—enter a check number (unless the payment is being made by another method) and the pay date. For the sake of clarity, the record highlighted in pink is the record that you have open.
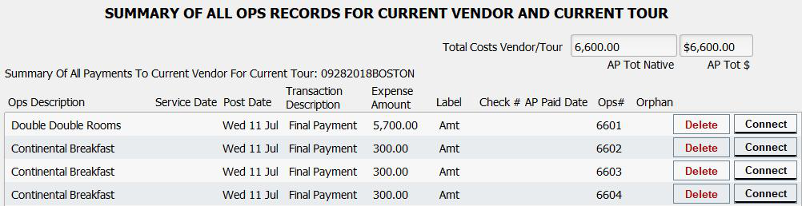
The last button to note is “Connect”. In instances where you had a service attached to a Package—for which you had posted a payment here in Ops—which you replace in Package because of a date change, the original Ops record will be replaced when you finish with the substitution. In such a situation, the payment posted to the original record will in a sense be “orphaned” but is recognized in the “Summary of All Ops Records …” area.
When you click on the “Connect” button related to that payment, it will be queued up on the Account Payable tab, after which you will make the usual entries (check number, payment date, etc.) to complete the transaction. Note that the original payment date will be reflected on the far left in the “Post Date” field; you may want that to again be the date you enter in the “Paid Date” field.To Do Tab
Several things are reflected on and can be done from this screen. When you request services from the Vendor, input the date in the Date Request Sent field. At the same time, you might want to create a To Do reminder to monitor receipt of a reply.
Once the service is confirmed, input the date in the Date Contract Rec’d. If a contract or reservation number is provided by the Vendor, record that in the Vendor Confirm # field.
The Space Status and Rate Status fields will show as “No Req” and “Est” until such time as a date is input in the “Date Contract Recd” field. Once that happens, the status of both will revert to “Conf”.
 Use the “Load Doc” button to attach a document—perhaps the Vendor’s confirmation or contract—to the Ops record. The process is exactly the same as that followed to attach a document to a Client or Booking record. Once loaded, the document(s) will be represented on the “Documents” tab.
Office Notes Tab
This screen is for internal office notes. Enter your text in the Office Notes Entry field and click on the pencil to load the text—which will be tagged with the note-taker’s name and date of entry—to the field below,
Itinerary Notes Tab
 If you entered notes in the Itinerary, Escort or Driver notes fields when you created your Price/Inventory records back in Vendor, those notes will flow to the Ops records, where they can be edited one last time. Notes can otherwise be entered right here in Ops. The beginning and end times of your service also appear—and can be altered—on this screen. The field labeled “Event or Place Name” reflects the description given to the Price/Inventory and can be edited as you might wish to become the “header” for the service as included on the final itinerary.
Creating Ops Info Records
It is possible to create records right in Ops that are not truly associated with a Package element but rather are needed to create “filler” in the itinerary. These records are purely informational and have no financial component
By example, let’s say you want to include in your itinerary a remark to the effect that the group may expect to be welcomed at Hotel XYZ with a punch and cookies reception.
With the Ops record that precedes the hotel overnight open, click on the “New Info Record” button. The record that is created will be classified as an “Ops Info Rec” as opposed to “Financial” since, as mentioned, it has no financial component. Enter the “Event Name” as well as the appropriate text in the “Itinerary Notes” field.
Two things to keep in mind: The info record will appear after the record you used to create it, and will appear only on the itinerary. Be sure to double check the date and time assigned to the newly created record and delete and start again if it is sequenced incorrectly.
Voucher Tab
If you plan to generate group vouchers from the system, do your set-up here. “Voucher” must be checked in the print control list and you can embellish the
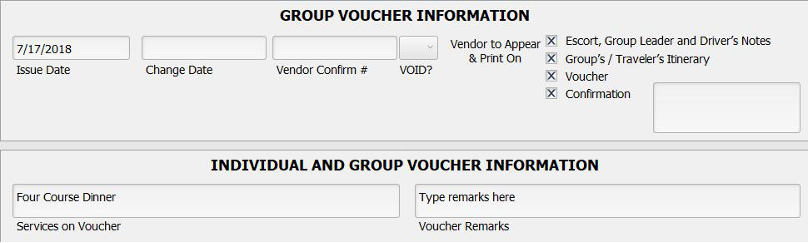
description as appears in the “Services on Voucher” field if you wish. If additional remarks on the voucher are desired, enter them in the field labeled “Voucher Remarks”.
When your input is complete, run a group voucher from the Operations Reports menu. Once that is done, the “Voucher Issue Date” will fill in. If you make changes and run it a second time, the “Voucher Change Date” will display. To void a voucher, click in the “VOID?” field and select the number one that appears.
Vendor Info Tab
You can reference the contact and address information from Vendor, as well as a number of other fields of information, here on this layout.
Cancelling One or All Ops Record(s)
If it becomes necessary to cancel the service represented in an Ops record, use the navigational button labeled “Cancel”. When you do, you will be asked if you want to cancel just the record you have open, or all of the records related to the same trip. Regardless of your reply, in the upper right corner of the Main tab, the field labeled “Type of Operations Record” will be stamped “CXL” and the “CXL Date” will reflect the date the action was taken. The cancellation date will also be reflected on the To Do tab, and on the Accounts Payable tab the sales figures will be stripped away, possibly leaving the record as “overpaid” if payments to the vendor were previously made.
As appropriate, refer to the addendum “Cancelling a Tour and Closing Out Booking/Operations Records” for instructions for zeroing out the record.
Replacing (Renaming) an Ops Record
In the eventuality a Vendor changes names—maybe a hotel that has been rebranded or a misspelling occurred when the record was created and not caught until some time later—check with TourTools™ Support for assistance. It may be possible for a developer to create a script to correct the problem, or we can step you through the “repair and replace” process.
 Some additional buttons that haven’t been described previously include the “Tour” button. Clicking on it will assemble all Ops records related to the same tour as the record you are in.
 If an email address is loaded in the Vendor record and therefore in the Ops, you can, as is the case in Client, send an email, with or without an attachment, directly from TourTools™. The process will ask you first to identify the document to be attached, and then prompt input of the email text.
Reports Menu
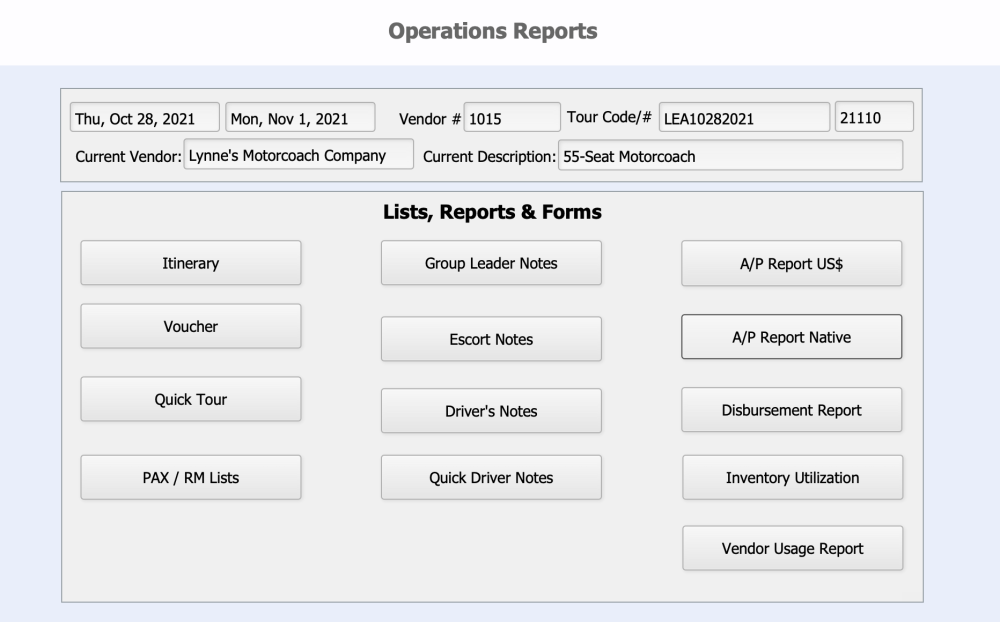
There are several reports included in the Operations database. Note that many, like the notes for the tour personnel, display first in Browse mode, meaning you are able to make final edits just before previewing and printing.
Itinerary: This is a day by day listing of all services that make up the tour (providing the Group’s/Traveler’s Itinerary print control has been checked and the service has not been tagged for omission back in the Package itinerary).
Voucher: Click on this icon to generate a group voucher. Remember, a voucher will only print if the print control box has been checked.
Quick Tour: This gives you an overview, in date order, of all operation records for a given tour.
Pax/Rm List: Use this report to run a list of passengers using the service(s) represented in your found set of records. If the Vendor is a hotel, the report will present as a rooming list. If not, the report will be a simple name list.
Escort Notes/Group Leader Notes/Driver Notes: These reports can be run for the respective personnel and reflect the notes as entered in Vendor, perhaps edited at the Price/Inventory level, with final adjustments possible here in Ops. You will see that what appears on the Group Leader Notes is actually drawn from both the Escort and the Driver’s Notes fields so if there is anything of a confidential nature, not to be shared with the Group Leader, you will want to run your Escort and Driver documents first, then edit the notes and run the report as intended for the Group Leader.
Quick Driver Notes: This report is an abbreviated version of Driver’s Directions.
Tour A/P Report US$: This report shows the total cost (based on current reservations), payments made and balance due to each Vendor, converting if necessary, any foreign currency amounts to US dollars.
A/P Report Native: This report reflects the same, however, in the case of vendors paid in foreign currency, you will see what rate of exchange was in effect when the Ops record was created (the “Base X”, what was used in the course of costing the Package), as well as the rate used when payments were made (the Adj X).
Disbursement Report: This report can be called based on a variety of criteria and reflects payments made, sorted by tour. The currency in which the Vendor was paid is visible, but there is no translation of the amount into USD.
Inventory Utilization: This report reflects inventory as loaded in the related Price/Inventory record, as well as what has been sold and what is still available. In addition, you can see at a glance how many Packages are sharing the particular Price/Inventory record (column labeled “#Pkgs”), whether the service has been inventoried (the column labeled “Mngr” will show P/I if there is inventory loaded back in the P/I record, and “O” if inventory is turned off), the “Type” as assigned back in Price/Inventory (per person, fixed or room), and the Space and Rate Status (explained under “To Do” previously). This report can be compiled by tour, by supplier, or by criteria of your choice.
In the heading for Escort Notes/etc., please change “Drivers Directions” to “Driver Notes” and also remove reference to the “Tour Notes Outline” since that’s no longer available.
Vendor Usage: This report is somewhat similar to the Utilization Report but shows only usage, not inventoried numbers or availability. Figures reflecting cost, payments and balance due are also represented. As implied by the name, this report is intended to be run by Vendor but can be called by tour, or by other criteria of your choice. Note, however, if it’s not run by Vendor, the summary totals don’t necessarily make sense.
If you have any questions that are not answered here Contact TourTools Support for assistance.
Post your comment on this topic.