
Store contact details, rate information and inventory detail for the suppliers with which you do business.
In many ways, the Vendor module is at the very heart of TourTools™. The Price/Inventory Records created here are the elements that are ultimately bundled into the Packages being sold, thereby creating receivables. And, each of those Package elements has a corresponding Operations record, where Bookings meet services sold, thereby creating payables.
Creating a New Vendor
To create a new record, click on the “+ New Vendor” button at the top of the screen.
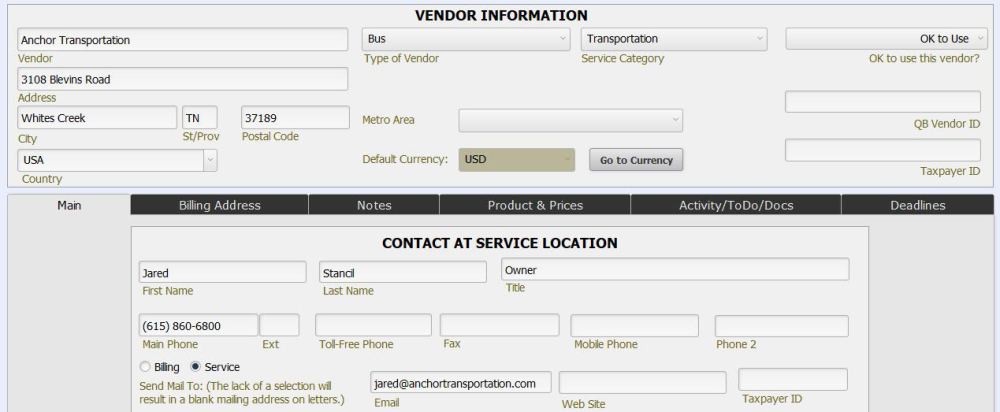
Most of the fields are obvious as to the content. As in Client, it is not necessary to enter a city and state; rather, enter the zip code and those fields will “auto-fill”. “Phone fields” will automatically format; in other words, there’s no need to include punctuation as you input the number, the system will add that for you. Select the “Service Category” and “Type of Vendor” from value lists that present. These lists are maintained in the Value Lists Support File, accessed from the home dashboard.
By default, the “Default Currency” field will auto-fill with “USD”. If this is not correct, select from the value list the monetary unit that the Vendor will be paid in (this value list compiles based on the currency records that exist in the Currency Support File). To create or reference a currency record and/or establish exchange rates, click on the ‘Go to Currency” button.
Creating and Maintaining Currency Records
Let’s segue a moment to address the issue of “Currency”. In the Support File so named, create a new record by clicking on the “+ New” button and identify the currency with the universally accepted three-character code. Note there is a field where you can load the URL of your favorite currency exchange website, which can be accessed by clicking on the “Open” button.
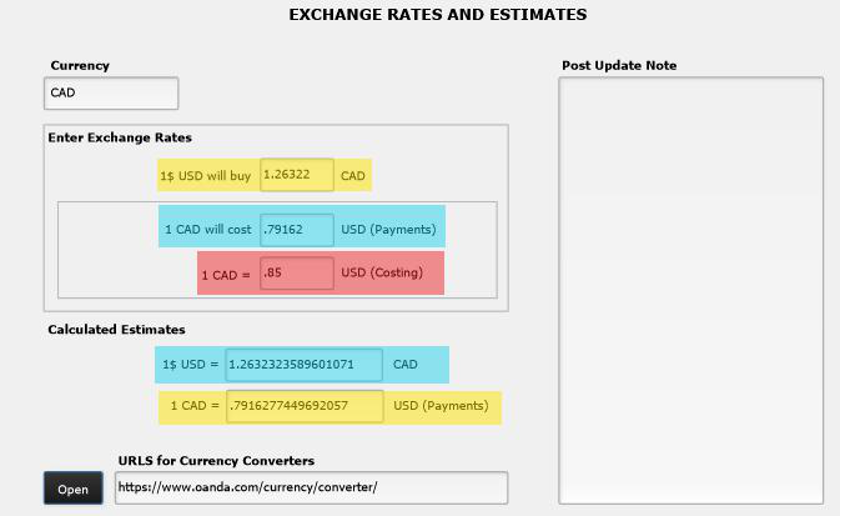
Complete the record by filling in the first field, highlighted in this example at the top, in yellow. This amount represents what one US Dollar will purchase in the foreign currency. Once that field is loaded, the corresponding yellow-highlighted field below will auto-fill with the “inverse” value of the currency, or, what one currency unit will cost in US Dollars. Take that number—rounded if you wish—and load it in the field highlighted here in blue at the top of the screen. That is the exchange rate that will be in effect were you to make a payment from Ops. The inverse of that amount will auto-load to the blue highlighted field below.
The last—and most important —field to complete is the one highlighted in red, labeled “Costing”. As you build a Package using services from the Vendor in question, this amount is what will be used to convert/calculate the cost. Since many tours are costed a year or more in advance of their actual operation, you will probably want to allow some “wiggle room” to allow for fluctuation in the exchange rate. In this scenario, the exchange rate could change by more than five cents in the Vendor’s favor before the costing of the trip would be negatively affected. Conversely, if the exchange rate improves by the time we have to pay the Vendor, the profit margin on the Package increases.
When all of your input is complete, use the “Post Update Note” field to load some reference of who last updated the rate—perhaps their initials—and on what date.
More specifics on currency exchanges as they relate to costing tours and making payments are covered in the Package and Ops chapters.
The importance of properly identifying the currency in which the supplier will be paid cannot be overstated. If it is mis-identified and the currency mis-valued, there will be cascading effects that could negatively impact your pricing and profitability.
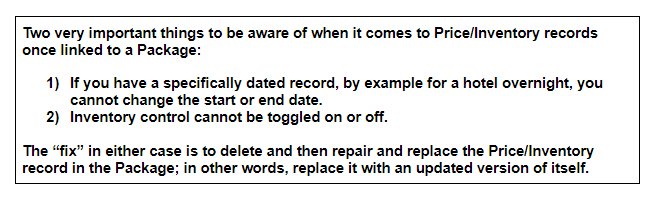
If an incorrect currency is associated with a Vendor record at this level and goes undetected to the point that Operations records have been created, there is no “fix” other than to strip the incorrect Price/Inventory record from each affected Package, and then delete the P/I record from the Vendor record. Only then can you reassign the currency associated with the Vendor and start building your P/I records, Packages, etc., all over again (all of this will be explained further as we move along).
Back to the front page of the record…In the fields referenced as “Contact at Service Location”, load details of your primary contact. At the very bottom of the screen, is an area where you can load additional contact details. Notice the section referenced “Tours on Which This Vendor is Being Used”. Nothing will appear here until Price/Inventory records for this Vendor are linked to Packages, and Operations records are created (processes explained as we move along).
Billing Address Tab
In situations where the physical address of and contact information for the Vendor is different from what you use when contracting services, use this screen to load the alternate information. An example might be the Westin Hotel in Halifax that you actually contract via the Westin sales office in Chicago. On the Billing Address section, load the details for your contact in Chicago. Select the address to which mail should be sent by clicking on the appropriate “Send Mail To” button.
If your system is interfaced to QuickBooks, there is a field in the upper right of this particular layout to reference the ID number for the Vendor. In the taxpayer ID field, enter the Vendor’s EIN as you wish.
Notes Tab
This is one of many spots where you can enter “notes” that become part of printed documents later on. The field labels give an indication of which notes appear on what documents.
You may wish to enter colorful and enticing marketing copy into the Proposal Notes field.
Itinerary Notes tend to be more informational or instructional, as they are included on documents provided to the individual travelers.
In the Escort Notes field, common entries include information that your escort should be aware of like restaurant hours, the fact that the hotel likes to welcome the group upon arrival, etc.
In the Drivers Notes field you might touch on where passengers should be dropped and where parking is available.
Notes made in the Follow Up Comments field are strictly for internal use. You might want to note how much time is needed to tour an attraction, or specifics about how many and what type of vehicles a particular motorcoach operator has in their fleet.
At the end of this manual, there is a complete section dedicated to notes; where they originate, how they can be edited, etc. Meanwhile, given that notes will copy from one part of the system to the next in sort of a hierarchical way, it makes sense to initially load multiple descriptions at the Vendor level, knowing that edits are possible as you move along. By example, the Vendor might be a hotel, for which you are going to create Price Inventory records for rooms and for meals. Go ahead and enter descriptive information for both services in the same field, knowing that what is not appropriate to the specific record down line can be edited out, without there being any effect on the original note.
Activity/To Do/Docs Tab
(We’re intentionally skipping over the Product & Prices tab; we’ll get back to that in a minute).
This layout is pretty busy. In the pane labeled “Activities” you are able to create and store emails, phone calls, and similar, just as you do in Client. Functionality in the “To Do” area is also identical to what happens in Client.
Store “Bank Account Information” as suits your situation. The field labeled BLZ relates to German bank account numbers.
The “Primary Destinations List” displays values from the “Destinations” support file maintained from the Home page. You can create values representative of the specific or general geographic location of the Vendor, or the type of tour on which this Vendor is used. Be aware that Tour Master records are tagged with a destination value, so when it comes time to create a tour to San Antonio or “The Great Southwest”, the classification you used for the Vendor record should probably be the same one you pick to classify the tour.
Documents associated with a particular Vendor, perhaps a copy of a motorcoach company’s promo piece with photos and specs on their fleet, can be attached to the record by clicking on the “Load Doc” button. You will be stepped through the process of naming and describing the document, then browsing, identifying and attaching the document. Once attached, the document can be viewed by going to the “Activities/To Do/Docs” tab and then clicking on the “Documents” tab on the right.
Deadlines Tab
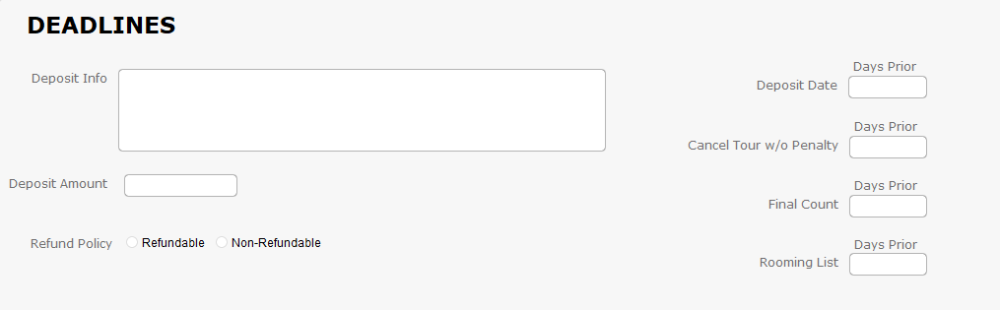 Fields in this area should be completed only when the deadlines, amounts and terms referenced are always the same for the Vendor, which in reality is rarely the case. More often than not, deadlines and amounts are dependent on variables like the date of service, the size of the group, and the like. As such, it usually makes more sense to create “To Do” reminders in your Ops records, which will be tied to a very specific service, in connection with a very specific tour. If you do elect to fill in the fields here, To Do reminders will be created for you each and every time this Vendor is linked to a Package.
Product & Prices Tab
The loading of services you have contracted with your suppliers begins here, but before proceeding, it may be helpful to look at the process in terms of a “flow chart”. At the top of the chart is your Vendor, from which you purchase a variety of products grouped in a Product Date Record, each of which takes the form of a Price/Inventory Record.
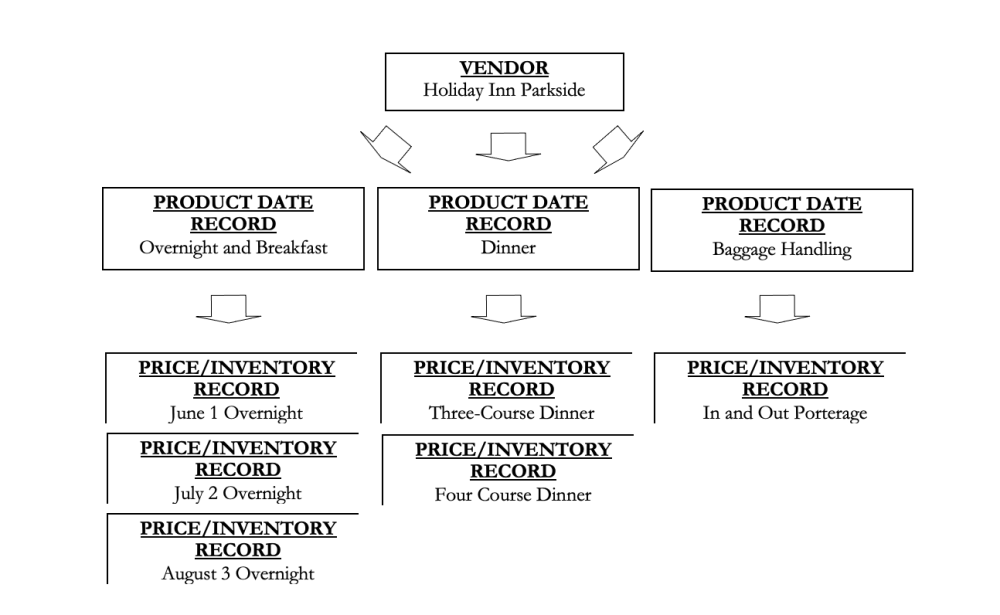
It might be helpful to think of the relationships in this part of the program as a series of file cabinets, each of which has multiple drawers, in which are contained all of your contracts. In the example that follows, Lynne’s Hotel—the Vendor—is the file cabinet, and we are about to allocate and label one drawer (a Product Date Record), in which we expect to find paperwork documenting all of the reservations we have made for accommodations and meals anytime during 2018 (represented by Price Inventory records). At the point we contract services for 2019, we will create—manually or via the “duplicate” process—a second Product Date Record (a second drawer), in which we will find Price Inventory records (contracts) related to reservations for the new year.
 To create a Product Date Record, click on the “+ New” button located mid-screen. The Vendor name auto-loads as does the Default Currency. The description you give the Product Date Record will reference the services that you are about to create at the Price/Inventory level.
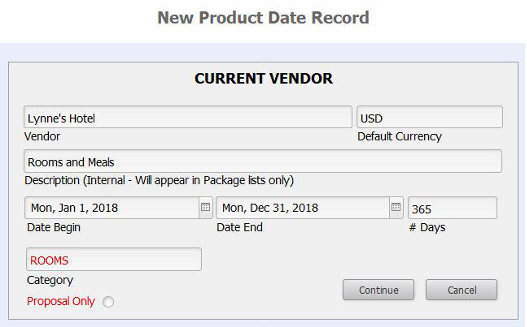 The Date Begin and Date End fields define the period of time during which the product specified is available. The range may be as long as a year or may reflect seasonality. The “# Days” field will auto-fill. The Category description is essential to the “Tour Duplicate” function available in Tour Master working properly. That process will be explained in detail in Chapter 4. At this juncture, the most important thing to know is that if you have multiple Product Date Records whose dates overlap even by a single day, it is critical that they be assigned different categories. It is recommended that the category be kept simple…one word is good.
Select the “Proposal Only” button if the Price/Inventory records you are about to create are “generic”—perhaps the costs are estimated, and you do not actually have the service contracted with the supplier—and are needed only for purposes of being able to put together a proposal. Marking them as such will prevent them their being mistaken for the “real thing” when used in packages.
Click on the Continue button to proceed (as you are in the middle of a script), or on Cancel if you do not wish to move forward.
Inventory & Pricing Data Tab
The completed Product Date record has one additional field to note, that being “Destination (Internal)”. The attached value list also draws from the “Destinations” Support File, and your choice will usually be the city where the Vendor is actually located. Looking ahead, this assignment becomes useful when you link Vendor services to a Package, as one of the ways you can select the Vendor whose service you want to link is to pick by “Destination” (explained in greater detail in the Chapter 5). When you might type or select a different value is when the Vendor, let’s say a hotel in Alexandria, VA, is being used in connection with a Package for Washington, DC. In such a case, you would label the “Destination” as being Washington, DC, not Alexandria. A good rule of thumb is to think in terms of this field as being an “in connection with” pointer. Note that it’s perfectly acceptable to not load any value in this field. Not doing so only means you won’t be able to link the service to a Package using the “Destination” process referred to in Chapter 5.
You are now at the point where, from within the parameters of this Product Date Record, you can create a Price/Inventory record. To start, click on the “+ New” button. For now, ignore what appears at the top left part of your screen referencing the Current Tour# and Package#. Initially, this has nothing to do with the record you are creating. At the point the record is being attached to a Package, the information that displays will be relevant.
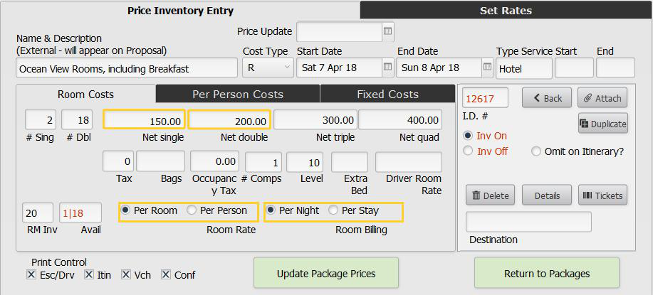
Looking, then, at the part of the layout labeled “Price Inventory Entry”, the Name & Description, as you’ll note, is “external” and is what will appear on proposals and itineraries, so be clear and succinct. If you are creating a “Proposal Only” record, you might want to get in the habit of prefacing your description with the word “Proposed”; another measure that will help avoid the accidental “misinterpretation” of the record.
In the Cost Type field, select F, P or R (Fixed, Per Person, or Room), or let that value be set automatically upon entry on any one of the three related tabs in the record.
The Start Date and End Date will initially auto-load as the dates assigned in your Product Date record but can be overtyped as has been done in the example. For services like a theme park admission that remains constant all year, the year-long date range would be applicable. For a tour-related motorcoach charter, your date range will be as long as the tour. In the case of hotel accommodations, you have two choices. One is to create one record for each overnight; the other is to set up a date range, with the Start Date being the date of check in, and the End Date being the date of check out. The biggest factor that should drive your decision is…will every member of the traveling party be with the group every night, or does the possibility exist that some will miss a night due to late arrival or early departure? If you want to be able to eventually generate a separate roomlist for each night of the stay and not have to make any manual adjustments to the payable created for the hotel in Ops, then you will create a separate Price/Inventory record for each overnight.
The Type Service will also auto-load as the same value used to classify the Vendor. The same value list is attached to the field and you may, if you wish, re-classify the record. By example, if you are creating a record representing dinner at Hotel Washington, you might change the Type Service from “Hotel” to “Meals”.
In cases where your service has a specific start and/or end time—a theater performance or restaurant reservation, by example—you will want to fill in the Time Begin and possibly also the Time End field.
Note that the system is again assigning “ID numbers” to the records that you are creating. The Vendor has a number, seen in the upper left corner of the Vendor record.
When you drive down a level, to the Product Date Record, it also references an ID, in the same upper left position…
…as does the Price/Inventory record, just to the right of the Room, Per Person and Fixed tabs.
If you want to manage inventory for a Room or Per Person service here in Vendor, you will click Inv On. Doing so necessitates that you then load a figure representing the quantity on hand. In our example, since we are talking about rooms, we loaded 2 (rooms) in the # Sing field and 18 in the #Dbl. Please note that inventory can be controlled for a daily/one-off service, an overnight service, or for a “stay”. You cannot set up a date range (for example January 1, 2018 through December 31, 2018) and expect to manage the inventory for each day. Instead, you must create a separate Price/Inventory record for each day with its own cost and inventory (easy to do using the Dupe feature, which will be addressed shortly).
Note that the numbers you load can be “massaged” as needed. By example, if you max out the number of tickets booked for a given theater performance and are able to obtain additional, simply up the count. Similarly, if you release tickets back to the theater due to slow sales, you will want to adjust the number downward.
If it is not necessary to manage inventory—for a service like shuttle vouchers, by example—you will leave inventory turned off.
The button just below, Omit on Itin?, signals the program to not list the service in an itinerary. Items like a per-diem allowance for your tour manager’s on-the-road expenses would likely be treated this way. The cost for that service needs be included in your Package for pricing but should not show up as a “line item” in the documents your client or passenger receives.
As mentioned earlier, there are three kinds of costs that you can manage in TourTools™, Fixed, Per Person, and Room. Fixed costs are those that will be shared by the entire group. Some examples are the cost of a motorcoach, or tour manager wages. Per person costs are fairly obvious; anything like a meal or a theatre ticket that will be charged on a per-person basis falls into this category. Anything that has a room component to it—hotel rooms, cabins on a ship, or a resort stay—will be loaded as Room costs. Only one type of cost can be loaded in a single record. To elaborate on each a bit more:
Fixed Costs
Using a motorcoach charter as an example and moving across the fields of entry from left to right, the Fixed Inv field is where you can input the number of busses you have chartered for a particular tour. To accommodate the cost, you can use either the FX Group Cost field or the Group Cost/Daily field. The difference between the two is as follows:
Example
You have contracted with a motorcoach company for an over-the-road charter for the period January 1 to 7, 2018. The cost for the week will be $5,500. You will load that amount as a FX Group Cost, associated with a Begin Date of January 1 and an End Date of the 7th.
From the same company, you contract shuttle services on a daily basis quite frequently throughout the season. One airport-to-hotel trip costs $250, which amount you will load as a Group Cost/Daily. The date range for this record might be January 1 through December 31, which implies that you can pull this service into any number of Packages, so long as the date of usage falls between January 1st and December 31st.
Two unique things to note about Fixed Costs: First, loading a number in the “Fixed Inv” field is simply an indication of how many of that service has been contracted and provides no inventory control. In other words, if you charter two coaches for a tour and enter “2” in the “Fixed Inv” field, there is nothing to prevent you from adding three coaches at the point you link the Price/Inventory record to a Package.
Second, the field referencing Capacity is also not providing any inventory control. For the charter service used in our example, you might load 45 as being the number of seats on the bus. Again, this is for reference only since there’s nothing to alert you when you book more than 45 passengers on the tour using the charter. If you feel it essential to carefully watch capacity on the bus— in other words there’s no other inventoried component in your Package that will prevent exceeding the number of seats available—then consider creating what we call a “Max Pax” record, which serves specifically as a “counter”. The per person record will be dated the same as your charter record, will obviously have no cost associated with it, but will have inventory turned “on” and loaded.
Per Person Costs:
Once again using theater tickets as an example, your Begin and End Dates will be the same and you may want to load the starting time of the play in the Time Begin field and the approximate end time in the Time End field. Inventory would be turned “on”, and the number of tickets you are holding would be entered in the PP Inv field. As mentioned earlier, if you have a block of 35 tickets, at the point you tried to sell a 36th person on the Package featuring this service, the booking would waitlist.
As bookings are made on Packages using the service, the inventory will decrement, and you will see the quantity still available in the Avail field.
If complimentary tickets based on sales will accrue to you from the Vendor, enter the number and the level at which you will receive them in the #Comps and Level fields. If, by example, you will earn one free ticket for every 40 sold, your entry will be 1 and 40. If you have a situation where you will earn a free ticket regardless of whether you sell 4 or 40, you will simply enter 1 in the #Comps field and nothing in the Level field.
Room Costs
Referring to the example shown earlier, you will use the Room Costs tab when loading inventory and costs relating to the reservation of rooms with a hotel, cabins with a cruise line, or a package of arrangements with an all-inclusive resort. Note that your End Date will always be the date of check out, so at the very least, (as in the case of a single overnight) all of your records will have a one-day difference in the Begin and End fields. In the Inv fields, you will load the number of single and double rooms booked, if you have checked “Inv On”. Note that any Bookings eventually made on a triple or quad occupancy basis will draw from the inventory loaded in the # Dbl field; only singles will decrement the number loaded in the # Sing field. The total number of rooms loaded in the record will appear in the lower left corner, adjacent to the Avail field, which—as Bookings accrue—will reflect what is still available.
The next four fields are for input of the single, double, triple and quad room costs. In the Tax field, load a decimal figure representing the tax rate, if applicable. In the field labeled Bags, load the per-person cost for baggage handling (obviously, if you create separate records for each individual night, only one should contain the baggage handling fee; or, consider the possibility of creating a Price/Inventory for just the cost of porterage in and out). In the last field, Occupancy Tax, load a dollar amount representing any occupancy tax on the room. On the far right is a field to indicate the #Comps and Level. Your input here should be indicative of how many rooms will be comped for how many rooms sold.
If the hotel quotes a flat rate for a room on single or double occupancy and quotes the cost for triple or quad occupancy by giving an “extra bed” cost, that cost will go in the field labeled Extra Bed.
Finally, if you are responsible for the cost of the driver’s room on tour and the hotel offers a special rate for same, enter the amount in the last field, Driver Room Rate.
On the next line, identify the “billing structure”. You’ll note the choices are to bill per person or per room, and per night or per stay.
Note: When the “extra bed” or “driver room” rates are considered for pricing in Package, they will be subject to the same tax rates as indicated in the line above, so both entries should be net amounts. Also, when you specify that the costs are “per stay”, the occupancy tax should likewise be for the stay, as should the cost for the extra bed and the driver’s room.
Net vs Set Prices
As was explained at the beginning of the chapter, the cost you load in the Price Inventory record will be considered when the Package it becomes part of is priced, since that cost represents what you will owe the Vendor for the service. Part of the pricing process will be to establish a percentage of profit, which percentage will impact the total net cost of all the included Vendor services UNLESS you wish to exempt any and instead account for the profit here in Vendor. To do so, you will still load your net prices on the tab labeled Price Inventory Entry, but then move to the Set Rates tab and continue as follows:
In the field labeled Margin + Comm, enter the combined margin of profit and commission, then click the “Load” button. Doing so will load the calculated result in the corresponding field.
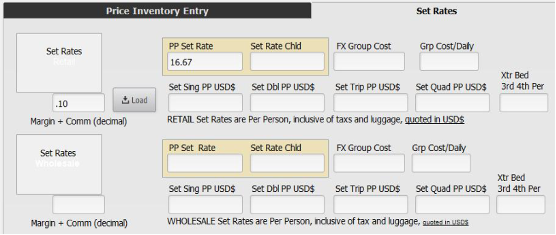
In this example, $15 was input as the per person cost on the previous tab, .10 was input as the margin and, after clicking “Load”, $16.67 dropped into the “PP Set Field” (if you wish, the calculated amount can be rounded by simply overtyping the figure).
When this Price Inventory record is linked to a Package, $15 is still the amount that will load as the net payable, but this and any other Price Inventory records that have been linked using the “Set” pricing, will be impacted by the margin (not markup; the difference is explained in Chapter 5) of profit referenced in Package. Rather, that percentage will be ignored given the profit has already been accounted for back in the Price/Inventory record (in our example, $1.67).
The choice of whether to use Net or Set prices is made when you create your itinerary in Package, using either the “Attach” or “List by Name” method.
Note that there are two types of Set rates; one is for elements to be included in a Package to be sold Retail (this is the system default) and the other is for use in Wholesale pricing. The ability to offer Wholesale pricing is not resident in the “generic” system and would be considered a customization).
Navigational Button Bank
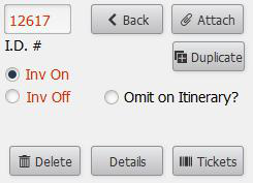 Clicking on the < Back button will return you to the Product and Prices tab in the record.
Use the Attach button to attach Vendor records to Packages. Chapter 5 will explain the process in detail.
The Duplicate button (process) will save you an immeasurable amount of time in setting up records that are similar or identical to records that already exist. To use, position yourself within the record you want to copy, and click on the button. You will be asked whether you want to make a single copy of the record or if you want to replicate a range. If you choose the first, an exact duplicate of the original record will be created, the dates and possibly other details of which you will need to alter. If you pick the latter, this screen will present:
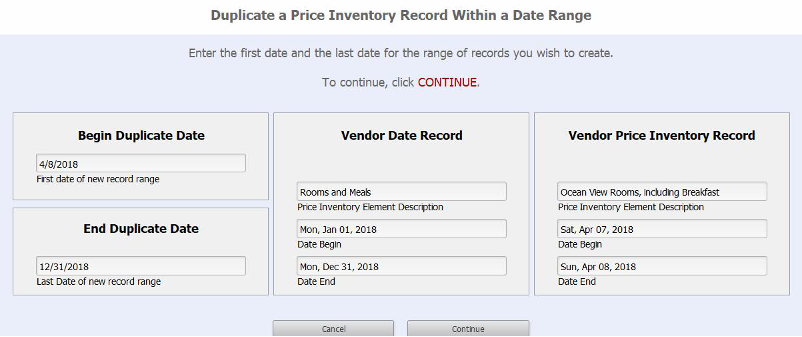
In the center of the layout, the Product Date Record description and date range is referenced. To the right of that is a reconfirmation of the description and the date of the Price/Inventory record you are copying.
Initially, the white fields to the left will display, in the First Date field, the day following the service being copied—in this case, April 8th—all the way to the last date of your product date record, December 31st. What you will want to do is edit the End Duplicate Date to show instead the check-out date for your last record, let’s say, April 10th.In this example, clicking on the Continue button will create two new records; one for an overnight on the 8th and one for the 9th.
Use the Delete button if the record is not needed. Note, however, that you will be thwarted in its removal if it has been attached to a Package.
Clicking on the Details button will present a multi-tabbed layout, the top half of which looks like this:
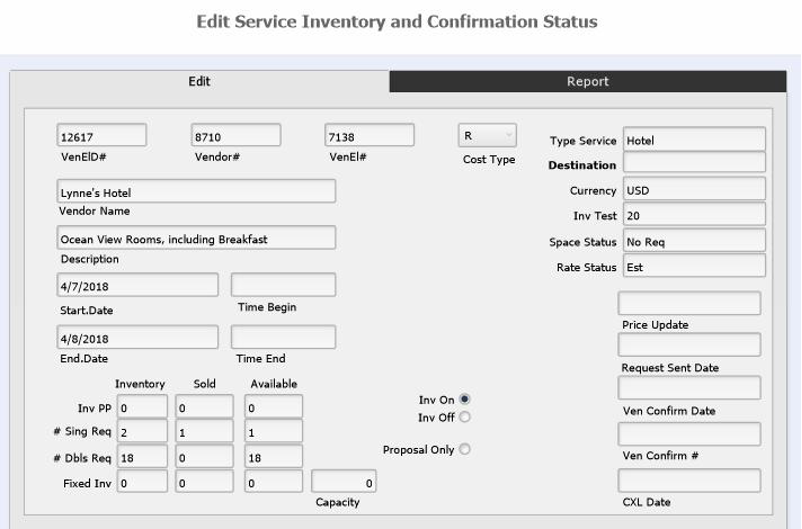
Much of what displays on the Edit tab are details from the Price/Inventory record. For point of reference, the field labeled VenElD# is the number assigned to the Price/Inventory record; the Vendor# is obvious; the VenEl# is the Product Date Record’s ID number.
The fields in the lower right are reserved for input of dates on which you may have updated the costs in the record (process explained on the next page), sent a request for service to the vendor, received a confirmation of the request from the vendor, any pertinent confirmation or contract numbers, or the date on which you requested cancellation of the service.
From the Report tab, you are able to run a “Vendor Status List”, reflecting the details of the Price/Inventory records, including what’s been inventoried, what’s still available, and how many Packages are using the product.
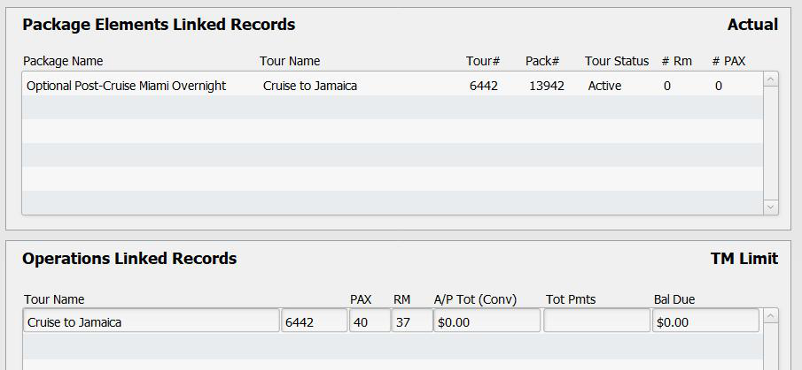
At the bottom of the layout, there are two panes, one labeled “Package Elements Linked Records” where you are able to reference which Package(s) this record has been attached to. The lower section of the screen references the Operations records that are linked to the Price/Inventory record.

The two remaining areas at the bottom of your Price Inventory record are the Print Control check boxes and the Update Package Prices button. The check boxes are used to indicate whether you want the particular Price Inventory to be represented on the print document specified. If it’s something not appropriate to be included in the itinerary that will be provided to your travelers, by example, then that box would not be checked. Note that this choice also presents in Ops.
The Update Package Prices button can be used if there is a price change that needs to considered as “global”, in other words needs to be changed in every Package to which it’s been linked. When you use this functionality, the cost reflected in each Package will be changed, but you will have to manually update the Package pricing and, if the effect is significant, re-publish all of them.
Generally speaking, it will usually make better sense to individually address price updates on a Package by Package basis, process explained next.
Managing Price/Inventory Price Changes
 When the cost of a service represented in the Price Inventory record changes after it has been attached to a Package and you want to see its effect on the net price, open up the Price Inventory record and change the cost. From the Itinerary tab in the Package, open the Package Element and click on the “Update Prices” button. Doing so will update the cost in the Package Element (after which, if the effect is significant, you may want to re-price and re-publish the Package). As you wish, use the Price Update field at the top of the Price/Inventory record to “date stamp” the price change.
 This process is explained in more detail in Chapter 5.
Notes
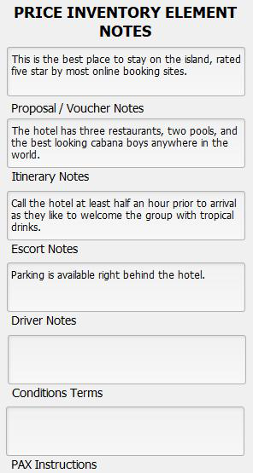
With a P/I record open, notice the area to the right where you’ll see a series of notes fields. The notes resident at the Vendor level will automatically copy here and may require no editing. If there is something unique to the record you have open, simply make the changes. Any updates made at this level do not affect your original notes, and these descriptions are what you will see when generating a Proposal or Itinerary from the Package and/or Ops parts of the system.
 Two more buttons to look at here in Vendor are found adjacent to the Product Date Records listed in the portal on the Product and Prices tab. Clicking on the “Duplicate” button will step you through a process whereby you can copy all of the Price Inventory records contained within the Product Date Record to another Vendor or—more likely—to the same Vendor but for a new year. Since the new records will be exact copies, you may have to edit the prices, but if you tend to purchase the same product from the Vendor from one year to the next, this functionality can save you a lot of time.
The small trash can icon to the far right is used to delete the Product Date Record and all related Price Inventory records contained within. This script is also password dependent, and won’t work if the Price/Inventory records have been linked to Packages.
Reports Menu
A limited number of reports are available in this module; one is a simple list of Vendors and the others are a variety of labels.
If you have any questions that are not answered here Contact TourTools Support for assistance.
Post your comment on this topic.