
Stores contact information on your clients—name, address, phone, etc.—proposal history, current and past travel, information requests and other important information.
The Client or Contact database represents, first of all, your mailing list. You will create a record for every person or organization that does business with you. Client is also where your marketing efforts are recorded and is where you will begin the booking process. Over time, the records in Client become a treasure chest of information reflecting the destinations of interest, the brochure request history, and the travel history of each of your contacts.
Because this is probably the most straightforward part of the entire system, not much explanation is required to introduce all of its functions, so we’re going to use this particular database to explain some of the “basics” of TourTools™ (note that this screenshot is the top half of an actual record; all of the various fields and tabs will be explained in more detail as we make our way through this chapter).
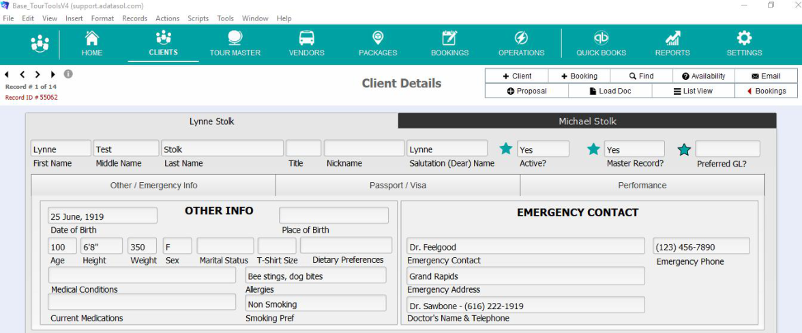
First, at the top left of the screen, notice the text that says, “Record #1 of 14”. This tells you that you are in the first of 14 records accessible to you right now.
Each record is assigned a unique, sequential record ID number as it is created. The one shown above is Client Record #55062.
To the right of this area is a bank of “navigational buttons”. Each of these buttons activates a “script”.

 Click on this button whenever you want to create a new Client record. Before doing so, always “Find” to make sure it isn’t already in the database. The plus sign is common to other parts of the system, indicating that clicking on the button will begin the process of adding a new record.
Click on the (new) Booking button to begin making a booking/reservation.

As briefly explained earlier, you can search for one or a group of record(s) by clicking on the “Find” button. Note: The Client database is the only one that offers a choice of layouts to conduct the search. Having clicked the button, you will be asked if you want to stay on the current screen or if you want to “Use Find”. This second option allows you to search using fields that are actually resident in another part of the system. By example, if you want to assemble the Client records for all passengers confirmed on a specific tour, you would search on the Tour Name and Res Status “Active”. Similarly, you could locate the records of anyone having traveled on a tour that has already been archived by using some of the fields in the “Pax History Fields” section. Lastly, when you “find” on the Last Name field on this layout, TourTools™ will search for that name on both the first and second name tabs in Client.
Note: Anytime you want to do a “find” outside the parameters of a script, you can position yourself on virtually any screen and go into “Find” mode—password permitting—by clicking on “View” and then on “Find” from the FileMaker menu.
If you want to view the records in a particular order, you can sort them by clicking on “Records” and then on “Sort Records” from the FileMaker menu. Doing so will open a window listing the fields in use on the layout you are on. Select the one(s) you want to use (such as Last Name), by double clicking on the field name to move it to the right, then click on “sort” and the records will sort in the manner you selected. If you want to re-order the fields on the right, clicking and dragging on the double-arrow symbols to the left of the field name will accomplish that task.
Be aware that you can use the exclamation mark while in “find” mode to locate dupes. By example, it would be unusual to have more than one traveler living at the same address. Click on “Find”, and using the “Current” layout, put ! in the “Street” field on the front page. If your search results in more than one record, chances are they are duplicates.
 Clicking on this button will take you to the Tour Master database where you can check availability on a tour or tours before returning to Client to start the booking process.
 Click this button when you want to send an email to the client whose record you have open (be sure there is an address loaded in the record or the script, obviously, will not work). A dialog window will open to step you through the process of sending a message with or without an attachment. When your message is ready, click the “Send” button at the bottom of the layout.
 Click on the Proposal button to begin the proposal building process. You will be stepped through creation of a TM record as well as a Package (see Chapter 6 for specifics).
 Documents associated with a particular Client, perhaps a copy of a passport, can be attached to the record by clicking on the “Load Doc” button. You will be stepped through the process of naming and describing the document, then browsing, identifying and attaching the document. Once attached, the document can be viewed by going to the “Activities/To Do/Docs” tab and then clicking on the “Documents” tab on the right.
 Clicking on “List View” will show the found set of records in a table format. Clicking on the up-arrow symbol to the left of a name will take you directly to that record.
 Buttons marked with a red arrow and the name of another database perform a lookup of related records. By example, this button will assemble the Booking records for the Client in question.
On the “List View” layout there are a couple of additional buttons, as follows:
 Use this button to export the records in your “found set” to an Excel spreadsheet. Note that the fields of data in use on the “List View” layout are those that will be included.
“Show All” will expand your “Found Set” to include all records in your database.
 If you want to compare two or more records, identify which you want to compare by clicking in the related “Select” field on the “List View” layout and then click the “Compare” button.
You’ll note there is no button to delete a Client and that is because it most often makes better sense to instead deactivate rather than remove the record in order that you can maintain the history associated with the person or entity. If you do decide to completey remove a record, select “Records” and then “Delete Record” from the FileMaker menu. You will be “second guessed” as to whether you really want to delete the record and once having answered “yes”, the record will be PERMANENTLY deleted, in other words, there is no “undo”, so be careful when you use this function. Note that not all passwords allow deletion of records.
Creating a Client Record
| Before creating a new record, it’s always a good idea to check first to see if it already exists. Dupes can create havoc in a database. |
To create a new client record, click on the “+ Client” button. By default, you will land on the “Home” tab, which contains fields associated with an individual. If your record is for a business or organization, click to the “Business” tab instead.
On either, there are two tabs where you are able to enter the name of a first and possibly a second person. As soon as you add a First Name on the first tab, the “Salutation (Dear) Name” field will populate with that same name. The content of that field is what will appear after the “Dear” in any letter that you eventually generate from the system. So, if you continue and add a second name, it would be appropriate to overwrite the field content with both names. If your relationship to the clients is friendly; “Fred and Wilma”, might suffice; if a more formal salutation is appropriate, type “Mr. and Mrs. Flintstone”.
To continue, input address details as well as phone numbers and email addresses. Work Phone is assumed to be that of the first client, whereas Work 2 Phone belongs to the person on the “2nd Client” tab. Same with cell numbers and Email addresses.
Note that, dependent on which tab you are working—Home Address or Business Address—the related “Send Mail To” value will have been selected automatically. That value can be changed manually as appropriate, and in cases where you don’t want mail to be directed to the Client in question, click “Don’t Mail”.
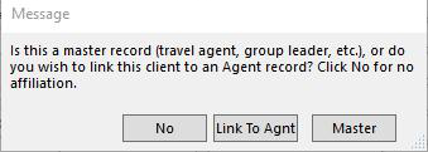 The remaining fields are explained in detail as we continue tab by tab through a completed Client record. Meanwhile, there is one question that you will be prompted to answer before a record is complete, and that is whether or not it is a “Master” or should be linked to a “Master”.
You will mark the Client as a “Master” when the record is for a re-seller of your product; another tour operator or travel agent, a group leader, perhaps the director of a senior center. A “Master” could also be a set of grandparents who are taking their entire family on a vacation that they are financing. Two things generally dictate tagging the record a “Master”: 1) You will not be receiving any contact information for their travelers; and 2) You will not be receiving payments from those travelers direct. Identifying a Client as a “Master” is what will enable your generating what is called a “Group Leader Invoice” in Bookings; i.e. an invoice representing charges for the entire group (explained in more detail in Chapter 7).
If the client is someone who sometimes books directly with you, and sometimes travels with one of your group leaders, you will click on the “Link to Agnt” button. When you do so, a dialog box will open, prompting you to identify the Master Record to which the record should be linked. From the list of clients who meet your “find” criteria, click on the name of choice and click “Continue”. Once you finish you will be returned to the main client entry screen.
If the record is for a travel agency the process differs slightly. Complete the fields on the Business Address tab then click on either the “New Agency” or the “Load Agency Defaults” button. When you click the former, you are first of all identifying the entity as a “Master Record”. When you click on the latter, you will be stepped through a process by which you will identify a previously created master record whose address, phone, commission level, etc., you want copied into the record you are creating (think agencies with multiple agents that you work with).
As you create records, they will be marked as “Active” (status displays in the upper half of the record, on the right). This allows that a Booking can be made from the Client record. You can change the status, in other words de-activate a record and thereby prevent the possibility of a Booking being made, by clicking on the star icon. Some reasons you may want to “deactivate” a client include:
1. A client may have caused repeated problems on tour and you don’t want them on a future trip. By deactivating their client record and noting why you did so in “Notes”, you can prevent recurring problems.
2. A client may have a balance outstanding that you are having difficulty collecting on and, until the account is closed, you don’t want to allow additional booking activity. Again, you will want to make a note in the record to document the situation.
Note: De-activating a Client record does not prevent its being included in a set of labels you might prepare for a mailing. Usually it is advisable to use “Active” as one criteria when finding records for this purpose. If you de-activate a record for any of the above reasons, you may also want to put them on a “don’t mail” status.
Client Details
To keep things simple, we’re going to address first of all the information seen on the top half of the Client record. After that, we’ll go tab by tab through the bottom section.
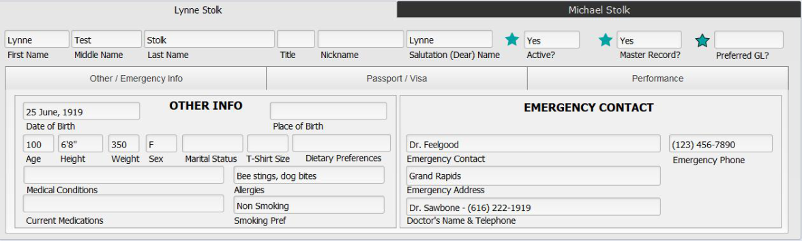
First of all, notice the two tabs, labeled with the name(s) in the record. By default, the record will be marked Active upon creation; to de-activate it, click on the star icon to the left.
The Master Record field will reflect a “Yes” value if previously set; otherwise, click that star icon to set that value here (similarly, you can click to change it to “No” as appropriate).
The Preferred GL field can be set to “Yes” by clicking on the third star, and is based on whatever criteria you choose to assign to the question.
Other/Emergency Info Tab
This tab is visible by default when you open a record, and is the location for emergency contact information and any medical conditions for both the first and second named client, depending on which is clicked open. This information will be captured in the Pax section of Booking records created for the Client(s), for reference or potentially to be included on a report, perhaps for your tour manager.
Passport/Visa Tab
Passport and visa information can be stored here for both the first and second travelers.
Performance Tab
If you are working with a performing group, details as to instrumentation can be maintained here.
Then, addressing the tabs that present in the lower part of the record:
Main Tab
The mailing address selected for the Client is visible on this page. Note that any required edits need to be made on the Addresses tab.
FYT stands for First Year Traveled, the LYT for Last Year Traveled. These fields will be filled in automatically as Bookings are made.
Use the Select field to temporarily hold together a set of records that otherwise have nothing in common.
Example
In Chapter 1, “finding” on clients in two different states was explained. Here’s a slight twist on that exercise that is especially helpful if your “find” is complex. Having applied the first criteria, imagine that your find produced 50 records. Type something in any one of the record’s “Select” field; it might be your initials, by example; then, click on the button labeled “Replace”. You will be asked to confirm that you want to replace the content of the field “Select” in the 50 records with your initials.
Having done so, continue to your next “find” and when those records are assembled, repeat the process…as many times as necessary. When you finish, do a find on your initials in the “Select” field to assemble ALL the records from ALL of your finds…and move to printing labels, doing your email blast, etc.
Once you finish working with your found set, it’s a good idea as a courtesy to your colleagues to clear the “Select” field. To do that, repeat the find, and in any one of the records delete your initials and repeat the “Replace” process. This time, the dialogue box will indicate you are about to replace the field with “nothing”, represented by double apostrophes.
Salesperson: Reference the salesperson to whom the client is credited by selecting from the staff list that presents. Bookings made from the Client record will be tagged with this name and you can get a breakdown of activity attributable to the salesperson by running the Salesperson Totals report in Bookings. Note: If a salesperson’s name is loaded in the Client record when it is linked to a specific Tour Master record, the salesperson will be credited with all of the reservations activity on that tour when you run the P/L Report by Salesperson from TM
Source and Segment Fields: Working in tandem, these fields allow you to identify how the client became your client. Generally, the Source is something that is “recurring”, and the Segment more finely defines it.
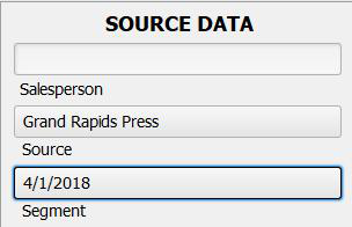
In this example, the Client was in contact after having seen an ad that ran in the Grand Rapids Press on April 1st, 2018. As more ads run in the Press, your Source record remains the same, but multiple “Segments” will be attached. Once you select a Source from the value list that appears, a list of Segments associated with that Source will drop into view, from which you can chose.
These value lists are actually created and maintained in the Support File called “Marketing”, accessed from the Home/Dashboard. As you create a Source record, the system will automatically assign it a number and will mark it as “Active”. At such time as the Source becomes outdated and you no longer want it to be included in the value list, you can “de-activate” it using the Yes/No value list in the field labeled “Active”. Obsolete Segment codes can be deleted by using the trash can icon to the right of the description; however, remember the cautionary warning from Page 6 about deleting in-use values.
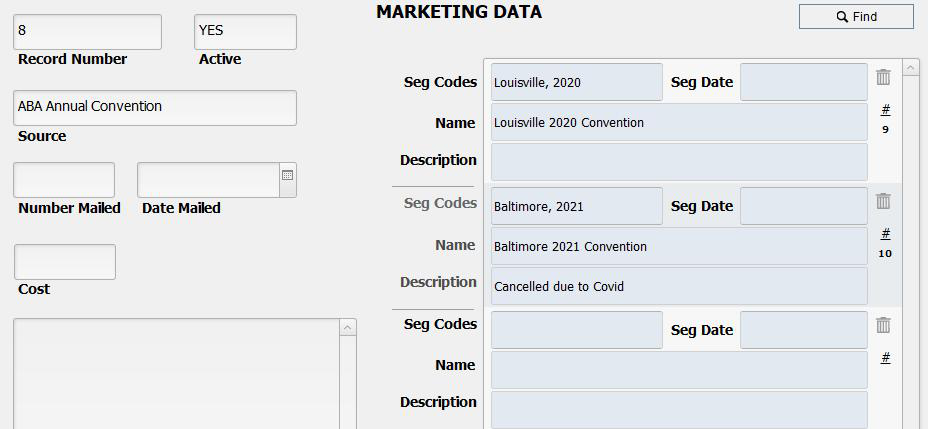
In the “Source” field, reference the mailing piece, advertising source, or event that represents your marketing effort; as well as the number mailed and/or the cost of your effort, as appropriate. If the event or marketing effort has “multiples”, move over to the “Seg Codes” field to load the factors. Here, the ABA Annual Convention is identified as the “Source” and there are two “Segments”, one for the 2020 Convention and one referencing the 2021. As you continue to participate in the conventions, add new segments to reflect the dates and descriptions.
By running the “Source Report” from the Client menu, you are able to track your “return on investment” for a specific marketing effort in terms of either how many new Client records were added or how many requests for information were received compared to the cost of that effort.
Last Contact will indicate the date on which you last were in contact with the Client. The field will auto-fill if you email that Client, fulfill an info request, etc.
Critical Client Information is used to capture just that…information that is critical for you to know about that potential traveler; perhaps that they require a wheelchair, are legally blind, etc.
Addresses Tab

There is a lot happening on this tab. If you deal with travel agencies at which you have multiple contacts, the pane labeled Business/School has a number of buttons you may use.
You will use the “Join to Agency” button if your contact should be linked to an agency already resident in your system. In their Client record, clicking this button will step you through a “Find” and then presents a “Select” screen. Pick from the list of “hits”, and once you confirm the selection, that agency’s address, phone, etc., details will load to your current record. Before the process is complete, you will want to manually update things like e-mail addresses, private phone numbers or extensions, and similar.

If your contact leaves to join an agency/school not yet resident in your system, update all of the name, address, contact detail, etc., in their record and click on the “Make New Org” button.
Use the “Edit Org” button if there has been some change in the detail loaded for a given agency—change of address, phone, commission level—that you want applied to all records at the same time. Begin in any one of the records, click on the “Edit Org” button, make whatever change is desired, and confirm that you want that change applied to all related records.
Use the “Make Manager” button to designate the Client who is the manager of a given agency. Begin in the record of the agent that you want to appoint manager and click the “Make Manager” button. The pop-up window will give an indication of who is currently designated manager, at which point you can confirm the change or halt the process. Note the field labeled “Org Manager”. That is a “yes/no” indicator of whether the record you have open is, indeed, that of the manager.
While all of this functionality can be applied to a school as well as an agency, it’s fairly obvious (also because of the additional fields that are included in the same quadrant) that it’s more geared toward multiple-location travel agencies. In large part, this functionality exists in order that you can track production from a given agency that has multiple locations. If that is not important to your business model, you will want to simply maintain separate Client records for each individual agent or teacher.
Some of the remaining fields are obvious as to their use. The ARC and IATA number fields are for free-form entry; the Consortium uses a value list from which you can pick the consortium that an agency is part of.
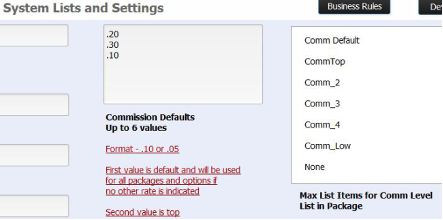 Before explaining what you see under “Commission Rates”, let’s look at what is going on back in “Settings”, where there is a place to load Commission Defaults. As can be seen from this screenshot, 20% is set as the default value, 30% as “Top”, and 10% as “Comm 2”.
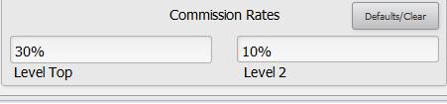
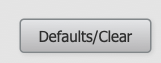 Back in Client, clicking on the button labeled “Defaults/Clear” will load these values (or, conversely, will clear values previously loaded as appropriate).
What you have done in loading these fields is set the stage for commission to be calculated on Booking eventually made from this record (explained further in the Booking chapter).
On the next tab, labeled Address / Contact, you are able to edit the address associated with the business or school. On the Group Leader Prefs tab, capture the preferences of your group leader as far as things like preferred departure points, whether gratuities are to be provided as part of the tour cost, etc. Click on the “Print GL Prefs” button to produce a paper copy of the information logged.
In the pane on the right, labeled “Home”, you can reference your contact’s primary address, and—if they are a “snowbird” who winter in Arizona, by example— you can enter the Alternate Address and the dates “from” and “to” that they will be at that address. If a mailing label or a document with an address block is generated during that time frame, the alternate address is the one that will be grabbed.

The “Update” button found on the “Alternate Address Dates” tab will automatically update every “First Date” and “Last Date” from the current year to the next year. Caution: Since it’s unlikely the date range for most alternate addresses will be exactly the same from year to year, this feature may not work for you, in which case it’s probably a good idea to stick to manual updates when and where appropriate.
The information reflected under “Mailing Address” is pretty much self-explanatory. Note: Marking a record “Don’t Mail” will not prevent the Client record from being picked up in any found set that might be assembled for a mailing, but labels or letters will be missing an address which would prompt them being tossed.
Preferred Contact Method is a value list choice to reference the preferred method for contacting this Client—home or business phone, e-mail, etc.
Mailing Group Tab
On this page, you can assign your Client to one or more marketing niches. At some point, checked values might be part of a “find” used to do a mailing or an email blast.
The appearance is different than most, but the choices that appear as check boxes in the various panes come from value lists which are maintained in the “Value Lists” support file found on the home dashboard.
Group Info Tab
If it hasn’t already been done, you can designate a client as a travel agent or group leader or associate a client with a travel agent or group leader (explained earlier in the Client Entry section) from this tab.
Linkages that have been associated with the Client will appear at the bottom of the screen.
Notes Tab
Compose New Note is for free-form entry of general information about the client, specifics about conversations with them, or perhaps the reason for the record being de-activated. When your entry is complete, click on the “Add this Entry” button and today’s date, your name, and your comments will load to “history” (which can be edited only by a holder of the highest password).
Activities/To Do Tab
From this screen, there are two tabs from which you can create and reference a variety of activities associated with this client; or reference documents—receipts, invoices, etc.—that have been printed/sent to the Client.
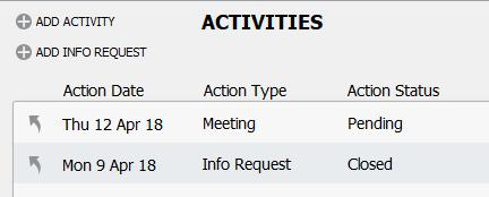
Click on “Add Activity” to create a record referencing a call, email, meeting, Info Request or Inquiry. Depending on the activity chosen, you will be taken to the appropriate screen to enter text or information. If “e-mail” is selected, you will complete your message and click on either the “Send” or “Send/Attach” button. “Send” will activate a seamless transmission of your message; “Send/Attach” will open the usual dialog box you see when attaching something to an email message. Note: Messages sent from this area of TourTools™ can be saved for future reference in the Client record. Note also that you are able to schedule a “To Do” follow-up, that will be linked directly to the “Activity” record. Detailed instructions for sending a “blast” appear at the end of this section.
Add Info Request: To react to a client request for a brochure or some other information, click on this button.
Pick the brochure requested and destination information (if applicable) from the value lists that present. In the same way that you can assign a “Source” and related “Segment” to indicate how the Client came to be a client (explained in detail under “Mailing Groups”), you can capture how the information request came to be (the same value lists are in use in both places). Note that the Action Status of the record is set to “Pending”.
Once you run the report called “Information Request List/Labels” to complete your brochure fulfillment (explained in detail in the “Reports” section of this chapter), the request will be marked “Closed”, and a “To Do” record will be created as a reminder to follow up on the request seven days later. You can otherwise manually create a “To Do” reminder from within the “Info Request” by clicking on the “New To Do Item” button at the bottom of the layout.
To review any of these entries, click on the “up-arrow” icon preceding the listing.
At the bottom of the layout, you’ll notice that there is a recap of the “First Activity” and “Recent Activity”, along with fields representing the first and last year traveled, and the Source/Segment combination for the contact record (explained earlier).
On the “To Do/Documents” tab, click on the “Add” button to create a reminder. As mentioned, you can also create them while in the process of logging a new “Information Request” or an “Activity”. For more specific instructions, refer to Chapter 9.
Click on the “Documents” tab to see any documents that have been attached to the Client record (process explained on page 8).
Sending an e-Blast
Your first step is to create a “found set” (the Clients to whom you want to send an email). This set might be members of a specific tour, individuals in a particular mailing group, or individuals who have nothing in common. For assistance in assembling a found set of client records, please see page 3 of this user guide.
Next, go to the Reports menu, select Client Reports, then select “Unstored Email” or “Email w/Attachment(s).
Create your email and then at the top of the layout, click the small icon labeled “Send”.
Note: if you want to save the actual email to the Client record(s), you should first click on the “Save Message” button.
When you are done, click on the “Back” button.
If you selected the “Save Message” option, the email will save as an “Activity” on the Activities/To Do/Docs tab in Client. The “up arrow” preceding the listings, when clicked, will open for viewing the message that was sent.
Bookings/Quotes Tab
On the left-hand side of the tab, you will see a list of bookings currently linked to this client. Click on “More Detail” to see additional information about the bookings, or click the up-arrow icon preceding to actually open the reservation in question. Click on the “Archive” button to see information on bookings that have been archived (records that have been deleted from the Bookings data base, details of which have been saved for historic purposes). On the right, in the area named “Bookings for this Record as Group Leader”, a list of bookings related to a Client identified as a “Master/GL” record will display. In the area “Proposals/Records” you will see a list of all proposals sent to the Client. Clicking on the up-arrow that references either will take you to the related record.
Web Tab
If your system and your website are interfaced, and your Clients are required to create an online presence, there are two fields on this tab where you will record and maintain logon and password details.
Reports from the Client Reports Menu
Unstored Quick Letter/Unstored E-Mail: These are used to produce a quick letter or e-mail that you may not want to permanently store. (If you do, click on the “Save Message” button at the top of each layout). Any of these documents can be sent to one recipient or by a “blast” to multiple records in a “found set”.
Information Request List/Labels: This report is usually run by date or date range (represented in FileMaker as a begin date followed by an ellipsis and the close date (by example 6/25/2018…6/30/2018) to retrieve a list of individuals having requested information, the date of their request, what they requested and in what quantity. In addition to the list, you can generate mailing labels and can request that the information requests be marked as “closed”. As soon as the records are closed, a To Do reminder is created for you, to follow up on the information request one week later.
Information Request Report: This report gives you totals of what was requested and in what quantity, without identifying who did the requesting.
Source Report: Run this report to get totals on the source codes that were loaded at the Client level or at the “Info Request” level.
Passport Information: This report is initially a form that can be used to solicit from your traveler their passport and emergency information and may thenserve as a report you can provide to an escort accompanying a particular tour. In such a case, you would perform a“find” on the tour code from the “Use Find” layout and then print the document.
Emergency Information: Use this report as you would the Passport Report. This form reflects the information included on the Emergency Info screen as well as birth dates, etc.
Labels/Envelope: Use to generate labels or envelopes for your found set.
If you have any questions that are not answered here Contact TourTools Support for assistance.
Post your comment on this topic.