
If any printers or MFPs fail to configure automatically it is possible to re-run the process manually, which will show more detailed information about where the failure has occurred.
To re-run configuration manually select Printers and MFPs from the Managed Printing sidebar menu.
Select the printer to be configured in the top window and its details will appear below.
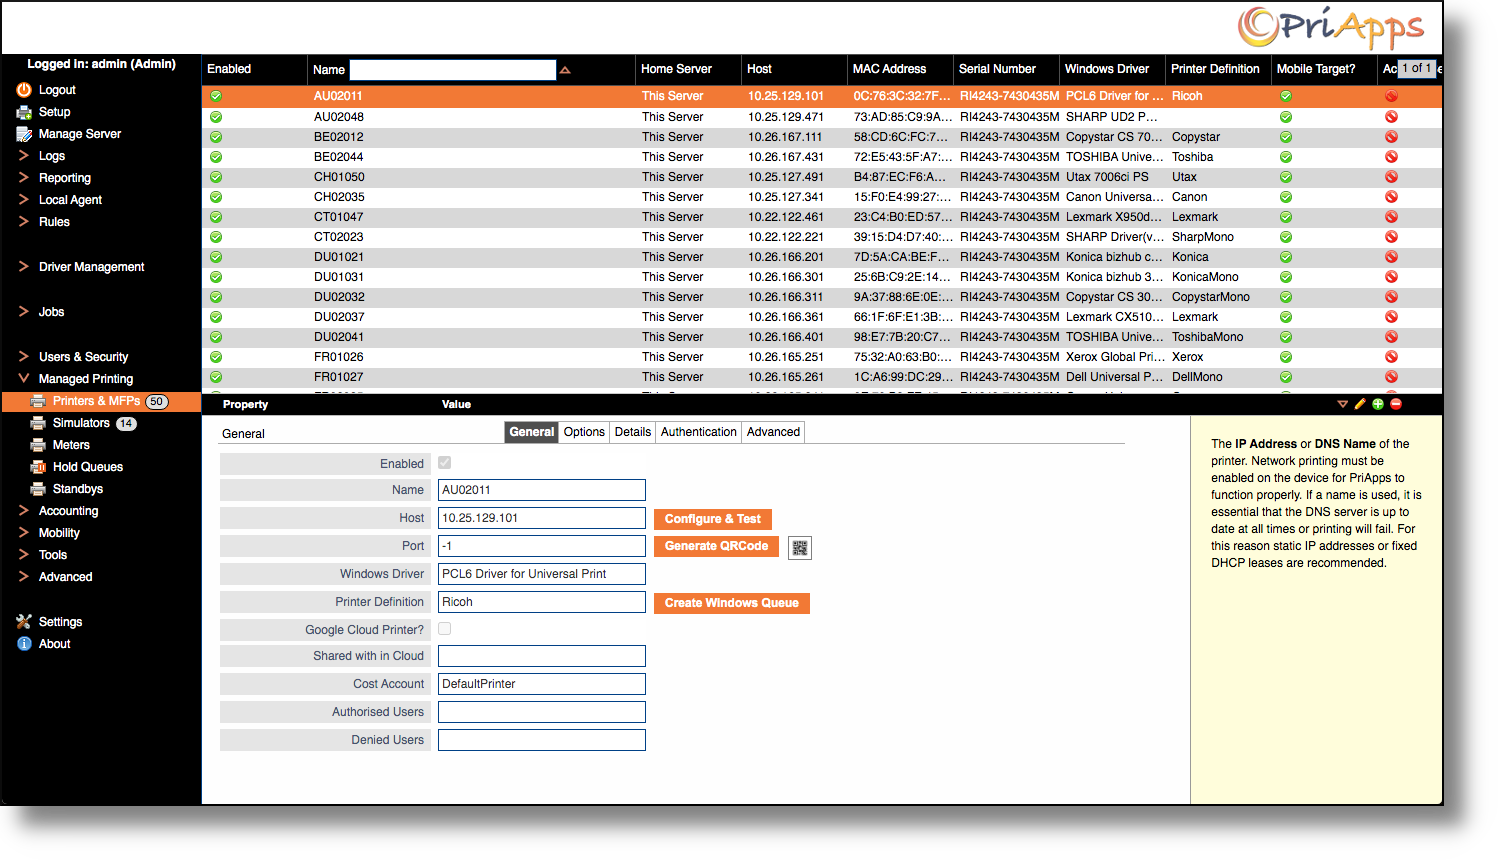
Complete the configuration options as instructed. Most of the options are configured automatically when the PriApps software is installed.
Printers & MFP Properties
When selecting the Managed Printer to be configured in the top pane, a series of tabs listing configurable properties is displayed
The following section describes the meaning and purpose of each property contained in the various tabs
Printers MFP Properties – General tab
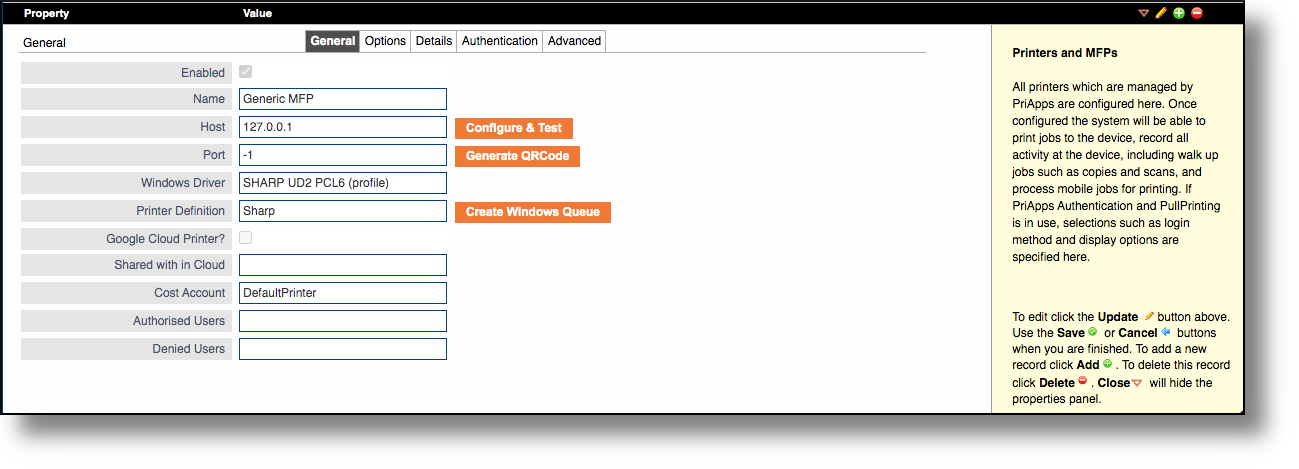
- Name – The Name of this printer. This name must be unique. It is used for job submissions and all management functions that reference the printer. For example, it is used when creating groups of printers for reporting or security functions. If a Windows Queue has been created for this printer it will be identified by this name followed by (PriApps)
- Host – The IP Address or DNS Name of the printer. Network printing must be enabled on the device for PriApps to function properly. If a name is used, it is essential that the DNS server is up to date at all times or printing will fail. For this reason static IP addresses or fixed DHCP leases are recommended.
- Port – The Port number on which the printer listens for print data. By default this is 9100, but it can be changed if the printer is configured to use a different port for direct printing.
- Windows Driver – The correct Windows Driver for the printer. This is not used directly by PriApps for printing but is required for direct printing from Windows desktops, and for mobile printing where it is used to render jobs into a printable format. The driver may be selected from a list of all the drivers installed on the server by clicking the Set Windows Driver button, choosing the required driver and clicking the Configure button. The driver must have previously been installed on the PriApps Application server. Once you have selected the driver, the printer settings will be automatically saved. To continue editing and complete your configuration click the Update button again.
- Printer Definition – The pre-defined Printer Definition for this device. Printer definitions specify the commands that may be sent to the printer to override settings such as Duplex and Color mode. Generally Printer Definitions are named after the manufacturer of the device. A pull down list of Printer Definitions will be displayed for this setting.
- Google Cloud Printer? – if this option is checked the device will be available as a Google Cloud Printer
- Shared within Cloud – If a Google Share group is specified here, all the members of the group will have the printer shared with them automatically. This means the printer will immediately become available to them on publication. Google Share groups may be created and managed by selecting Groups under Users & Security in the sidebar. A pull down list of Google Share groups will be displayed for this setting.
- Cost Account – Specifies the default Cost Account for the device if applicable.
- Authorized Users – Only users in this selected Group are allowed to use the device.
- Denied Users – Users in this Group are not allowed to use this device.
- Configure & Test button – The Configure & Test button will automatically configure a printer based on the built-in PriApps database of supported MFP platforms. The only information that needs to be manually entered is the IP Address or DNS Name of the printer, and a unique name for it. This function uses SNMP to query the printer so SNMP needs to be enabled on the printer, and allowed within the network otherwise all options need to be configured manually.
- Generate QR Code button – The Generate QR Code button will automatically create a QR Code for the Managed Printer, which can be used to login to the device and/or release print jobs using a PriApps Mobile app. This options is required for devices that do not have a suitable control panel on which the QR Code can be displayed automatically. In these cases it is necessary to print a label that can be stuck to the printer and scanned by the PriApps Mobile app to sign-in. Once a QR Code has been generated, an icon will appear for it that can be downloaded and printed.
- Create Windows Queue button – The Create Windows Queue button is used to generate a Windows print queue on the PriApps Application server, which enables applications to print directly to the specified printer through PriApps. The printer will be identified by the Name field above, followed by (PriApps). It will be automatically shared so any user can connect and use it. The name generated will be displayed after the printer is created.
Printers & MFP Properties – Options tab
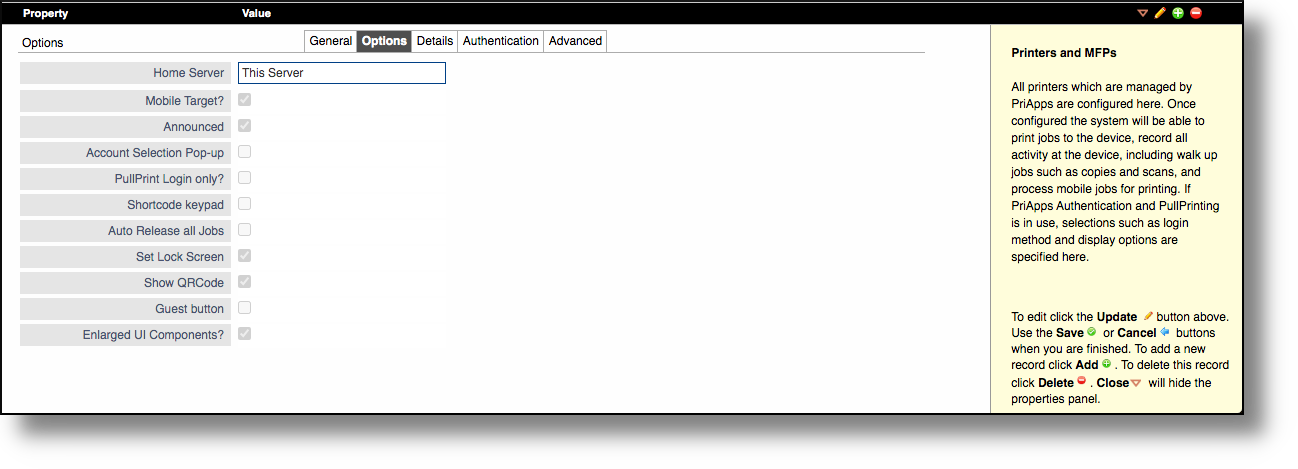
- Home Server – In a multi-server Enterprise environment where there are more than one PriApps servers installed. It is necessary to specify which server controls the printer. This is the Home Server of the printer. If synchronization between servers is enabled this value will be filled in automatically.
- Mobile Target – Enables this device to be a target device on the PriApps Mobile app.
- Announced – When checked the printer is announced as a network service on iOS devices using the IPP protocol.
- Account Selection Pop-up – If checked, the Cost Account Selection UI will appear on the user’s workstation or laptop if the PriApps Agent has been installed.
- PullPrint Login Only – PullPrint Login Only indicates that the printer is not locked down and login at the device only applies to Pull Print.
- Short Code Keypad – Shows a keypad on the control panel of Managed Printers when short code is selected as the authentication type for this device (if applicable).
- Auto Release all Jobs – Releases all jobs after login to this device. Typically used to when using network card readers to offer a PullPrint function on a network printer as opposed to a Managed Printer.
- Set Lock Screen – use custom lock screen instead of the device default.
- Show QR Code – Will show the QR Code on the control panel of Managed Printers that can be used with the PriApps Mobile app to authenticate the user at the device or release print jobs from the user’s myQueue.
- Guest Login – Shows a Guest Login button on the control panel of Managed Printers.
- Enlarged UI Components – Larger UI text will be displayed on the control panel of Managed Printers.
Printers & MFP Properties – Details tab

- MAC Address – The Mac Address of the printer interface card. If not already present this may be entered manually or can be automatically discovered using SNMP by pressing the Query Details button. A value for MAC address is required if Google Cloud Print is enabled. Otherwise it is for information only.
- Serial Number – The Serial Number of the printer. If not already present this may be entered manually or can be automatically discovered using SNMP by pressing the Query Details button. A value for Serial Number is required if Google Cloud Print is enabled.
Otherwise it is for information only.
- Manufacturer – The Manufacturer of the printer. If not already present this may be entered manually or can be automatically discovered using SNMP by pressing the Query Details button.
- Model – The Model of the printer. If not already present this may be entered manually or can be automatically discovered using SNMP by pressing the Query Details button.
- Description – a description of the printer.
- Location – the location of the printer.
Printers MFP Properties – Authentication tab

Most of the settings in the Authentication tab are configured automatically once the PriApps software has been installed on the device.
- Printer Platform – The manufacturer specific software platform of the device.
- Web Service Port – Port number used by the on-board Web Service of this MFP type.
- Admin User – The admin username of the device administrator.
- Admin Password – the password for the device administrator
- Authentication Server – The IP address or DNS name of the server running the PriApps Authentication Service which supports this MFP type. In all but exceptional cases this is the address of the current PriApps server.
- Authentication Server Port – Port number used by the PriApps Authentication Service which supports this MFP type.
- Login Type – The text Login Type available on this MFP in addition to ID Card or Mobile App login. Options are:
- None – No additional login type
- Full – Windows login and password
- Shortcode – Unique User Numeric code
- ShortcodePIN – Numeric code and additional numeric PIN
- SmartPIN – Mobile App Generated one-time Numeric code
- Card Reader Type – Method by which Card Reader is connected to this MFP. Options are:
- None – No Card Reader
- Direct – Reader directly plugged into MFP (IC mode)
- TTY – Reader directly plugged into MFP (Keyboard mode)
- NetCard – Reader independently connected to the network
- CardReader IP – the IP address of the Card Reader for this Managed Printer if it is independently connected to the network. Usually this will be via an interface box suitable for the reader.
- Minimum Card ID Length – Minimum Card ID Length is the smallest number of digits that must be read for a card id to be recognized. This is mostly needed for keyboard mode readers that do not end the card id with a newline
- Initial Screen – Specifies the screen that will be displayed for the user after a successful login. Some Options are dependent on the capability of the MFP make or model:
- Dashboard – displays the PriApps Dashboard offering users the option to select Print Release, Personalized Scan Workflows, Copy Control, Fax, or the default homepage of the device (options displayed depend on the capability of the device)
- PullPrint – displays the user’s list of print jobs in the PriApps PullPrint screen
- ScanApp – displays the default 3rd party scan app for the MFP (Manufacturer dependent)
- Landing – displays a default landing page (required for older Toshiba e-BRIDGE (eBX) MFPs only)
- TopScreen – displays the default MFP homepage of the MFP
- AppMenu – displays the screen showing applications installed on the MFP (Manufacturer dependent)
- Copy – displays the default copy functions of the MFP
- Scan – displays the default scan functions of the MFP
- eFiling – displays the default eFiling functions of the MFP
- Print – displays the default print functions of the MFP
- Touch-Free – displays the PriApps Touch-Free ‘Do Not Touch’ warning page and options
- Ignore Logged in User – Do not use the user currently logged in to the device for Pull Print and always show the login page
- Configure Platform button – The Configure Platform button will automatically configure a printer based on the values entered here. For Sharp, Toshiba, OKI and Xerox devices this will completely set up the device to work with PriApps. For Kyocera the embedded app must first have been installed using NetViewer. For Ricoh there are some additional steps that can only be done at the device panel
Printers & MFP Properties – Advanced tab
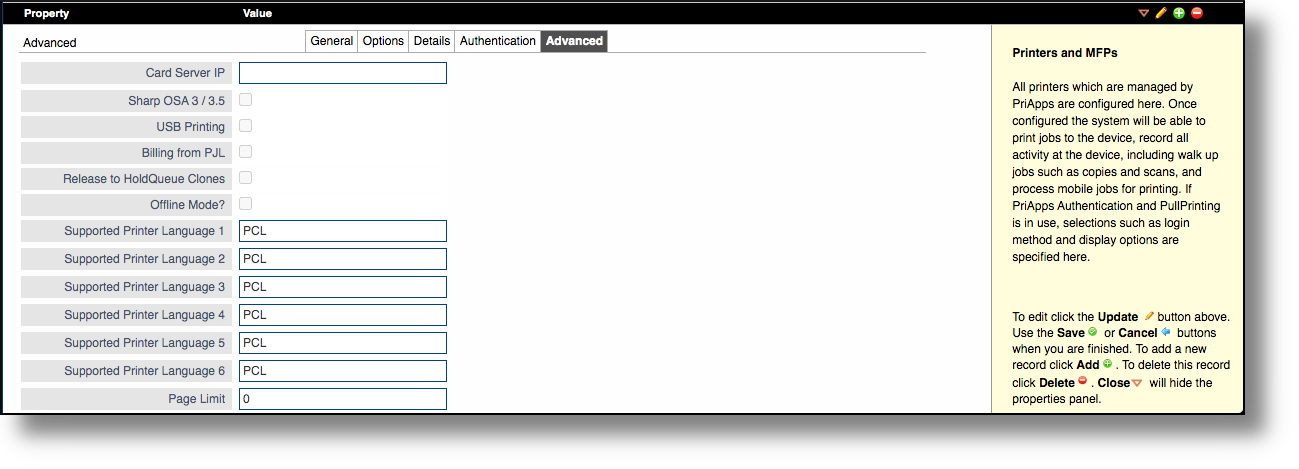
- Billing from PJL – If Billing from PJL is checked this indicates that a driver function to allow the account code for the job to be entered at submission time is in use. Some manufacturers drivers support this type of job accounting. The account code is placed in the PJL header of the job. PriApps will extract the code and use it to allocate the job to an account. It is necessary for the PJL codes to be present in the appropriate Printer Definition xml file for this to work.
- Release to HoldQueue Clones – Releases jobs to HoldQueue clone printers.
- Offline Mode – If Offline Mode is checked this indicates that the MFP supports an offline mode of operation when the PriApps server is unavailable. Currently this is only available for Sharp MFPs and the mode needs to be explicitly enabled at the device.
- Supported Printer Language 1-6 – The Supported Printer Language fields specify which types of files can be handled directly by the printer, and do not need to be converted by PriApps.
- Page Limit – the Maximum page size of document that can be printed at this Managed Printer.
- Display Width – Display width, in pixels, of the Managed Printer control panel, if required.
- Display Height – Display height, in pixels, of the Managed Printer control panel, if required.
Need more help with this?
Contact PriApps Support